Gengo Girls #28: Multilayer Cultural Barrier

Gengo Girls #28: Multilayer Cultural Barrier

It’s often said that the Japanese are more polite than us Americans, and it’s probably true. But a big part of this comes from the fact that the Japanese have a very different definition of “polite” than we’re used to.

Here in America our country was based around the idea that “all men are created equal”. As a result we consider it really rude when a person tries to act superior by insisting on a specific title. A PhD might prefer to be called “Doctor” but if he makes too big a deal out of it we would consider him to be acting impolite. In many parts of the country we actually prefer it when people are casual and feel insulted when people are too formal.

Japan, on the other hand, has a history full of military empires where rank was everything. As a result their language is full of different ways tot show respect and it’s considered very rude to not use language that clearly identifies the difference between superiors vs inferiors or friends and family vs casual acquaintances. Now that Japan’s military government has been replaced by a modern democracy “superior” is more likely to mean a senior coworker than a nearby warlord but the tradition of respecting even small differences in social rank is still going strong.

Transcript

言語ガールズ #28

Multilayer Cultural Barrier

Blue: Pop Quiz: A man has just introduced himself as たなか ひろ. What do you call him?

Yellow: That means たなか is his family name, so I would call him たなかさん.

Yellow: But is this name and title stuff really that important?

Blue: It is. In 日本 first names are reserved for friends and family.

Blue: Using someone’s first names is kind of like calling them “Pal” or “Sweetie”.

Blue: It’s fine between friends and family but kind of awkward with strangers or coworkers.

Yellow: Where I grew up it was pretty normal to call strangers “Sweetie”. Showed we were friendly.

Blue: Looks like we’re dealing with more cultural barriers here than I thought.

Gengo Girls #27: The First Shall Be Last

Gengo Girls #27: The First Shall Be Last

The order of a person’s full name (family then personal or personal then family) is a lot like the question of which side of the street you should drive on: It doesn’t really matter as long as everyone agrees. Of course, if you’re used to doing things one way and then visit a country where they do things the opposite way a little confusion is inevitable, but at least mixing up Japanese name order is unlikely to result in a car crash.

Bonus confusion: When a Japanese person is talking to a foreigner they might decide to switch their names around and give it in western order (family name last). They do this to be helpful but it actually makes it harder to guess which name is their family name since you no longer know for sure which pattern they are following. This is likely to lead to much polite smiling and repeating of names until the mess gets sorted out.

Vocabulary

さん = Mr, Mrs, Ms

先生 = せんせい = teacher

Transcript

言語ガールズ #27

The First Shall Be Last

Yellow: So what else do I need to know about this Japanese honor stuff?

Blue: It’s important to call people by the proper name and title.

Blue: Everyone you meet, except children, should be called by their family name followed by the polite title さん.

Blue: Though if they have a more specific title like 先生 you should use that instead of さん.

Blue: And remember, in 日本語 introductions the last name comes first.

Yellow: That’s silly. By definition the first name comes first.

Yellow: I thought you were supposed to be the smart one.

Blue: What I mean is: In 日本語 introductions the family name comes first and personal names come last.

Blue: A man called John Doe in アメリカ would introduce himself as Doe John in 日本.

Let’s Program A JavaScript Game 8: That Sinking Feeling

Newton Would Be Proud


In the real world gravity is a universal force that causes things to constantly accelerate downwards, moving faster and faster until they eventually hit a solid object like the ground.


We want our game gravity to work similarly. The player should be pulled towards the bottom of the screen at faster and faster speeds every frame until they hit a solid platform or fall into a bottomless pit and get a game over.


This is actually pretty easy to simulate. We just keep track of how fast the player is moving and every frame we adjust that speed to point slightly more downwards. It’s as easy as incrementing a variable every turn.


But for really good gravity we also want to consider terminal velocity. In the real world falling objects eventually start moving so fast that air pressure prevents them from accelerating any further. Similarly we can program our game gravity to max out at a certain speed and prevent the player from ever falling faster than that set maximum. This is a useful strategy for preventing falling characters from speeding up to extreme velocities that make the game hard to control.


The only remaining issue is deciding how strong our game gravity should be and how fast our terminal velocity should be. If gravity and terminal velocity are too low the player will feel floaty. If they are too high the player will feel like he can barely get off the ground. Figuring out the perfect balance usually requires some play-testing though, so for this test I’m just going to grab some numbers that feel decent. We can fine tune them later.


Introducing The Ground


It’s hard to test gravity without something to land on between jumps. Eventually we will have an entire map full of tricky platforms but for now we’ll just create one really big platform along the bottom of the screen. So go back to the top of your script and redefine testObject like this:


var testObject = new Object();
testObject.x = 0;
testObject.y = 350;
testObject.width = 600;
testObject.height = 20;


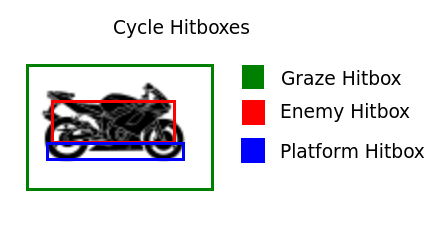
We also want to upgrade our player object to keep track of two new pieces of information: Its current Y velocity and whether or not it is sitting on the ground (Only cycles on the ground can jump.)


var player = new Object();
player.x = 100;
player.y = 100;
player.yVel = 0;
player.onGround = false;


And with that we can now implement simple gravity by just adding this code somewhere inside of updateGame, like right after the player input checks.


player.y += player.yVel;
player.yVel +=1;
if(player.yVel >= 15){
   player.yVel=15;
}


This is a very simple, semi-realistic approach to gravity. Every turn the character moves up or down based off of their current Y velocity. Their Y Velocity is then slightly increased, to represent that gravity is causing them to move towards the earth. This will result in them falling faster and faster each frame until they reach a terminal velocity of 15 pixels per frame.


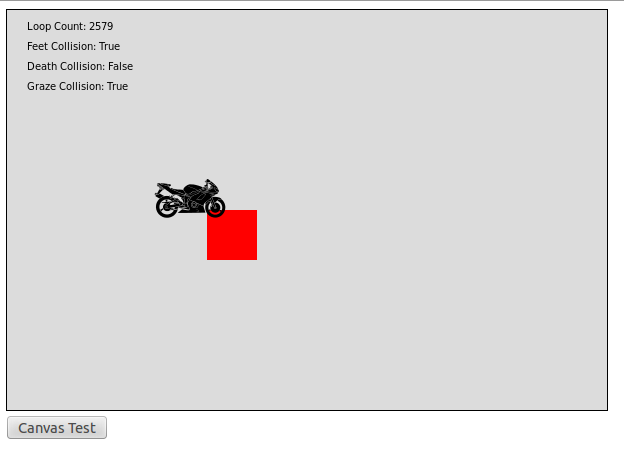
I Don’t Believe In Ghosts


If you were to run the game now you would notice that the motorcycle tends to fall downwards but that when it hits the “ground” it just passes through and falls off the screen. We obviously can’t have that so let’s make the testObject a little more solid by having a collision between player and testObject result in the player coming to an abrupt stop.


The code is already testing for collisions between the player’s feet hitbox and the testObject, so all we have to do is add a little code to that statement to prevent the player from falling forever.


if(intersectRect(testObject, getFeetHitbox(player.x, player.y))){
   feetCollision = true;
   player.yVel=0;
   player.y=testObject.y-48;
   player.onGround=true;
}


Simple enough. If the player hits the testObject we stop their downward movement, align them so they are barely touching the ground (remember, the cycle picture is 48 pixels tall) and then make a note that they are currently on the ground and ready to jump.


Of course, next frame the motorcycle will start to accelerate downwards again and start falling through the ground. This will result in a second collision and the cycle will once again have to be stopped and moved to the surface of the ground. This pattern will actually repeat for every single frame the cycle is on the ground.


You might think that constantly dipping into the earth and being pushed back up would lead to some jittery up and down motion, but because we do all the falling and ground checking before we draw any graphics the whole up/down cycle is hidden and the end result makes it look like the motorcycle is smoothly gliding along the ground.


I Believe I Can’t Fly


So we can fall and hit the ground, but there’s still the issue that the game lets player directly move up and down. Since we want the player to jump not fly it’s time to fix that.


First off we delete the if(playerInput.down) statement since we don’t need it anymore. We don’t want to let the player fall faster than normal so we don’t really need to worry about whether or not the down key is pressed.


Now we want to change the if(playerInput.up) statement from flight to a simple jump.


if(playerInput.up && player.onGround){
   player.yVel=-15;
   player.onGround=false;
}


You can see we’re bringing in our onGround variable to make sure the player is actually in a position they are allowed to jump from. If they are then we give them an upwards velocity of 15 and disable jumping (at least until they hit testObject and onGround gets reset).


An image of a cycle sprite landing on the ground

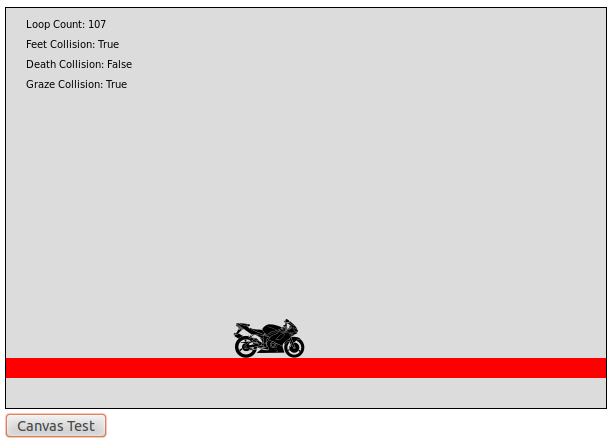
A cycle sitting on the ground after landing a jump. Much more exciting in action than as a still image.


And that’s all it takes. We now have gravity and jumping. Try it out for yourself.


Missing The Ground


There is one last important detail I want to mention, and that is the risk of missing the ground.


The player moves multiple pixels per frame, and we only check for collisions at the final location. So if the player was falling at 50 pixels per frame it could completely skip over a 10 pixel object in it’s path. This would lead to the player ghosting through objects they should have hit.


To avoid this you just have to make sure that the player’s and obstacles hitboxes are thick enough to clip each other even at max speed.


In our test code the player’s max falling speed is 15 pixels per frame. The player’s feet hitbox is 5 pixels tall, and the “ground” testObject is 20 pixels tall.


This is a safe combination, because there is no way for a 5 pixel object to jump through a 20 pixel object by moving 15 pixels at a time. (Bonus question: How fast would it have to be going?)


But what if the ground object were much thinner, say only 2 pixels tall? Now the 5 pixel feet hitbox moving at 15 pixels per frame could easily skip over it. If you want to see this in action, shrink the height of textObject and see what happens when you jump or even just fall from the default starting position.


This is also one area where increasing your framerate can help.


An object falling 20 pixels per frame 20 times a second looks identical to an object falling 10 pixels per frame 40 times per second. But the second strategy lets us check for collisions every 10 pixels, allowing for much smaller and more precise hitboxes. So if you want to program a game with lots of fast moving tiny objects you might want to increase your frame rate.


Another option is to keep a low frame rate but design a more advanced collision algorithm that checks whether or not object paths overlap, not just the objects themselves. This can be a lot of work for both programmer and computer but it does eliminate all ghosting problems.


Fortunately it looks like we won’t have any ghosting problems so we can just stick with 20 frames per second, 20 pixel thick platforms and our simple collision checking. I just wanted you to know about this issue for your future game programming needs.


Digital Genesis


We have gravity. We have jumping. Now we can move ahead and build an entire world for the player to jump and gravity along. That’s right, next time we’ll be randomly generating a bunch of floating platforms.

Gengo Girls #26: Honor Thy Father

Gengo Girls #26: Honor Thy Father

The general rule of thumb is that you should be humble about yourself and anything related to you while being respectful of whoever you are talking to and anything related to them.

So when talking about your father you use (ちち) to show you are humble about your family. When talking to someone else about their father you use お父さん (おとうさん) to show you respect their family. And finally when talking to your father you use お父さん (おとうさん) because parents deserve respect from their children.

Of course, the fun really starts when you wind up talking about your father to someone else while your father is listening. Do you go humble to not sound like you’re boasting about your family or go respectful because he’s right there?

Also, happy Father’s Day. Not that this strip was originally published on Father’s Day or anything. But odds are good at some point in the future someone will read this comic on Father’s Day.

Vocabulary

= ちち = father (humble)

お父さん = おとうさん = father (respectful)

Transcript

言語ガールズ #26

Honor Thy Father

Yellow: I bet the 日本語 word for father has weird rules just like the word for mother.

Blue: That’s right!

Blue: You use (ちち) when talking about your father but use お父さん (おとうさん) when talking to your father or about someone else s father.

Yellow: Why?

Blue: It has to do with honor, humility and tradition.

Yellow: I have heard the Japanese are big on honor…

Yellow: Wait, if I use the wrong word for father will I be expected to commit ritual suicide out of shame?

Blue: They don’t do that anymore.

Blue: And when they did it was usually for war crimes, not grammar mistakes.

Gengo Girls #25: Mama Mother Mom

Gengo Girls #25: Mama Mother Mom

This marks our first real encounter with the complexities of Japanese honorifics. Some words are considered humble while other words are considered respectful and figuring out which ones to use in any given situation can even give a native a run for their money.

Also, happy Mother’s Day. Not that this strip was originally published on Mother’s Day or anything. But odds are good at some point in the future someone will read this comic on Mother’s Day.

Vocabulary

= はは = mother (humble)

お母さん = おかあさん = mother (respectful)

Transcript

言語ガールズ #25

Mama Mother Mom

Blue: Back to your normal outfit?

Yellow: Yeah. I decided dressing up like an oriental schoolgirl was kind of silly.

Yellow: Also, when my mom found out I had worn my 制服 to school she took it away.

Yellow: She said I can’t have it back until Halloween.

Blue: That reminds me, there are two common words for mother in 日本語.

Blue: When talking ABOUT your own mother you use (はは).

Blue: But when talking TO your mother or about someone else’s mother you use お母さん(おかあさん).

Gengo Girls #24: Always A Silver Lining

Gengo Girls #24: Always A Silver Lining

Every Japanese high-school graduate is expected to have learned a set of 2,136 kanji called the Jouyou kanji, which covers the majority (but not quite all) of the kanji in common use today. Mastering this entire list is a difficult feat that many foreigners never accomplish. As a casual student of Japanese I personally am only familiar with a few hundred of the most common.

There are also thousands and thousands of historic kanji that have basically faded from modern Japanese and only show up in historic documents and certain names. There really isn’t any reason for your average American student to worry about these. In fact, most Japanese aren’t really that familiar with the older kanji either.

Anyways, don’t obsess about memorizing kanji too much. You don’t have to read kanji to speak Japanese and a lot of entry level Japanese literature has hiragana pronunciation guides called furigana printed right next to every kanji symbol. Even more complex texts tend to have furigana for uncommon kanji so you really don’t have to memorize all the kanji all at once to start enjoying basic Japanese stories and comics.

Vocabulary

可愛い =かわいい= cute

恥ずかしい = はずかしい = embarrassing

Transcript

言語ガールズ #24

Always A Silver Lining

Yellow: I’m tired of dictionaries. Maybe I should just memorize all the kanji.

Blue: Good luck. There are several thousand.

Yellow: Several thousand!!

Blue: Don’t worry. Modern 日本語 only really uses about 2,000 of them. The rest are pretty uncommon.

Yellow: That’s still too many! Especially since this 制服 isn’t making 日本語 any easier.

Blue: Did you really think it would?

Yellow: Oh well. At least it’s 可愛い.

Blue: I think the word you’re looking for is 恥ずかしい.

Gengo Girls #23: Electronic Induced ADD

Gengo Girls #23: Electronic Induced ADD

Computers are amazing all-purpose devices. Maybe a little too all-purpose.

Anyways, if you want to try out an electronic kanji dictionary I suggest http://jisho.org/kanji/radicals/. It’s free, easy to use and has an excellent database of both common and uncommon kanji. It’s my go-to resource when I need to translate something. Why not grab a kanji from a previous strip and see if you can find it?

Transcript

言語ガールズ #23

Electronic Induced ADD

Yellow: The computer lab?

Blue: Digital kanji dictionaries have certain advantages over normal paper dictionaries.

Blue: One big advantage is that electronic dictionaries let you search for multiple radicals at the same time.

Blue: This let’s you pinpoint the exact kanji you’re looking for.

Blue: There might be a hundred kanji with the radical but there are only two with both the AND the radical.

Blue: Even you can’t complain about results like that.

Blue: So, do you want to give it a try?

Yellow: I found a video of a stuck in a box!

Gengo Girls #22: Totally Rad

Gengo Girls #22: Totally Rad

I think we’ve all experienced the feeling that a hard thing should be easier than it is.

A lot of the time that’s just us suffering form unrealistic expectations. Some things are just plain hard and there’s not much you can do about it except grit your teeth and keep working.

But sometimes there really is an easier way to solve your problems. Which is actually the topic of the next comic.

Vocabulary

= よる = evening, night

Transcript

言語ガールズ #22

Totally Rad

Yellow: Looking kanji up by stroke count is frustrating.

Blue: You could try looking them up with radicals instead.

Blue: Radicals are the simple symbols that get combined together to make complicated kanji, like this symbol here.

Yellow: So I just flip to the section of the dictionary and…

Yellow: What!? There’s over a hundred different kanji in this list!

Yellow: This isn’t radical at all. This is just as slow and frustrating as stroke counting.

Blue: Patience is a virtue, especially when studying 日本語.

Gengo Girls #21: Relative VS Absolute

Gengo Girls #21: Relative VS Absolute

I was planning on giving you some useful tips on how to count brush strokes only to realize that I’m not 100% sure myself. I guess my best advice would be to look up some tutorials on how to properly draw the basic three and four stroke kanji. That might give you a feel for what sort of stoke shapes are and aren’t common. Example: a lot of kanji have strokes that go to the right and then angle down, but very few have strokes that start out moving down and then angle right.

Or you could just give up on stroke counting for now and try a different kanji look up method.

Vocabulary

= = eye

Transcript

言語ガールズ #21

Relative VS Absolute

Blue: Let’s try looking up this kanji by stroke count.

Yellow: I count six lines, so is that a six stroke kanji?

Blue: It’s actually a five stroke kanji. The top and right lines were drawn with one angled stroke.

Yellow: So I just flip to the list of five stroke kanji and… WOAH!

Yellow: There must be a hundred of these things! How is this helpful?

Blue: Searching a list of 100 symbols is easier than searching a full list of thousands of symbols.

Yellow: Easier doesn’t mean easy!

Let’s Program A JavaScript Game 7: When Worlds Collide For Real

Knowing Is Only Half The Battle


Last time we covered the theory behind hitboxes and decided that our digital motorcycle needs three different hitboxes:

Hitbox Diagram For A Motorcycle

Remember This?

So now let’s actually put that idea into practice with some code.


Hitbox Creation Functions


Obviously our game is going to keep track of where the player is on the screen. But for collision detection what we really need is a way to transform that position into a set of three hitboxes.


The most straightforward solution is to write three functions that each accept an x and y coordinate representing the player’s position and then returns a complete hitbox object.


Now to be honest creating a bunch of new rectangle objects every everyt ime we want to do a collision check strikes me as potentially wasteful. Maybe it would be smarter to just create the hitboxes at the beginning of the script and then update them every time the character moves.


But I don’t want to waste time obsessing about how to run this code fast until I know for sure that the easy approach really is too slow. So I’m just going to build the hitbox creator functions and see how that runs. I can always optimize later.


Now it’s time for some math.


Our “cycle.png” image (which I recently flipped to face right instead of left) is 75 pixels wide and 48 pixels tall. We want to put a a five pixel tall “feet hitbox” along the bottom of the motorcycle for detecting when we hit platforms. Since the player’s position is measured from the top-left corner of the image that means the feet hitbox needs to be 43 pixels lower than then the player position.


// Get a 5x75 hitbox along the bottom of a 48x75 sprite.
// Used for detecting when the player has landed on a platform
// If you change the player sprite dimension you should update this function too
function getFeetHitbox(xPos, yPos){
   var feetHitbox = new Object();
   feetHitbox.x = xPos;
   feetHitbox.y = yPos+43;
   feetHitbox.width = 75;
   feetHitbox.height = 5;
   return feetHitbox
}


Next we want a relatively small “death hitbox” along the middle of the cycle. It will take some play testing to decide what the best size for it is but for now let’s say… 24 by 50 pixels. That’s about 12 pixels away from each side of the motorcycle which tells us everything we need for setting up the offsets.


// Get a 24x50 hitbox in the middle of a 48x75 sprite.
// Used for detecting when the player has hit an enemy
// If you change the player sprite dimension you should update this function too
function getDeathHitbox(xPos, yPos){
   var deathHitbox = new Object();
   deathHitbox.x = xPos+12;
   deathHitbox.y = yPos+12;
   deathHitbox.width = 50;
   deathHitbox.height = 24;
   return deathHitbox;
}


Finally we need to build the “graze hitbox” to track when the player is close enough to an enemy to start getting bonus points. This box actually need to be larger than the motorcycle graphic. Once again we’ll have to actually play test the game to fine tune the size of the graze box, but for starters lets give it 20 extra pixels on every side of the motorcycle (for an extra 40 pixels of width and height). Note that this actually requires negative offsets in order to put the graze box above and to the left of the player’s main position.


// Get a 88x115 hitbox centered around a 48x75 sprite.
// Used for detecting when the player is grazing an enemy
// If you change the player sprite dimension you should update this function too
function getGrazeHitbox(xPos, yPos){
   var grazeHitbox = new Object();
   grazeHitbox.x = xPos-20;
   grazeHitbox.y = yPos-20;
   grazeHitbox.width = 115;
   grazeHitbox.height = 88;
   return grazeHitbox;
}


Quick Test


Collision detection function? Check!


Hitbox creation function? Check!


Hitbox testing code? Let’s write it!


For starters you’re going to need to update your global variables to this:


var loopCount=0;
var playerInput = new Object();

var player = new Object();
player.x = 100;
player.y = 100;

var testObject = new Object();
testObject.x = 200;
testObject.y = 200;
testObject.width = 50;
testObject.height = 50;

var feetCollision = false;
var grazeCollision = false;
var deathCollision = false;

var cycleImage = new Image();
cycleImage.src = "cycle.png";


And then you’ll need to change your update method in two ways. First, when the user presses a key you need to update the player object instead of the generic xPos and yPos variables. Second, you need to check for collisions and update the global collision variables.


//Update the game by one step
function updateGame(){
   loopCount++;
   if(playerInput.right){
      player.x+=5;
   }

   if(playerInput.left){
      player.x-=5;
   }

   if(playerInput.up){
      player.y-=5;
   }

   if(playerInput.down){
      player.y+=5;
   }

   feetCollision = false;
   grazeCollision = false;
   deathCollision = false; 

   if(intersectRect(testObject, getFeetHitbox(player.x, player.y))){
      feetCollision = true;
   }

   if(intersectRect(testObject, getDeathHitbox(player.x, player.y))){
      deathCollision = true;
   }

   if(intersectRect(testObject, getGrazeHitbox(player.x, player.y))){
      grazeCollision = true;
   }
}


And finally we need to update our draw code to draw the player motorcycle, the test obstacle and a list of what hitboxes are and aren’t being hit:


//Draw the screen
function drawScreen(){
   var canvas = document.getElementById('gameCanvas');
   var context = canvas.getContext('2d');

   //Draw background
   context.fillStyle = '#dcdcdc';
   context.fillRect(0,0,600,400);

   //Draw black text
   context.fillStyle = '#000000';
   context.fillText("Loop Count: "+loopCount, 20, 20);

   if(feetCollision){
      context.fillText("Feet Collision: True", 20, 40);
   }
   else{
      context.fillText("Feet Collision: False", 20, 40);
   }
   
   if(deathCollision){
      context.fillText("Death Collision: True", 20, 60);
   }
   else{
      context.fillText("Death Collision: False", 20, 60);
   }

   if(grazeCollision){
      context.fillText("Graze Collision: True", 20, 80);
   }
   else{
      context.fillText("Graze Collision: False", 20, 80);
   }

   //Draw a red square the player can run into
   context.fillStyle = '#FF0000';
   context.fillRect(testObject.x, testObject.y, testObject.width, testObject.height);

   //Draw a motorcycle as the player's avatar
   context.drawImage(cycleImage, player.x, player.y);
}


If you’ve managed to properly copy all the code so far you should be able to hit the canvas test button and then control the motorcycle graphic by using the arrow keys. Move it towards and over the red box and watch how the three different collision variables react.


A sample screenshot of the collision test.

Close enough to graze and land on the square, but not close enough to hit the “death hitbox”.


I Hope You Remember High School Physics


With collisions working the next big piece of our simulation is a simple gravity system to pull the motorcycle downwards and give the player a reason to jump from platform to platform. So tune in next week as we try to find a gravity algorithm that walks the fine line between realistic and fun.