I’m Pretty Sure This Is What That Word Means…
There are two common definitions of “Game State”. At least two that I’ve heard. Who knows whether or not the big time developers use these. But my blog, my definitions. So… Game State:
The first definition is: A complete description of exactly what is going on in the game including the value of every variable. Very useful for creating save files or debugging glitches.
The second definition is: A high level description of what the game is currently doing, such as “paused”, “saving”, “in combat” or “showing world map”.
Our big focus today is going to be on the second definition, which is going to help us add a “Start Screen” and “Game Over Screen” to our current code. Or in other words, we are going to change from a game that only has one state (running) to a game that has three states (start, game over, main game).
But it’s not enough to have different game states. You also need a plan for switching between those game states. How does the player get to the “game over” state? Once he is in the “game over” state, how can he get back into the “main game” state? That sort of stuff.
This can all be described pretty well with a quick flowchart. Here’s an example of the four game states we want for Defrag Cycle and how they are related (although we’re only building three of them today:
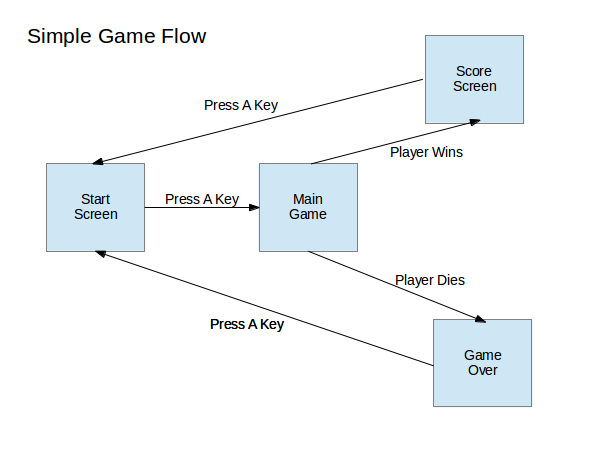
Everybody Loves Flowcharts!
Pretty simple, right?
Of course, not all games are so straightforward. For example, here is a sample state chart for a generic RPG:
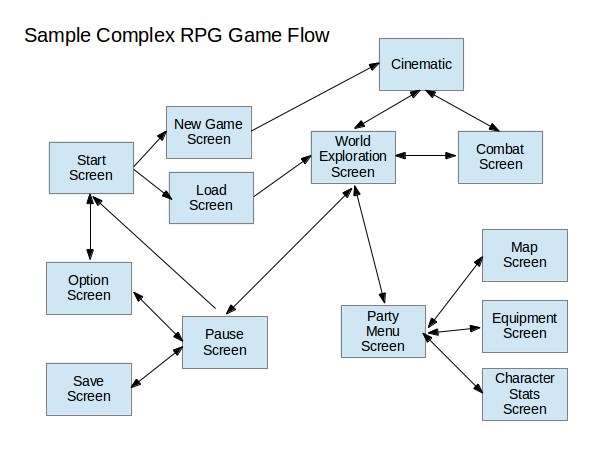
Whoops, looks like I forget to add a “game over” state, so let’s just pretend this chart is for one of those games where losing a fight just sends you to the nearest hospital/temple/inn.
Bonus Activity: Take your favorite game and try to draw a game state flowchart for it. Pay special attention to the transitions between states. Try to figure out which transitions go both ways (you can go from main game to pause screen and pause screen to main game) and which are one way (you can go from main game to game over, but it’s a one way trip).
Simple State Switching
First up we’re going to need a global variable for keeping tack of what state the game is in, along with some predictable values for the states themselves. So let’s just stick this somewhere near the top of our script along with the rest of our global variables and setup code:
//Game State "constants" (Javascript does not support true constants)
var STATE_RUNNING = 1;
var STATE_START_SCREEN = 2;
var STATE_GAMEOVER = 3;
var STATE_WIN = 4;

//Current Game State. Start game in "Start Screen" state
var gameState = STATE_START_SCREEN;
Now to put those states to good use. Update your gameLoop function like this:
//The main game loop
function gameLoop(){
   var startTime = Date.now();

   if(gameState == STATE_START_SCREEN){
      updateStartScreen();
      drawStartScreen();
   }
   else if(gameState == STATE_RUNNING){
      updateGame();
      drawScreen();
   }
   else if(gameState == STATE_GAMEOVER){
      updateGameover();
      drawGameoverScreen();
   }
   else if(gameState == STATE_WIN){
      // We'll implement this later
   }
   else{ //Fix the game if we somehow end up with an invalid state
      gameState = STATE_START_SCREEN;
   }

   var elapsedTime = Date.now()-startTime;

   if(elapsedTime>=50){ //Code took too long, run again immediately
      gameLoop();
   }
   else{ //Code didn't take long enough. Wait before running it again
      setTimeout("gameLoop()",50-elapsedTime);
   }
}
Can you see what we’re doing? The main gameLoop logic is the same as always. Make a note of what time it is, do some useful work, see how much time has passed and then decide when to run the next gameLoop. The big difference is that we now use the gameState variable to decide what kind of useful work we do.
When the state is STATE_RUNNING we just run the same old updateGame and drawScreen logic that we’ve already written. No need to make any changes here, unless you want to give them better function names like updateMainGame or updateRunningGame or something. I’m not going to mess with that just right now.
When the state is instead set to the start screen or the gameover screen we skip the game updates and instead run new functions specifically designed for those states. Functions that we haven’t written yet, but will in just a second.
As a side note, state switching like this can be an easy way to do pause screens. The main game update function only gets called during STATE_RUNNING, so by switching to a different state you can basically freeze the game world by preventing enemy and player position variables from updating.
New Code For Our New States
So… what should a start screen and an gameover screen actually do?
It seems to me a simple online game startscreen needs to do three things:
- Show the game’s title
- Explain how to play
- Explain how to move from the start screen to the main game
Similarly a gameover screen has two jobs:
- Show a gameover message
- Explain how to move from the gameover screen back to the start screen
In a real game we would hire a real artist to design some attractive screens for us. They would probably choose some lovely fonts and throw together a cool background filled with lasers and explosions.
But this is a game programming tutorial, not a game design tutorial, so I’m just going to throw together some text and call it a day.
//Draw the start screen with game title and instructions
function drawStartScreen(){
   var canvas = document.getElementById('gameCanvas');
   var context = canvas.getContext('2d');

   //Draw background
   context.fillStyle = '#dcdcdc';
   context.fillRect(0,0,600,400);

   //Draw black text
   context.fillStyle = '#000000';
   context.font = 'bold 70px impact';
   context.fillText("DEFRAG CYCLE", 20, 150);
   context.font = '20px impact';
   context.fillText("- Defrag the hard drive by avoiding pits and viruses", 20, 200);
   context.fillText("- When the counter reaches 1000 GB you win!", 20, 230);
   context.fillText("- LEFT and RIGHT arrow keys to move", 20, 260);
   context.fillText("- UP arrow key to jump", 20, 290);
   context.fillText("- Graze viruses to speed up the defrag counter", 20, 320);
   context.fillText("- Press UP arrow key to start game", 20, 350);
}

//Draw the gameover screen
function drawGameoverScreen(){
   var canvas = document.getElementById('gameCanvas');
   var context = canvas.getContext('2d');

   //Draw background
   context.fillStyle = '#000000';
   context.fillRect(0,0,600,400);

   //Draw green text
   context.fillStyle = '#00CC00';
   context.font = 'bold 80px impact';
   context.fillText("GAME OVER", 40, 200);
   context.font = '30px impact';
   context.fillText("Press UP arrow to retry", 120, 250);
}
Now all that’s left to do is fill in those two new update methods, which is really easy since all they do is check for the up key and then switch states (remember the flowchart):
//Check to see if the user is ready to start the game
function updateStartScreen(){
   if(playerInput.up){
      gameState = STATE_RUNNING;
   }
}

//Check to see if the user is ready to restart the game
function updateGameover(){
   if(playerInput.up){
      gameState = STATE_START_SCREEN;
   }
}
And with that the game now starts on the start screen and can be transitioned to the main game by tapping up. We’ve also built in the link between the gameover screen and then start screen. All that’s left is to link in the main game to the gameover screen.
Once again this is pretty easy. We already have a deathCollision flag that’s being set everytime we hit a virus and we already check to see if the player has fallen off the bottom of the screen. All we have to do is find inside the main updateGame function (it’s right at the bottom):
//Reset the player to default location when they fall off the screen
if(player.y > 400){
   player.x = 100;
   player.y = 100;
}
And change it to this:
//Gameover if the player falls of the screen or has hit a virus
if(player.y > 400){
   player.x = 100;
   player.y = 100;
   gameState = STATE_GAMEOVER;
}

if(deathCollision){
   gameState = STATE_GAMEOVER;
}
And now the game can flow between all three different states. Just ram yourself into a virus or fall into a pit and watch that transition to gameover.
This Is Actually Pretty Terrible
So… those of you who tried out your updated code probably noticed that it’s a little rough around the edges. Actually, that’s an understatement. These edges are downright serrated:
- You can see the cycle jerk back into default position after falling off the screen but right before the game over message
- Even if you just tap the up arrow key it will usually skip through both the gameover and start screen too fast to see
- If you hit a virus you will immediately hit it again after you restart the game
This is obviously not anywhere near playable. But our goal was just to get the state switching working and that we have done!
Next time around we’ll start cleaning up some of these issues in preparation for adding the scoring system and a way to actually win.