Now Where Did I Put That Wand…
Way back in tutorial 3 we talked about how to use find and the command line tool to search for entire groups of items inside a collection. Now we’re going to do the same thing with PHP and connect it all to a user friendly form that makes searching for treasure as easy as clicking a button. This is the last major feature of Treasure Bag. After this we’ll be done and you will have successfully built a complete MongoDB web application.
Bad Design Warning
We’re going to create the treasure search form by copy pasting and then slightly modifying the JavaScript and HTML from the treasure creation form. And in order to print our search results we’re going to copy paste the treasure listing code from “index.php”.
In a big, professional project duplicating code like this is a major mistake. Duplicating code means you risk duplicating bugs. And even if you don’t accidentally copy and paste a bug all over your code you might decide you need to upgrade your program and now you’re stuck finding and rewriting every piece of duplicate code.
If you find yourself copy pasting a certain bit of code it’s usually a better idea to turn that code into a function or a class that only has to be written once but can be used by multiple files. Then fixing bugs and making upgrades is as simple as updating one piece of code.
But this isn’t a big, professional project. It’s just a tiny practice project and we’re not concerned about security bugs or clients demanding new features. So in this case we can get away with being a little sloppy and copy pasting a bit.
Just don’t let me catch you doing it anywhere else.
Creating The Search Form
Our search form is going to be called “search.php” and will be made up of two halves. The first half of the file will be a JavaScipt enhanced HTML form that lets the user tell us what he is searching for. The second half of the file will be a PHP script that takes the user’s treasure requirements, finds any items that match and then prints them to the screen.
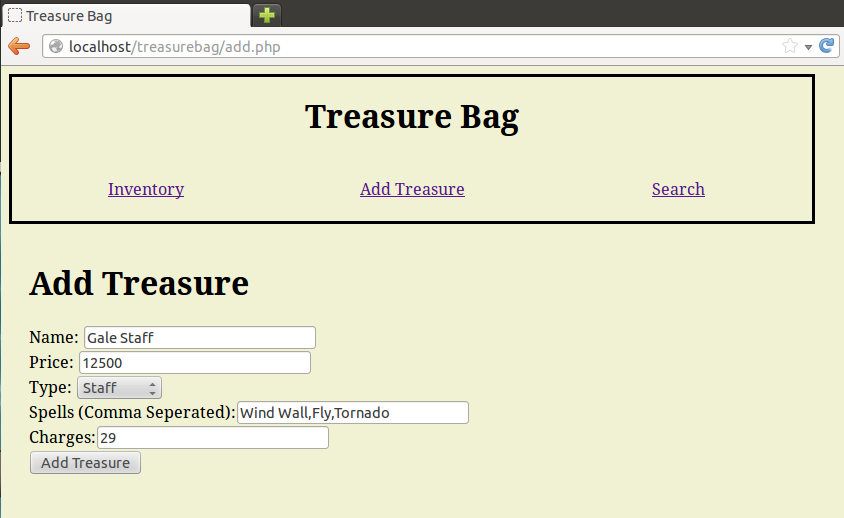
Let’s start by creating a new “search.php” file. Since this is a MongoDB tutorial I’m just going to dump the boring form code on you with minimal explanation. It’s virtually identical to the treasure creation form in “add.php” with only three slight difference.
First, inputs that expect numbers have been split into a Max and Min field. So instead of just asking the user for “Price” they will be asked for “Max Price” and “Min Price”.
Second, the form is now of type “GET” instead of “POST”.
Third, the drop down value for not selecting a treasure type is now the empty string ” instead of ‘none’. As you read the rest of the code I’m sure you’ll be able to figure out why we made these changes.
<?php
include('header.php');
?>
<script>
	function addTypeSpecificAttributes(){
		var specificAttributesDiv =  document.getElementById('typeSpecificAttributesDiv');
		var typeSelect = document.getElementById('typeSelect');
		var currentType = typeSelect.options[typeSelect.selectedIndex].value;
		switch(currentType){
			case 'Ring':
				specificAttributesDiv.innerHTML="Special Attribute:<input type='text' name='Special Attribute'/><br/>";
				break;
			case 'Staff':
				specificAttributesDiv.innerHTML="Spells (One at a time):<input type='text' name='Spells'/><br/>Min Charges:<input type='text' name='minCharges'/><br/>Max Charges:<input type='text' name='maxCharges'/><br/>";
				break;
			case 'Wand':
				specificAttributesDiv.innerHTML="Spell:<input type='text' name='Spell'/><br/>Min Charges:<input type='text' name='minCharges'/><br/>Max Charges:<input type='text' name='maxCharges'/><br/>";
				break;
			case 'Weapon':
				specificAttributesDiv.innerHTML="Min Bonus:<input type='text' name='minBonus'/><br/>Max Bonus:<input type='text' name='maxBonus'/><br/>Special Attributes (One at a time):<input type='text' name='Special Attributes'/><br/>";
				break;
			default:
				specificAttributesDiv.innerHTML='';
		}
	}
</script>

<h1>Search Treasures</h1>
<form method='get' action='search.php'>
Name: <input name='name' type='text' /><br/>
Min Price: <input name='minPrice' type='text' /><br/>
Max Price: <input name='maxPrice' type='text' /><br/>
Type: <select name='type' id='typeSelect' onchange='addTypeSpecificAttributes();'>
			<option value=''>---</option>
			<option value='Ring'>Ring</option>
			<option value='Staff'>Staff</option>
			<option value='Wand'>Wand</option>
			<option value='Weapon'>Weapon</option>
		</select><br/>
<div id='typeSpecificAttributesDiv'>
</div>
<input type='submit' value='Search' />
</form>

<?php

//MongoDB code will go here

include('footer.php');
?>
The Search Flow
That’s it for the first half of “search.php”. Now for the second, MongoDB focused half.
Let’s start by reviewing what we want to happen when visiting the search page. If we don’t have any user search requirements we will just display every treasure in the collection. If we do have search requirements we only want to show treasures that match.
Now a quick reminder on how we can use the PHP version of find both to search for items and to just display everything.
In order to search a collection you have to pass find an array of key/value pairs.
If instead you just want to access every single item in a collection you can either give find zero arguments or you can pass it an empty array.
This means that the easiest way to do what we want to do is to create an empty array, fill it with user search requirements and then give it to the database. If there are no user search terms the array will stay empty and we’ll get every item out of the collection, just like we wanted. If there are search requirements then find will only give us matching items, which is also what we want.
So let’s it get our MongoDB focused code started like this:
$criteria = new array();

//Fill $criteria with search criteria here

$connection = new Mongo();
$cursor = $connection->treasurebag->treasure->find($criteria);

//Print results here
Let’s Copy Paste Some Print Code
Before we start worrying about the user’s input let’s make sure our base case with no input and a blank array works properly. For this we’re going to grab the treasure table printing code form “index.php” and drop it in near the end of “search.php”, after the database call but before we include the footer.
echo '<h2>Search Results</h2>';
echo '<table><tr><td>Name</td><td>Price</td><td>Type</td></tr>';
while($document = $cursor->getNext()){

    $treasureID = $document['_id'];
    $name = $document['Name'];
    $price = $document['Price'];
    $type = $document['Type'];

    echo "<tr><td><a href='viewItem.php?id=$treasureID'>$name</a></td>
                <td>$price</td>
                <td>$type</td></tr>";

}
echo '</table>';
If everything is working properly you should be able to refresh “search.php” and see a compelete listing of the treasures in your treasure collection.
Checking For Input
Now that you know the empty case is working it’s time to start working on what our code should do if the user has actually entered some search criteria. All the rest of the code in this tutorial belongs after declaring the empty $criteria array but before we make our call to the database, so make some space in your code and let’s get started!
Between our four different treasure types and all their unique attributes there are a lot of different pieces of data that might or might not be inside of the $_GET array. And for every single one of those pieces of data we’re going to do the same thing.
if( !empty( $_GET['ATTRIBUTE NAME'] ) ){
   //Add search term to criteria area
}
For example:
if(!empty($_GET['name'])){
   //Add name to search criteria
}
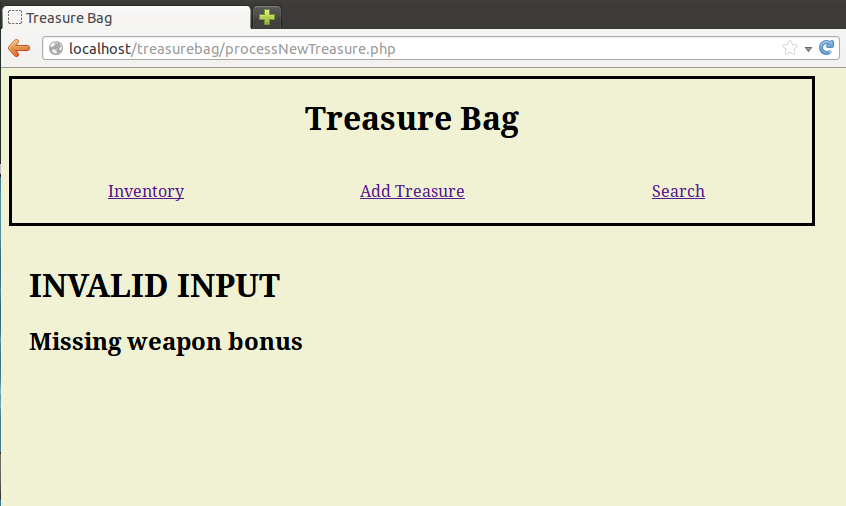
Using this example go ahead and write the basic if statement for all the other possible attributes. You can figure out what they are from examining the HTML form and form modification script, or you can just use this handy list (case is important): name, minPrice, maxPrice, type, Special_Attribute, minCharges, maxCharges, Spells, Spell, minBonus, maxBonus, Special_Attributes.
Searching For Exact Matches With MongoDB and PHP
Now that we can figure out which search terms the user has or hasn’t filled out we can finally start building the search criteria array. There are three major types of searches we might run into as part of Treasure Bag and I’m going to give each one their own mini-section.
The easiest and most straightforward search is when we are looking for an exact match. The user only wants treasures named “Orc Poker” or the user only wants items of type “Ring”. To search MongoDB for an exact match all you have to do is add the key value pair to the criteria array. Let’s use “name” as an example of how to do this in code:
if(!empty($_GET['name']) ){
   $criteria['Name'] = $_GET['name'];
}
It’s pretty simple. When we see that the user is asking for a specific name all we do is add a ‘Name’ entry to our array and assign it whatever value the user is looking for. And that’s all you need to know in order to fill out all the other exact match entries: type, Special_Attribute and Spell.
Greater Than And Less Than In MongoDB with PHP
The second type of search we’ll run into is numeric searches. These are a little more difficult because they include entire ranges or values instead of just a single exact value. For example, the user might be looking for items worth 500 or more.
In order to ask MongoDB to do a comparison search we actually have to put an array inside our criteria array. The keys to these inner array will be the names of special MongoDB comparison instructions and the value will be the base number we are comparing against.
The special MongoDB comparison instructions and what they mean are:
$gt = greater than
$gte = greater than or equal
$lt = less than
$lte = less than or equal
$ne = not equal
Here are a few quick samples to show how this works
//Examples only. Do not put in search.php!

//All documents with an item value greater than 500
$criteria['Price'] = array ( '$gt' => 500 );

//All documents with an item value equal to 10000 or less
$criteria['Price'] = array( '$lte' => 10000 );

//All documents with an item value between 300 and 5000
$criteria['Price'] = array ( '$gt' => 500, '$lt' => 5000);
But that’s not the only way to build an array inside an array in PHP. Consider this:
//These two pieces of code will both result in the same MongoDB search
$criteria1['Price'] = array( '$gte' => 500 );
$criteria2['Price']['$gte'] = 500;
For our code we are going to use the second method. This will make it easy to add a maximum search criteria to an array that already has minimum search criteria.
Having trouble understanding how that will work? Maybe this code will help clear things up:
if(!empty($_GET['minPrice'])){
   $criteria['Price']['$gte'] =intval($_GET['minPrice'])
}

if(!empty($_GET['maxPrice'])){
   $criteria['Price']['$lte'] = intval($_GET['maxPrice']);
}
Now follow this same pattern to fill in the code for minBonus, maxBonus, minCharges and maxCharges.
Searching MongoDB When Documents Have Arrays
The last kind of search we will run into deals with values that actually have more than one value. For example, Staffs have a “Spells” attribute that can hold multiple items. When we search for a Staff with a specific spell we don’t want to limit ourselves to Staffs that only have that one exact spell. We want to find any Staff that has that spell anywhere in it’s Spells list.
MongoDB has lots of different array searching tricks for the different ways you might want to search through arrays inside of documents inside of collections. Finding any array that features a particular item at least once, like we want to do, is actually one of the easiest searches to program. It even uses the exact same syntax as looking for an exact match. Here’s an example using Spells:
if(!empty($_GET['Spells'])){
   $criteria['Spells']=$_GET['Spells'];
}
Even though this code looks like something we’ve already done it’s important to know to understand that MongoDB will treat it differently . When a keyword only has one value this syntax means “Find an exact match”. But when keyword has an entire array of values this syntax means “Matches any array that has this value no matter what else is in the array”.
Now based off this pattern you can fill in the Special_Attributes if statement, which should be your last one.
No Results
If you’ve been messing around with your new search form you might have noticed that some searches have zero results. When this happens your code will still print the beginning of the treasure list table, it just won’t have anything besides the column names. This is pretty ugly looking. Why not change the code so that an empty result set generates an apologetic warning instead of a mutilated table?
In order to generate an empty result warning we’re going to need some way to tell when our results are empty. Forunately, MongoDB has us covered. Remember the cursor class that we’ve been using to cycle through search results? Well that class also has a handy little function called count that lets you know exactly how many results you have to work with. So checking for empty results is as easy as checking whether count is returning zero.
if( $cursor->count() == 0 ){
   echo "<h2>No Matching Treasure Found</h2>";
}
else{
   //Inventory table code you already wrote goes here
}
And that’s it! You’ve successfully implemented every use case in our design document. Or at least, you should have. It’s time to test whether your code actually works.
Testing
There are tons of use cases for search. Here are a few to think about:
- Search by item type. Make sure no items of the wrong type show up. Make sure that all the items of the right type do show up.
- For minimum and maximum values make sure that items on the edge show up. If the user asks for treasures with a minimum price of 1000 then items worth exactly 1000 should still show up.
- Create multiple staffs that all share one spell but otherwise have different Spells arrays. Make sure that they all show up when you search for that one spell. Make sure they don’t all show up if you choose a spell that only one staff has.
- Search for multiple attributes at the same time and make sure only items that fit all requirements show up. If you choose item type “ring” and max price 500 you should have no non-ring or above 500 items.
Screen Shots
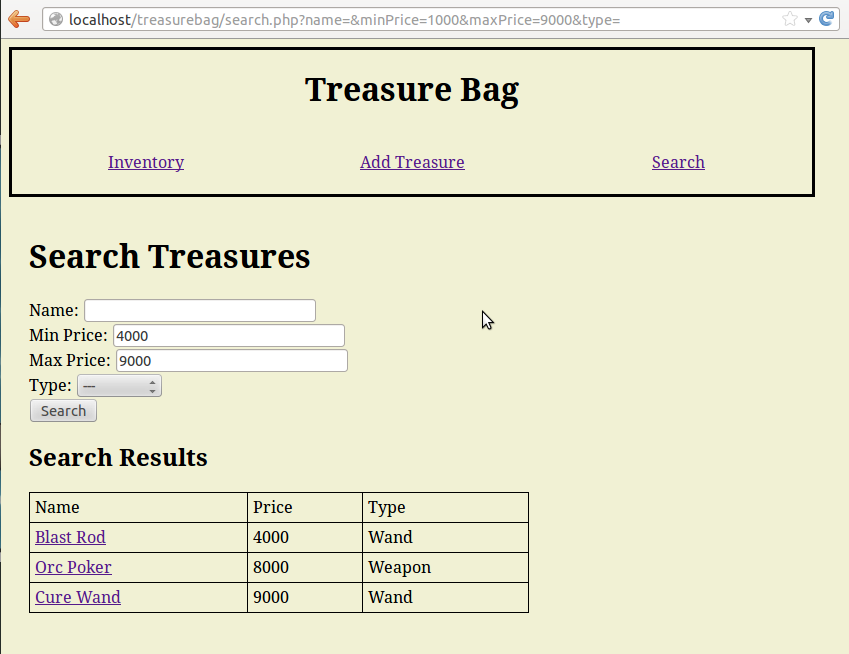
Searching all treasure types at once to find item inside a specific price range
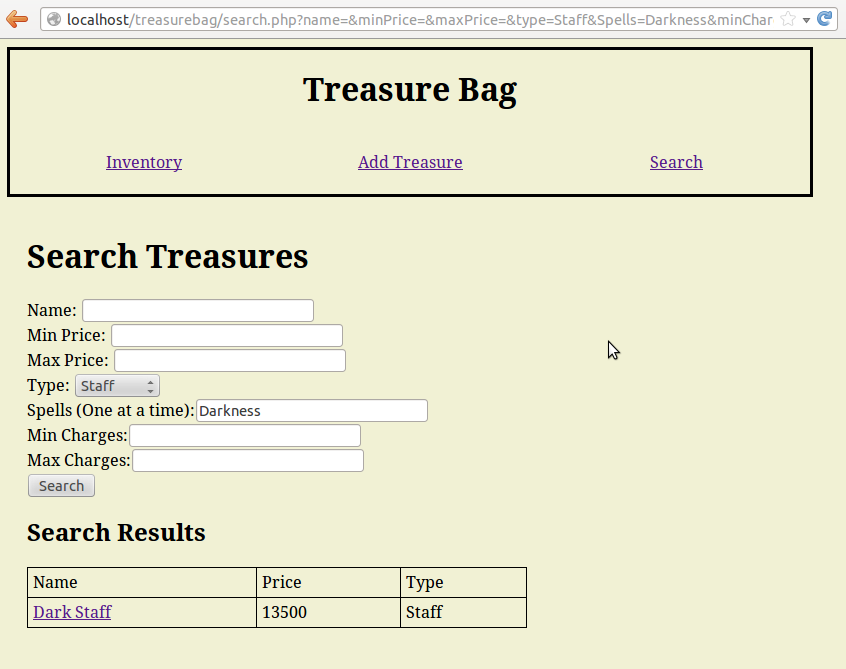
The Dark Staff has multiple spells, but because at least one of those is “Darkness” it shows up for this search
Complete Code
Here is what my final “search.php” file looked like:
<?php
include('header.php');
?>
<script>
    function addTypeSpecificAttributes(){
        var specificAttributesDiv =  document.getElementById('typeSpecificAttributesDiv');
        var typeSelect = document.getElementById('typeSelect');
        var currentType = typeSelect.options[typeSelect.selectedIndex].value;
        switch(currentType){
            case 'Ring':
                specificAttributesDiv.innerHTML="Special Attribute:<input type='text' name='Special Attribute'/><br/>";
                break;
            case 'Staff':
                specificAttributesDiv.innerHTML="Spells (One at a time):<input type='text' name='Spells'/><br/>Min Charges:<input type='text' name='minCharges'/><br/>Max Charges:<input type='text' name='maxCharges'/><br/>";
                break;
            case 'Wand':
                specificAttributesDiv.innerHTML="Spell:<input type='text' name='Spell'/><br/>Min Charges:<input type='text' name='minCharges'/><br/>Max Charges:<input type='text' name='maxCharges'/><br/>";
                break;
            case 'Weapon':
                specificAttributesDiv.innerHTML="Min Bonus:<input type='text' name='minBonus'/><br/>Max Bonus:<input type='text' name='maxBonus'/><br/>Special Attributes (One at a time):<input type='text' name='Special Attributes'/><br/>";
                break;
            default:
                specificAttributesDiv.innerHTML='';
        }
    }
</script>

<h1>Search Treasures</h1>
<form method='get' action='search.php'>
Name: <input name='name' type='text' /><br/>
Min Price: <input name='minPrice' type='text' /><br/>
Max Price: <input name='maxPrice' type='text' /><br/>
Type: <select name='type' id='typeSelect' onchange='addTypeSpecificAttributes();'>
            <option value=''>---</option>
            <option value='Ring'>Ring</option>
            <option value='Staff'>Staff</option>
            <option value='Wand'>Wand</option>
            <option value='Weapon'>Weapon</option>
        </select><br/>
<div id='typeSpecificAttributesDiv'>
</div>
<input type='submit' value='Search' />
</form>

<?php

$criteria = array();
if(!empty($_GET['name'])){
    $criteria['Name']=$_GET['name'];
}
if(!empty($_GET['minPrice'])){
    $criteria['Price']['$gte'] =intval($_GET['minPrice']);
}
if(!empty($_GET['maxPrice'])){
    $criteria['Price']['$lte'] = intval($_GET['maxPrice']);
}
if(!empty($_GET['type'])){
    $criteria['Type']=$_GET['type'];
}
if(!empty($_GET['Special_Attribute'])){
    $criteria['Special Attribute']=$_GET['Special_Attribute'];
}
if(!empty($_GET['minCharges'])){
    $criteria['Charges']['$gte']=intval($_GET['minCharges']);
}
if(!empty($_GET['maxCharges'])){
    $criteria['Charges']['$lte']=intval($_GET['maxCharges']);
}
if(!empty($_GET['Spells'])){
    $criteria['Spells']=$_GET['Spells'];
}
if(!empty($_GET['Spell'])){
    $criteria['Spell']=$_GET['Spell'];
}
if(!empty($_GET['minBonus'])){
    $criteria['Bonus']['$gte']=intval($_GET['minBonus']);
}
if(!empty($_GET['maxBonus'])){
    $criteria['Bonus']['$lte']=intval($_GET['maxBonus']);
}
if(!empty($_GET['Special_Attributes'])){
    $criteria['Special Attributes']=$_GET['Special_Attributes'];
}

$connection = new Mongo();
$cursor = $connection->treasurebag->treasure->find($criteria);

if($cursor->count()==0){
    echo "<h2>No Matching Treasure Found</h2>";
}
else{
    echo '<h2>Search Results</h2>';
    echo '<table><tr><td>Name</td><td>Price</td><td>Type</td></tr>';
    while($document = $cursor->getNext()){

        $treasureID = $document['_id'];
        $name = $document['Name'];
        $price = $document['Price'];
        $type = $document['Type'];

        echo "<tr><td><a href='viewItem.php?id=$treasureID'>$name</a></td>
                    <td>$price</td>
                    <td>$type</td></tr>";

    }
    echo '</table>';
}

include('footer.php');
?>
Why Did We Use MongoDB?
Now that we’ve finished up the search interface and you’ve proved to yourself that it works let’s take a moment to appreciate the flexibility of MongoDB. Do a couple searches based on minimum and maximum price. Notice how the results (probably) include a mix of all four different types of items.
I’ll let that sink in.
This entire project uses only one MongoDB collection, but we were able to keep track of four different kinds of items with it. And because we are only using one collection we can search and sort all of our treasures with only one database call.
To do the same thing in MySQL we would probably have to have a different table for every different type of treasure. Creating, sorting or searching a list of all of our treasures would probably require joining multiple tables together.
MongoDB isn’t a miracle cure and it has a few weaknesses that make it a poor choice for certain applications. But this program also shows that there are certain things that only MongoDB can do. Next time you find yourself struggling to design a database that can work well with sets of irregular data, remember the flexibility of MongoDB.
Conclusion
Congratulations! You’ve successfully completed my intermediate MongoDB tutorial and have proved yourself capable of using PHP and MongoDB. If you feel like you still need more practice why not go back to the start of the tutorial and complete all the BONUS exercises I included at the end of each tutorial.
If you’ve already completed all the BONUS exercises, I have nothing left to teach you. Go forth, programmer, and show your MongoDB prowess unto the world!
BONUS!
All you character database enthusiasts probably know what’s coming. Build a search form that lets you search your character database based off of character name, class, level or whatever it is you’ve been storing during your exercises.
BONUS BONUS!!
This has nothing to do with MongoDB, but wouldn’t it be nice if our search form automatically filled itself with the user’s current search terms instead of resetting itself every time the user hit’s search? Add some PHP to the form so that it can detect $_GET variables and fill itself out accordingly. Nothing too hard here, just tedious.