Game animations are important.
First off, they look cool. Watching a warrior swing his ax is much more entertaining than just watching him sit still while you pretend he’s swinging his ax. (No offense to old school RPGs, of which I own an embarrassing amount.)
Second, they make the game feel more realistic. A character who stands perfectly still while falling hundreds of feet feels fake. It’s much more immersive when the character has billowing clothing or flailing limbs to drive home the fact that he’s falling.
Finally, and maybe most importantly, animations give the player information about what’s happening in the game. They show when and how enemies are attacking and give hints about what the character can and can’t do.
I mean, imagine a game with a two second delay between attacks that you just had to remember. Frustrating! Now imagine a game with a two second animation of your character reloading his giant shotgun after every attack. Now it’s easy to see exactly when you can and can’t attack.
Pseudo Code
Animations are created by showing related images one after another at high speed. Take four pictures of a walking man, cycle through them a couple times a second and the human brain will see one walking man instead of four different pictures.
But in a game it’s (usually) not enough to have one animation. You have to have multiple animations you can switch between as needed. If the player is walking along and suddenly hits the jump button you need to be able to instantly switch from your walking animation to your jumping animation.
But even with that complication the logic of 2D game animation is pretty simple:
- Store what animation state your sprite is in (ex: walking, jumping, shooting)
- Store how long it’s been in that state (ex: 17 frames)
- Use that information to decide what image to show (ex: jump-image-3)
Now in a professional game step 3 can get pretty complicated. A running animation might have logic that looks like:
- If the sprite has been in “running” state for less than five frames show “warm up 1”
- If the sprite has been in “running” state for between five and fifteen frames show“warm up 2”
- If the sprite has been in “running” state for between fifteen and twenty two frames show “warm up 3”
- If the sprite has been in “running” state for more than twenty two frames switch between “running 1” and “running 2” every three frames.
Fortunately for us our only goal is to make our virus enemies spin while being grazed. That means we only have to worry about two sprite states (grazed and not-grazed) and our step three logic is going to be a pretty simple cycle.
How To Store An Animation
To show an animation you need to quickly switch between multiple related images. And while you could create every one of these images as an independent file we’re going to be using a “sprite sheet” instead.
A “sprite sheet” is one large image made up of multiple, related images glued together. For example, here’s a sprite sheet showing four different stages of a rotating virus enemy:

Load this into your virusImage object instead of the old single virus graphic
We load the image into the game once and can then create an animation by drawing different parts to the screen at different times. In JavaScript we do this by adding extra arguments to our drawImage calls.
You hopefully remember that by default drawImage accepts three arguments: the image we want to draw and the x and y coordinates of where we want to draw it on the canvas.
But there is also a nine argument version of drawImage. The first argument is still an image. The next four arguments define what part of the image we want to draw by creating a rectangle inside of the image. Then the last four arguments define a rectangle inside of the canvas showing where we want our sub-image to be draw and what size we want it to be stretched to.
So to draw the third frame of our 50×50 rotating virus at canvas coordinate (127, 33) we would do something like this:
context.drawImage(virusImage, 100, 0, 50, 50, 127, 33, 50, 50);
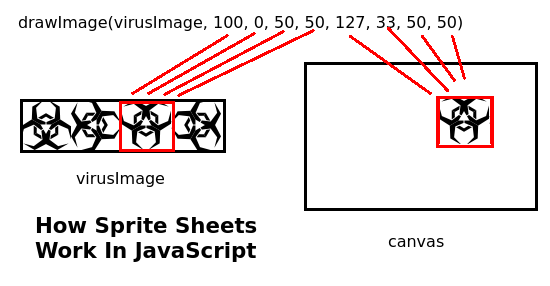
This nine argument function is really just asking for an image and two rectangles.
In other words: Grab the 50×50 sub image found at point (100, 0) of the virusImage and then draw it inside a 50×50 square at point (127, 33) on the canvas.
Make It So
With that we’re ready to upgrade our viruses so that they spin whenever the player grazes them.
First off, let’s define a new constant at the top of our code to help us keep track of what animation state our viruses are in. Since at the moment they can only be in state “grazed” or “not grazed” we really only need one constant:
var VIRUS_GRAZED = 1; //Used to identify a virus that is being grazed
Now we drop down into the graze logic of updateGame and have the viruses keep track of their current animation state:
//Virus logic
for( i = 0; i < viruses.length; i++){
   //Have all viruses move towards the player
   viruses[i].x-=VIRUS_SPEED;

   //See if the player is grazing this virus
   if(intersectRect(viruses[i], grazeHitbox)){
      grazeCollision = true;
      viruses[i].state = VIRUS_GRAZED;
      viruses[i].stateCounter++;
   }
   else{
      viruses[i].state = 0;
      viruses[i].stateCounter = 0;
   }

   //See if the player has had a lethal collission with this virus
   if(intersectRect(viruses[i], deathHitbox)){
      deathCollision = true;
   }
}
This is mostly the same virus enemy logic as before. But now when a virus is grazed it will set it’s state to VIRUS_GRAZED and increment a counter. And when a virus is not grazed it will erase that state and reset the counter.
Now that we know which viruses are being grazed and how long they’ve been grazed we can update our virus drawing logic down in drawScreen:
//Draw viruses
//Virus has a 200 pixel wide sprite sheet with four different 50x50 rotations all in a row
for(i = 0; i < viruses.length; i++){
   //By default draw the first virus
   virusSheetOffset = 0;

   //If the virus is being grazed make it spin by switching between rotations
   if(viruses[i].state = VIRUS_GRAZED){
      if( viruses[i].stateCounter % 8 < 2){
        virusSheetOffset = 0;
      }
      else if(viruses[i].stateCounter % 8 < 4){
         virusSheetOffset = 50;
      }
      else if(viruses[i].stateCounter % 8 < 6){
         virusSheetOffset = 100;
      }
      else{
         virusSheetOffset = 150;
      }
   }

   context.drawImage(virusImage, virusSheetOffset, 0, 50, 50, viruses[i].x, viruses[i].y, 50, 50);
}
Let’s analyze this by looking at the last line first:
context.drawImage(virusImage, virusSheetOffset, 0, 50, 50, viruses[i].x, viruses[i].y, 50, 50);
We always want to draw a 50×50 virus image at the x and y location of the current virus enemy. That’s why the last four arguments are viruses[i].x, viruses[i].y along with 50 width and 50 height.
We then choose between our four different virus sub-images by changing the “virusSheetOffset”. Since our sprite-sheet is just one big row we always leave the y coordinate of our frame as 0. Larger sprite sheets often have multiple rows and would need to calculate both an x and a y offset.
We choose our virusSheetOffest, and thus our sub-image, by seeing how long the virus has been grazed and switching every two frames. Four different sub-images at two frames each mean we complete a full cycle every eight frames so we calculate our current sub-image by using modulo eight to see whether we are at frame 0-1 of a cycle (image 1), 2-3 (image 2) 4-5 (image 3) or 6-7 (image 4).
Of course, all this only happens if the virus is being grazed. If not we just stick with an offset of 0 to get the default first frame. This means that only grazed viruses spin. The rest just sit there.
An Unrelated Tweak
Before we finish up this Let’s Program there’s one last little game flaw I want to fix.
Currently we start and restart the game by having the player press the up arrow key. Unfortunately if the player happens to already pressing the up key when he dies or wins he will immediately restart the game without any time to see the “game over”, “you win” or “start” screens.
To solve this I created a new global variable
var menuFrames = 0; //Has the player been on the menu long enough to press a button?
I then use this variable to force every menu screen to wait twenty frames before letting the player move on. Here’s an example from the win screen, but the other two functions were modified in the same way:
//Check to see if the user is ready to restart the game
//Slightly delay user input so they don't accidentally skip this screen
function updateWinScreen(){
   menuFrames++;
   if(playerInput.up && menuFrames >= 20){
      gameState = STATE_START_SCREEN;
      menuFrames = 0;
   }
}
Resetting the “menuFrames” counter before switching states is very important. Otherwise only the first menu of the game would have the input delay and then we’d be right back to being able to accidentally skip past important screens.
YOU WIN THE META-GAME!
We now have a complete game that shows off everything from basic animations, collision detection and sounds to real-time world generation and physics simulations. You can play the full version here and I strongly recommend downloading the page source so you can see the complete code.
And with that done all that’s left is a few final thoughts on what to do next.
