Dark Souls 3: That Which Has Been Illuminated Can No Longer Be Hid

A couple weeks ago we looked at Dark Souls 2 and talked about how FromSoftware is really good at making mystery adventure games but that their standard mystery formula doesn’t work so good when trying to make a sequel instead of standalone game.

Now that Dark Souls 3 is out it’s time to continue that discussion by asking ourselves: How did DS3 approach the mystery sequel problem? Did they do a better job than DS2?

Surprisingly enough the answer turns out to be: Dark Souls 3 avoided the mystery sequel problem entirely by not being a mystery game. It focused entirely on just being the best sequel it could.

That’s right, DS3 is a straight up adventure game with no big core mystery to solve. Sure, there are still a ton of mysterious environments to explore with their own hidden lore and history but the major points of the plot along with your overall endgame goal are all spelled out within the first thirty minutes of the game. This is obviously a big departure from the pacing of the original, where it was very possible to be two dozen hours into the game and still have only the vaguest idea of what was going on or why you were doing what you were doing.

On the one hand this is disappointing because my favorite thing about FromSoftware is how good they are at designing satisfying mysteries.

But on the other hand I have to admit that going for a more straightforward adventure story was probably a smart move. As I’ve said before, the first game really didn’t need a sequel. The plot was self-contained and all the big questions were answered. Forcing major new plot elements into the setting would just make a mess of both games.

So the developers gave up on mystery and instead tried (and succeeded) at showing a natural evolution of the world of Dark Souls. Almost every faction, enemy and location you discover has some sort of historical connection to an event from the original game. It leaves you with a satisfying feeling of “I can see why Thing A happening in Dark Souls has lead to Thing B existing in Dark Souls 3”.

In summary: Dark Souls 3 gave up on large scale mysteries in exchange for honoring and preserving the legacy of the original game. This was probably a smart move and the game was pretty fun but I personally hope that in the future FromSoftware goes back to making standalone mystery adventures and more or less gives up on direct sequels.

Should Dark Souls 2 Have Been Royal Souls The First?

In preparation for the imminent release of Dark Souls 3 I’ve been replaying the first two games and thinking about one of the more common criticism people had about Dark Souls 2: The fact that it somehow just didn’t fully capture the excellent feel of the first game. The combat was fun, the dungeons were interesting but at the end of the day it somehow didn’t have the same impact as the original. Still a great game, definitely worth playing but somehow lacking that special something.

Many people blame this on the fact that the game had a different director than the original. And that probably played a part.

But I think the bigger issue is that Dark Souls 2 was a sequel to a story that didn’t need a sequel. Even the best of directors is going to have trouble given that sort of prompt.

You see, a big part of what made the original so fascinating was the fact that the entire game was one big cohesive mystery revolving around the questions of “Why is civilization dying?” and “What happened to the gods?” The opening cutscene makes it clear that at one points the gods had built a pretty awesome civilization so why is the world you wind up exploring such an awful place?

From that starting point every location you visited, every item you picked up, and every scrap of lore hidden in a weapon description all worked together to weave the history of the ruined world the player was fighting their way through. Do even a half-decent job of finding and piecing together these story fragments and by the time you finished the game you had a solid idea of why the Dark Souls world was the way it was.

Sure, there were dozens of minor questions left unanswered and the ending was a little open-ended but the core mysteries all had satisfying conclusions. The game felt complete all on its own.

Now enter Dark Souls 2.

The developers’ goal was to build the same sort of mystery adventure that fans of the original loved so much. The problem is, you can’t just reuse a mystery. No point in asking “What happened to the gods?” when your veteran players already know the answers.

So Dark Souls 2 needed a brand new mystery to drive the adventure.

But even with a new core mystery Dark Souls 2 was still a Dark Souls game and had to have the same general look, feel and background lore as the first game.

And I think this is what ultimately dragged down Dark Souls 2. In the original every aspect of the game was carefully designed to tell a specific story, but in the sequel the new story was forced to share the stage with countless nostalgic references to the previous game.

The end result is a mildly muddled story that lacked the cohesive punch of the original.

So let’s play “What Could Have Been” and brainstorm what the game might have looked like if it had been a standalone title and allowed to focused 100% on it’s own themes and setting. This shouldn’t be too hard. I mean, Dark Souls 2 had a ton of really cool and original content. We just need to think of a way to move it to center stage.

For starters let’s identify what the core mystery theme of Dark Souls 2 actually was.

Well… half of the Dark Soul 2 main game and all three of the DLC areas focus on exploring the ruins of ancient castles and learning about the royalty that used to live there. You learn bits about how various kings and queens grew to power as well as how their various character flaws lead to their downfall. The “Scholar of the First Sin” edition even has a mysterious NPC who shows up on a regular basis and asks you “What does it mean to be a king?”

So there’s your central mystery. The player is stuck in the middle of a country filled with the ruins of multiple generations of failed kingdoms that leave him asking: Who built all this cool stuff? What went wrong to leave it a ruin?

Since the core theme is the rise and fall of kings, so let’s call our hypothetical standalone version “Royal Souls” and move on to how we might edit the existing game to fit our new mold. Strip out the undead and the old gods and what do we have left to work with?

As a reminder, the actual plot of Dark Souls 2 begins with the character realizing they have the undead curse from the first game and finding themselves drawn to the land of Drangleic. The player then encounters a mysterious lady who points them towards a distant castle and suggests that going there and talking with a certain king might help with the curse. But to get to the castle they need to gather four ancient souls (all with possible connections to the first game).

In our theoretical Royal Souls we could instead begin with the character (who isn’t a cursed undead) still finding themselves irresistibly drawn to the land of Drangleic. The player could then encounter the same mysterious lady who points them towards the same castle and tells them that the reason they have been drawn here is because they are destined to meet the King.

But wait! Without the undead curse how do we make the game work? Reviving when you die is a core part of the experience. And what about the bonfires? What do we use for check points if we don’t have the First Flame and bonfires from the Dark Souls series?

Well… what if we replaced the bonfires with ruined thrones that player can sit on? And when the player dies he returns to the last throne he sat upon?

You see, in Royal Souls the main driver of the plot wouldn’t be souls and humanity and curses and gods but instead the fact that the Royal Soul’s version of Drangleic is a mystic land that desperately needs a new king and naturally attracts people with the spark of royalty. The land itself then keeps them alive until they either go mad from their many deaths or finally achieve the goal of ascending to kinghood.

The four ancient souls the player needs to collect before opening the path to Drangleic Castle? They now become four royal souls, each belonging to a different king who at one time ruled Drangleic before falling into ruin and/or madness (which shouldn’t be a hard change since two of them fit that description anyways).

The player then eventually makes it to Drangleic Castle and discovers that the current king is mad or dying or cursed or maybe missing entirely. There’s some sort of final dramatic boss fight and the game ends with the player, having proven their worth, becoming the new king of Drangleic. The truth is finally revealed: The King they were questing to meet with was themselves all along.

And yet… after spending the entire game learning about the failures of a half dozen previous kings, can the player really say with any confidence that their reign will last? Maybe there is no such thing as a True Royal Soul.

So that basic plot sounds good enough. Gives the player a reason to explore a bunch of dungeons and has a nice but not too crazy twist ending. All that’s left to do now is flesh the world out with details about the various failed kingdoms. And since we’ve dropped all the Dark Souls references we have more than enough room to do so. Instead of “wasting” half of our equipment and most of our spells on references to Dark Souls we can make sure that every item description relates directly to one of the half-dozen kings of Drangleic.

For example, instead of pyromancy spells that constantly reference the old lore of Dark Souls we could have similar but new “Iron Works”, a unique brand of metal and fire themed magic invented during the reign Old Iron King. The player could then learn more about the Old Iron King by collecting Iron Works in the same way that Dark Souls 1 players learned more about the Witch of Izalith by learning pyromancies.

At this point you probably either think I’m crazy or are already half-way through your own redesign of the lore and setting of Dark Souls 2.

Either way it will certainly be interesting to see what happens with Dark Souls 3. They’ve brought back the original director and his recent work on Bloodborne shows he still knows how to tell an amazing standalone story. But can he pull off a sequel? Can he find a way to blend the lore he wrote in the original with the lore he wants to create for this third game?

I certainly hope so.

Open Worlds With Closed Plots

Open world games have become an incredibly popular genre and the industry has settled on a predictable formula for building them. You start by creating a decent sized world for the player to explore, usually a big city or a small country. You then fill that world with secrets to find, activities to do and optional mission to complete. You then finish up by introducing a series of connected, mandatory missions that work together to tell some sort of story.

Unfortunately, half the time the main story is the least entertaining part of the game.

Part of this is because open world games are hard to write for. Writers are used to linear stories where they can control what happens and when. Need tension? Put a bunch of tough challenges one right after another. Need urgency? Introduce a time limit. Want some relief? Tone down the enemies for a level or two.

But in an open world game? The pacing is all in the hands of the player. He might decide to follow along and do your “urgent” mission right away, or he might decide to spend five hours fishing and blow away whatever sense of dramatic tension you were trying to build. And while it is possible to write a story that makes sense regardless of whether it is done quickly or at a leisurely pace the truth is that most writers have yet to master the knack of producing such a flexible script.

But it’s not just story. There’s a real gameplay conflict between the freedom of the open world genre and the limits of mandatory plot missions. This leads to frustrated players who have gotten used to being able to pick and choose what they want to do and why only to suddenly find themselves forced into a specific type of gameplay or given a specific motivation they may or may not actually care about.

For instance, I spent most of my time in Watchdogs playing as the world’s sneakiest pacifist hacker and was rather annoyed when the game suddenly mandated that I murder several dozen mobsters in a literally explosive action scene. Sure, it was cool but that wasn’t how I wanted to play the game.

All of which makes me wonder… what if we built an open world game with no main plot? Just drop the player into the world, teach him what a sidequest marker looks like and then leave it completely up to him to pick and choose how to play the game. Don’t force a specific high-level goal on him or try to tell him what his character’s ultimate motivation is. Instead let every player blaze their own narrative into the world.

The Elder Scroll series and their Fallout cousins are actually pretty close to doing this. The main quest is already mechanically treated just like an extra big side quest and the manual is often eager to reassure you that nothing bad will happen if you decide to ignore the whole thing and go off and do your own thing instead. So why not go just one step further and drop that main quest entirely? Take the development time that would have gone into it to instead spice up as many of the side quests as possible.

Personally I think it’d be a blast.

Let’s Program A JavaScript Game 17: Can You Hear Me Now?

If I Wanted To Do Legal Research I Would Have Been A Lawyer

Today we’re going to be adding music and sound effects to our game.

But we need to start with a quick reminder that using copyrighted music and images in your games is illegal. It’s also pretty tacky. Nobody is impressed by the fact that your game uses the battle music from Final Fantasy 7. And don’t get me started on all those Taylor Swift* tracks you slipped into the pause menu.

One way around this problem is to pay people for the right to use their music. You can also find a lot of people on the Internet who give their music away for free. Either way there are two big questions you need to get answered:

Commercial VS Non-Commercial

Want to sell your game? Maybe have some ads so you get paid every time someone plays it for free? Then you need to make sure any art, music or code that you got from other people has been cleared for “Commercial Use”. In other words, make sure you have the original author’s permission to use their work to help you make money.

This is important because MOST of the free art and music you can find online (and even some of the paid stuff) is “Non-Commercial Use Only”. If a game uses even one piece of “Non-Commercial” media it’s now illegal to sell it or even attach advertisements to it. You might even get in trouble for just giving it away for free on a website that has it’s own ads.

Doing a school project or building a game to share with friends? Non-Commercial is fine.

But if you want the freedom to do whatever you want with your game make sure everything you use is cleared for Commercial Use.

Attribution Requirements

The other big legal aspect of using other people’s art, music or code is that they usually require you to give them credit. For a game this usually means including their name in the end credits and in any “readme” files that you might have. Some authors just want a simple mention of their name while others have entire legal phrases they want you to copy and past into your product.

Of course, some authors don’t care.

Either way before you publish your game you need to make sure you know which author’s do and don’t require attribution.

Let’s Find Some Free Stuff!

For today’s project we need two things: Some background music for our main game and a sound effect for when the player is grazing viruses.

For the background music we’re going to head to Kevin MacLeod’s website.

MacLeod releases all of his music under a “Free Commercial Use With Attribution” license. That means you can use the music from his website for whatever you want as long as you remember to give him credit in your project.

Also, he’s one of those authors who has a very specific request on how he wants his attribution to show up. So if I want to use “Ouroboros” from his electronica section (and I do) I’ll have to include this in my game:

“Ouroboros” Kevin MacLeod (incompetech.com)
Licensed under Creative Commons: By Attribution 3.0

http://creativecommons.org/licenses/by/3.0/

For sound effects we’re going to go to Wikimedia Commons, a giant database of free sounds and pictures with a wide variety of licenses.

The sound effect I chose can be found here (though I renamed the file wubwub.ogg for my game). You’ll notice that its license is “Public Domain”. That means this particular sound now belongs to everyone and can be freely used for commercial products with no need to give credit to anyone.

Public Domain is a really convenient source of video game art and music, but it can also be difficult to find because it requires an author to completely give up ownership of his work.

Public Domain is most common with works of art that have outlived their copyright. Classic music, ancient artwork, old books and so on. But just because something is several decades old doesn’t mean it’s automatically Public Domain! Laws are constantly changing and copyright now lasts longer than ever so double check the legal status of any “old” media you want to use in your game.

Quick Sound File Edits

MacLeod’s music comes in mp3 format, but for JavaScript purposes it’s better to use the “ogg” format. It has slightly more cross-browser support at the moment. (OOPS! That’s not true. See here)

Also, the sound effect from Wikimedia also has an obnoxious pause at the end of the file that makes it impossible to loop.

A couple minutes with Audacity is enough to convert the mp3 to ogg and trim off the extra space from the sound effect. You can do this yourself or wait for me to post the complete game and borrow my copy of each file.

Can We Start Programming Yet?

The boring legal stuff is out of the way now. Time to write some actual code!

This time around we’re going to be using the Audio class. This lets us build objects for loading and playing sound files.

First things first: we’re going to need two global variables to hold our music and sound effect.

var bgMusic;
var grazeSFX;

Now to put our sounds into those variables. Just like with the image files we want to make sure that the music is properly loaded before we start the actual game.

One big difference is that Audio objects don’t have an onload function that triggers when they fully load. Instead they have an oncanplaythrough function that triggers when enough of the file has loaded that it can be safely played while the rest of the file keeps loading in the background.

With that in mind we can rewrite our resource loading chain to include a new loadGrazeSFX and loadBackgroundMusic function:

function startGame(){
   loadCycleImage();
}

function loadCycleImage(){
   cycleImage = new Image();
   cycleImage.onload=function(){loadVirusImage();};
   cycleImage.src='cycle.png';
}

function loadVirusImage(){
   virusImage = new Image();
   virusImage.onload=function(){loadGrazeSFX();};
   virusImage.src='virus.png';
}

function loadGrazeSFX(){
   grazeSFX = new Audio();
   grazeSFX.oncanplaythrough = function(){ grazeSFX.oncanplaythrough=0; loadBackgroundMusic();};
   grazeSFX.src = 'wubwub.ogg';
   grazeSFX.loop=true;
}

function loadBackgroundMusic(){
   bgMusic = new Audio();
   bgMusic.oncanplaythrough = function(){bgMusic.oncanplaythrough=0;gameLoop();};
   bgMusic.src = 'Ouroboros.ogg';
   bgMusic.loop=true;
}

You probably noticed that there are a couple differences between our audio loading functions and our image loading functions.

When setting up the audio files we set the loop property to true. This means that the music and sound effect will automatically restart after they reaches the end. This is obviously useful for a game that lasts longer than the soundtrack.

Now most of the time you don’t want sound effects to repeat. One gunshot should have one “bang” noise, not a constant loop of “bangbangbangbang….”. But we want our “wubwub” to play for as long as the player is grazing a virus so it actually makes sense to let it loop.

The other big difference is that our oncanplaythrough function deletes itself as soon as it runs. This is because oncanplaythrough can actually trigger more than once. Since we use these triggers to start the game loop multiple triggers would result in multiple game loops and really mess the game up. Having the trigger clear itself after running once prevents this.

One, Two, Three, Hit It!

Now that we have a pair of audio objects we can control them using handy functions like play, pause, and fastSeek. Play and pause do exactly what you’d expect while fastSeek is used for skipping to different points in an audio file. Most importantly for us fastSeek(0) rewinds a sound clip back to it’s start. (OOPS AGAIN! Don’t use fastSeek. See here for more details).

But where should we put these functions?

I personally only want music to play during the main game and to stop as soon as the player dies. This means the most logical place to first play the music is during the transition from the start screen to the end screen:

//Check to see if the user is ready to start the game
function updateStartScreen(){
   if(playerInput.up){
      initializeGame();
      gameState = STATE_RUNNING;
      bgMusic.play();
   }
}

And to get it the music (and sound effects) to stop on a game over we want to include a pause and fastSeek(0) anytime the player dies. That means an update to some of the last few if statements in updateGame:

//Gameover if the player falls off the screen or has hit a virus
if(player.y > SCREEN_HEIGHT){
   bgMusic.pause();
   bgMusic.fastSeek(0);
   grazeSFX.pause();
   grazeSFX.fastSeek(0);
   gameState = STATE_GAMEOVER;
}

if(deathCollision){
   bgMusic.pause();
   bgMusic.fastSeek(0);
   grazeSFX.pause();
   grazeSFX.fastSeek(0);
   gameState = STATE_GAMEOVER;
}

Everytime the player dies the music stops and is rewound back to the start for the next run.This code also stops and rewinds our sound effects… but when did they start in the first place? I guess that’s what we should code next.

Logically we want the sound effect to play as long as the player is grazing and virus and stop as soon as he isn’t. That suggests an update to the graze logic in updateGame:

if(grazeCollision){
   if(currentFrameCount % FRAMES_PER_POINT == Math.floor(FRAMES_PER_POINT/2)){
      currentPoints++;
   }
   if(grazeSFX.paused){
      grazeSFX.play();
   }
}
else{
   if(!grazeSFX.paused){
      grazeSFX.pause();
      grazeSFX.fastSeek(0);
   }
}

And that’s it. The game now has sound and music.

It’s Almost Like A Real Game

It’s amazing how much difference a good soundtrack makes to a game. To be honest the rest of the game actually feels pretty lame compared to MacLeod’s work. But hey, it’s an educational demo. What did you really expect.

Anyways, with that complete all that’s really left are a few more game tweaks and some special effects. Stay tuned!

* A singer that was recently famous for being… good? Bad? Easy to parody? I wasn’t really paying attention but I saw her name on the Internet once.

Let’s Program A JavaScript Game 14: A Winner Is You

Anybody Remember The Point Of This Game?

Way back in our game design segment we decided that our game is about a program (the player) defragmenting a hard drive. In order to win the player just has to stay alive long enough to rack up 1000GB of defrag points. The player can earn bonus defrag points by grazing viruses, allowing skilled players to complete the game with faster times.

Today we’re going to build that.

Keeping Score

In order to have a game about building up points until you win we obviously need to keep track of both how many points the player currently has and how many total points they need. We also want to know how long it took them to win. This is easy enough with a handful of global variables added up near the top of our script. Maybe right after all of our collision variables:

var currentFrameCount; //Keep track of how long it takes the player to
var currentPoints;
var TOTAL_POINTS_TO_WIN = 100;

Eventually we will want TOTAL_POINTS_TO_WIN to be one thousand, but for testing purposes let’s keep it low for now.

Since currentPoints and currentFrameCount get set back to zero every time the player loses we should set their value inside of the initializeGame function. I put it right after the code that resets the player’s location:

//Reset player location
player.x = 100;
player.y = 100;
player.yVel = 0;
player.onGround = false;

//Reset points and time
currentFrameCount=0;
currentPoints=0;

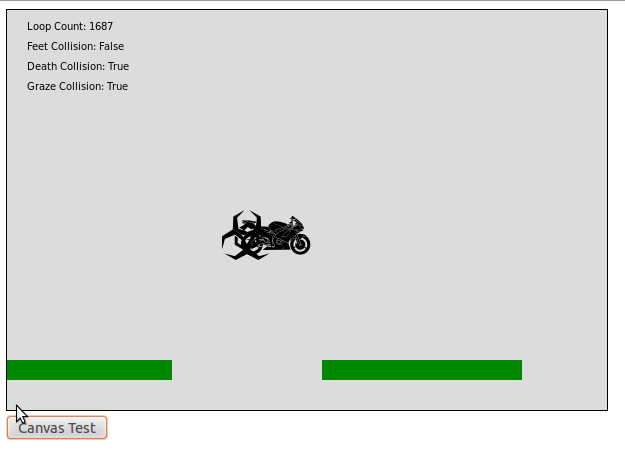
And finally let’s show this all to the player by updating our drawScreen function. Instead of printing out debug information about loops and collisions we’ll now print out the player’s current time and points so far by replacing this:

//Draw black text
context.fillStyle = '#000000';
context.fillText("Loop Count: "+loopCount, 20, 20);

if(feetCollision){
   context.fillText("Feet Collision: True", 20, 40);
}
else{
   context.fillText("Feet Collision: False", 20, 40);
}

if(deathCollision){
   context.fillText("Death Collision: True", 20, 60);
}
else{
   context.fillText("Death Collision: False", 20, 60);
}

if(grazeCollision){
   context.fillText("Graze Collision: True", 20, 80);
}
else{
   context.fillText("Graze Collision: False", 20, 80);
}

With this:

//Draw black text
context.fillStyle = '#000000';

//One frame should take 1/20 of a second
//For scoring purposes assume this is true even if the player is lagging
var time = currentFrameCount/20;
context.fillText("Time: "+ time.toFixed() + " seconds", 20, 20);
context.fillText("Progress: "+currentPoints+" out of "+TOTAL_POINTS_TO_WIN+" GB Defragged", 20, 40);

How Much Is A Point Worth?

Now that we have time and score variables we just have to figure out a good way to fill them up.

Time is easy enough. We just increase our frame count variable once per loop and we’re done.

function updateGame(){
   loopCount++;
   currentFrameCount++;
   // The rest of the function stays the same

Deciding how to update points is a little bit harder.

There are 20 frames per second in our game, so giving the player one point per frame would let them win the entire game in a mere 50 seconds. I think that’s a bit shorter than what we were hoping for.

So how long should the game last?

For a silly little web toy like this you can’t really expect players to concentrate for more than about three minutes.

Now if we give the player one point every 4 frames it will take them 4000 frames to collect the 1000 points they need to win. At twenty frames per second this is three and one third minutes and is a little bit longer than we want.

Or is it? Remember that players can graze to earn bonus points, which should shave half a minute or more off of the average player’s time. That cuts our three and one third minutes back down under the three minute limit.

So let’s try one point every four frames and see how that feels:

//Update the game by one step
function updateGame(){
   loopCount++;
   currentFrameCount++;
   if(currentFrameCount % 4 == 0){
      currentPoints++;
   }
   //Rest of the function doesn't change

Here we use the % “modulus” operator to find out whether or not the current frame count is evenly divisible by 4. If you’ve never used %, it just tells us what the remainder is from a piece of division. Example: 5 % 4 = 1, 7 % 4 = 3, 8 % 4 = 0, 122 % 4 = 2

Anyways, after giving the code a whirl I think that one point every four frames feels about right. The number goes up fast enough to feel satisfying but not so fast that the lowest digit is a mere blur.

Living Life On The Edge

Next goal is to implement bonus points from grazing. Exactly how many points grazing should be worth will take some experimentation but I’m going to start by having grazing be worth one point every four frames. That’s the same as our normal point rate and means that grazing will basically double your points per second.

Since we already keep track of grazing using the handy grazeCollision variable all we have to do to get graze points is copy our point code into a quick if statement somewhere near the end of updateGame. I put mine right before the code that checks if you’ve fallen off screen.

//Award bonus points if the player is grazing a virus
if(grazeCollision){
   if(currentFrameCount % 4 == 0){
      currentPoints++;
   }
}

Hmmm… this technically works but I don’t like how the score feels. It’s hard to tell at a glance that grazing makes you earn two points every four frames instead of the normal one. After all, the score is still being updated at the same old rate.

It would be much better if grazing made the player earn one point every two frames instead of two points every four frames. It’s mathematically the same but splitting the points up will make the score counter roll over faster and make it obvious the player is earning a bonus.

Making this happen is as simple as changing our bonus point code to kick in only when currentFrameCount is two frames past an even division by four. This way our normal points will kick in every fourth frame and our graze points will kick in two frames later.

//Award bonus points if the player is grazing a virus
if(grazeCollision){
   if(currentFrameCount % 4 == 2){
      currentPoints++;
   }
}

Victory

We’ve got points. We’ve got bonus points. All that’s left is popping up a victory screen when the player wins, which isn’t really all that different than the game over screen we’ve already designed.

First, we add some code to end of updateGame to check whether or not the player has enough points to win. If he does, we switch game state.

if(deathCollision){
   gameState = STATE_GAMEOVER;
}

if(currentPoints >= TOTAL_POINTS_TO_WIN){
   gameState = STATE_WIN;
}

And then we just write some quick code to handle the winning state.

//Check to see if the user is ready to restart the game
function updateWinScreen(){
   if(playerInput.up){
      gameState = STATE_START_SCREEN;
   }
}

//Show the player how long it took them to win the game
function drawWinScreen(){
   var canvas = document.getElementById('gameCanvas');
   var context = canvas.getContext('2d');

   //Draw background
   context.fillStyle = '#000000';
   context.fillRect(0,0,600,400);

   //Draw green text
   context.fillStyle = '#00CC00';
   context.font = 'bold 80px impact';
   context.fillText("YOU WIN!", 60, 100);
   
   context.font = 'bold 20px impact';
   var time = currentFrameCount/20;
   context.fillText("You defragmented the hard drive in "+ time.toFixed(1) + " seconds", 20, 200);
   context.fillText("Graze more viruses to improve your time", 20, 250);

   context.font = '30px impact';
   context.fillText("Press UP arrow to retry", 120, 350);
}

It’s up to you whether you want to keep these two functions next to each other in the code or split them up so all the “update” functions are next to each other and all the “draw” functions are next to each.

Anyways, with those two functions all that’s left is updating the main gameLoop function to properly call them when we’re in the winning state:

//The main game loop
function gameLoop(){
   var startTime = Date.now();
   
   if(gameState == STATE_START_SCREEN){
      updateStartScreen();
      drawStartScreen();
   }
   else if(gameState == STATE_RUNNING){
      updateGame();
      drawScreen();
   }
   else if(gameState == STATE_GAMEOVER){
      updateGameover();
      drawGameoverScreen();
   }
   else if(gameState == STATE_WIN){ //This is the new one!
      updateWinScreen();
      drawWinScreen();
   }
   else{ //Fix the game if we somehow end up with an invalid state
      gameState = STATE_START_SCREEN;
   }

   var elapsedTime = Date.now()-startTime;
   if(elapsedTime>=50){ //Code took too long, run again immediately
      gameLoop();
   }
   else{ //Code didn't take long enough. Wait before running it again
      setTimeout("gameLoop()",50-elapsedTime);
   }
}

And that’s that. You can test play the game and actually win now.

Kicking Things Up A Notch

It’s nice that everything works now, but the game is a little on the easy side with predictable enemies and small gaps. So next time I’ll be adding challenge by randomizing the platforms and enemies and even improving the game so that it gets more difficult the closer the player is to winning.

Let’s Program A JavaScript Game 13: Some Much Needed Polish

This Is Only The Beginning…

Our code so far makes a good proof of concept. We’ve shown that we can indeed move the player around, land on platforms, crash into enemies and switch between different game states. In other words, we can safely say that it is possible to build our game using JavaScript.

But our code also has a lot of problems, glitches and loose ends. So today we’re going to be cleaning those up and starting the transition from “Semi-functional Prototype” to “Product You Wouldn’t Be Embarrassed To Show Your Friends”.

As part of this we’re going to be rewriting a TON of code. But don’t worry, I’ll post a link to a live version of code at the end of this article so if you have trouble following my description of what I’m doing you can just grab the complete code and take a look for yourself.

Wait! I’m Not Ready Yet

Here’s an interesting little fact for you: When you use JavaScript to assign an image to a variable the code doesn’t stop and wait, it keeps running and loads the image in the background. That means that your code might accidentally try to use an image that hasn’t finished loading yet, which is bad.

Now in a simple game with just a couple small images this probably isn’t a problem. But if you have a big background image or lots and lots of tiles and enemies and animations you might end up with a game that tries to run while 90% of its graphics are still being loaded.

To avoid this problem we’re going to have to tell our code specifically to not run any actual game logic until after the images are finished loading. An easy way to do this is with the onload property of the JavaScript image object. This lets you attach a function to an image and have that function run once the image finishes loading.

Using this we can chain together our images like this:

var cycleImage = new Image();
var virusImage = new Image();

function canvasTest(){
   loadCycleImage();
}

function loadCycleImage(){
   cycleImage = new Image();
   cycleImage.onload=function(){loadVirusImage();};
   cycleImage.src='cycle.png';
}

function loadVirusImage(){
   virusImage = new Image();
   virusImage.onload=function(){gameLoop();};
   virusImage.src='virus.png';
}

Now canvasTest doesn’t immediately start the game but instead calls loadCycleImage. loadCycleImage loads cycle.png and then calls loadVirusImage, which load virus.png and then starts the game loop.

Now obviously the more images you have the longer this chain gets, which introduces two problems: First, a long chain is hard to maintain by hand. Second, a large chain leaves your game “frozen” for several minutes since nothing gets drawn to the screen until the chain has completed.

You can solve the code maintenance problem by writing a new recursive function that accepts an entire list of image objects and object URLs. It sets up the first image to loading and when it’s done it then calls itself with the rest of the lest. When the list is finally empty it calls gameLoop() instead. This lets you have one function and one loop instead of having to hand type a hundred different loading functions that chain into each other.

The “frozen” game problem is easy too. Just write some sort of drawResourceLoadingScreen screen function that displays a helpful message like “Now loading image X out of 45”. Call that method at the beginning of every step of the chain so the user knows why the game hasn’t started yet.

But since I’m only loading two images I’ll leave both of these tasks as exercises for the reader.

Initialization: One of Top Ten Most Computer Programmy Word Out There

Let’s continue with this theme of “Things we shouldn’t just leave at the top of our script” and talk about initializing game objects.

Before our games starts we obviously need to generate the player’s position, the starting platforms and the starting viruses. Currently we do that all up at the top of code.

But this means that our game only gets set up once, when the player loads the page. This is the reason why the player can get stuck inside a virus after a game over. Once the virus is in play it stays in play no matter how many times the player dies and respawns.

It would be much better if the game was reset every time the player switched from the start screen to the main game. Then instead of getting stuck inside a virus the player would get a fresh virus-free start when they died.

This is an easy problem to refactor. We just grab the setup code from the top of the script and stuff it into a function named initializeGame. Then we call initialize game right before we switch to the main game state.

The only possible trick is that it’s important to remember that global variables like players, platforms and viruses need to stay at the top of the script so our game functions can share them. We’re only moving the code that sets their values into a function, the declarations can stay put.

//Put the player in the starting location and generate the
//first platforms and enemies
function initializeGame(){
   //Reset player location
   player.x = 100;
   player.y = 100;
   player.yVel = 0;
   player.onGround = false;

   //Generate starting platforms into global array
   //Uses global variables to control platfrom generation
   for(i = 0; i < maxPlatformCount; i++){
      var newPlatform = new Object();
      newPlatform.x = i * (maxPlatformLength + maxPlatformGap);
      newPlatform.y = 350;
      newPlatform.width = maxPlatformLength;
      newPlatform.height = 20;
      platforms[i] = newPlatform;
   }

   //Generate starting viruses into global array (all off screen at first)
   //Uses global variables to control virus generation
   for(i = 0; i < maxVirusCount; i++){
      var newVirus = new Object();
      newVirus.x = virusStartingOffset + i * (virusWidth + maxVirusGap);
      newVirus.y = 200;
      newVirus.width = virusWidth;
      newVirus.height = virusHeight;
      viruses[i] = newVirus;
   }
}

And then we just have to slip a reference to this code into our startScreenUpdate function:

//Check to see if the user is ready to start the game
function updateStartScreen(){
   if(playerInput.up){
      initializeGame();
      gameState = STATE_RUNNING;
   }
}

Side note: Initializing a game can take a long time, especially if you have to load new graphics or run an expensive algorithm. In these scenarios it’s considered polite to put up a “Loading” screen so the player knows the game isn’t stuck.

Since we’re only initializing a few dozen values this function will run too fast to notice, making a loading screen pointless. But if you were making a more complex game you might want to build a simple “Initializing next stage” screen drawing function and add it right before the initialize call.

Fixing A Few Minor Issues

That’s it for our big two problems, but as long as we’re disecting code let’s fix a few tiny bugs I noticed.

First off, the player shouldn’t be allowed to move off screen. So let’s add this code somewhere inside updateGame

//Keep the 75px wide player inside the bound of the 600px screen
if(player.x<0){
   player.x=0;
}

if(player.x+75>600){
   player.x=600-75;
}

Good programmers will notice that these functions use a crazy amount of magic numbers. It would probably be a good idea to replace them by constant variables like PLAYER_WIDTH and SCREEN_WIDTH.

Another quick issue: The player can currently do an air jump by falling off a platform and then hitting up. This is because we only set “onGround” to false when the player jumps. So let’s update our code to set that to false whenever the player starts moving downwards by changing this:

player.y += player.yVel;
player.yVel +=1;
if(player.yVel>=15){
   player.yVel=15;
}

into this:

player.y += player.yVel;
player.yVel +=1;
//Assume player is no longer on groud. Platfrom collision later in loop can change this
player.onGround=false;
if(player.yVel>=15){
   player.yVel=15;
}

The positioning of this code is very important! It comes AFTER the player tries to jump but BEFORE the platform collision code that sets onGround to true.

This means that if the player was on a platform at the end of last frame he can still jump because the onGround false code hasn’t kicked in yet.

It also means that if the player stays on a platform for the entire loop the onGround false code will be immediately reversed by the platform checking code that comes after it, so the player can still jump next frame even though onGround was temporarily false.

The only way for onGround to get set to false and stay false is if the player isn’t on a platform, which is exactly what we wanted. In fact, this works so well that you can remove the onGround=false from the up key handling code if you want. It’s redundant now.

As long as we’re changing things up, let’s have all viruses spawn at y=300 instead of y=200. This puts them at about the same level as the player and makes jumping over them easier during testing.

Finally, having to click a button just to start the game doesn’t make a lot of sense now that we have an actual Start Screen. So let’s rename canvasTest to startGame and link it to the loading of the page instead of a button press.

<body onload="startGame()" onkeydown="doKeyDown(event);" onkeyup="doKeyUp(event);">
   <canvas id="gameCanvas" width=600 height=400 style="border:1px solid black;"></canvas>
</body>

The Code So Far

Here it is. Play it. Download it. Study it.

I Want To Be A Winner

With the game a little bit cleaner than before we’re all set to add in a scoring system and a win condition. Then we’ll be able to actually beat our game instead of just jumping over the same boring obstacles again and again until we get bored.

Let’s Program A JavaScript Game 12: Making A STATEment

I’m Pretty Sure This Is What That Word Means…

There are two common definitions of “Game State”. At least two that I’ve heard. Who knows whether or not the big time developers use these. But my blog, my definitions. So… Game State:

The first definition is: A complete description of exactly what is going on in the game including the value of every variable. Very useful for creating save files or debugging glitches.

The second definition is: A high level description of what the game is currently doing, such as “paused”, “saving”, “in combat” or “showing world map”.

Our big focus today is going to be on the second definition, which is going to help us add a “Start Screen” and “Game Over Screen” to our current code. Or in other words, we are going to change from a game that only has one state (running) to a game that has three states (start, game over, main game).

But it’s not enough to have different game states. You also need a plan for switching between those game states. How does the player get to the “game over” state? Once he is in the “game over” state, how can he get back into the “main game” state? That sort of stuff.

This can all be described pretty well with a quick flowchart. Here’s an example of the four game states we want for Defrag Cycle and how they are related (although we’re only building three of them today:

Everybody Loves Flowcharts!

Everybody Loves Flowcharts!

Pretty simple, right?

Of course, not all games are so straightforward. For example, here is a sample state chart for a generic RPG:

Whoops, looks like I forget to add a “game over” state, so let's just pretend this chart is for one of those games where losing a fight just sends you to the nearest hospital/temple/inn.

Whoops, looks like I forget to add a “game over” state, so let’s just pretend this chart is for one of those games where losing a fight just sends you to the nearest hospital/temple/inn.

Bonus Activity: Take your favorite game and try to draw a game state flowchart for it. Pay special attention to the transitions between states. Try to figure out which transitions go both ways (you can go from main game to pause screen and pause screen to main game) and which are one way (you can go from main game to game over, but it’s a one way trip).

Simple State Switching

First up we’re going to need a global variable for keeping tack of what state the game is in, along with some predictable values for the states themselves. So let’s just stick this somewhere near the top of our script along with the rest of our global variables and setup code:

//Game State "constants" (Javascript does not support true constants)
var STATE_RUNNING = 1;
var STATE_START_SCREEN = 2;
var STATE_GAMEOVER = 3;
var STATE_WIN = 4;

//Current Game State. Start game in "Start Screen" state
var gameState = STATE_START_SCREEN;

Now to put those states to good use. Update your gameLoop function like this:

//The main game loop
function gameLoop(){
   var startTime = Date.now();
   
   if(gameState == STATE_START_SCREEN){
      updateStartScreen();
      drawStartScreen();
   }
   else if(gameState == STATE_RUNNING){
      updateGame();
      drawScreen();
   }
   else if(gameState == STATE_GAMEOVER){
      updateGameover();
      drawGameoverScreen();
   }
   else if(gameState == STATE_WIN){
      // We'll implement this later
   }
   else{ //Fix the game if we somehow end up with an invalid state
      gameState = STATE_START_SCREEN;
   }

   var elapsedTime = Date.now()-startTime;
   
   if(elapsedTime>=50){ //Code took too long, run again immediately
      gameLoop();
   }
   else{ //Code didn't take long enough. Wait before running it again
      setTimeout("gameLoop()",50-elapsedTime);
   }
}

Can you see what we’re doing? The main gameLoop logic is the same as always. Make a note of what time it is, do some useful work, see how much time has passed and then decide when to run the next gameLoop. The big difference is that we now use the gameState variable to decide what kind of useful work we do.

When the state is STATE_RUNNING we just run the same old updateGame and drawScreen logic that we’ve already written. No need to make any changes here, unless you want to give them better function names like updateMainGame or updateRunningGame or something. I’m not going to mess with that just right now.

When the state is instead set to the start screen or the gameover screen we skip the game updates and instead run new functions specifically designed for those states. Functions that we haven’t written yet, but will in just a second.

As a side note, state switching like this can be an easy way to do pause screens. The main game update function only gets called during STATE_RUNNING, so by switching to a different state you can basically freeze the game world by preventing enemy and player position variables from updating.

New Code For Our New States

So… what should a start screen and an gameover screen actually do?

It seems to me a simple online game startscreen needs to do three things:

  1. Show the game’s title
  2. Explain how to play
  3. Explain how to move from the start screen to the main game

Similarly a gameover screen has two jobs:

  1. Show a gameover message
  2. Explain how to move from the gameover screen back to the start screen

In a real game we would hire a real artist to design some attractive screens for us. They would probably choose some lovely fonts and throw together a cool background filled with lasers and explosions.

But this is a game programming tutorial, not a game design tutorial, so I’m just going to throw together some text and call it a day.

//Draw the start screen with game title and instructions
function drawStartScreen(){
   var canvas = document.getElementById('gameCanvas');
   var context = canvas.getContext('2d');

   //Draw background
   context.fillStyle = '#dcdcdc';
   context.fillRect(0,0,600,400);

   //Draw black text
   context.fillStyle = '#000000';
   context.font = 'bold 70px impact';
   context.fillText("DEFRAG CYCLE", 20, 150);
   context.font = '20px impact';
   context.fillText("- Defrag the hard drive by avoiding pits and viruses", 20, 200);
   context.fillText("- When the counter reaches 1000 GB you win!", 20, 230);
   context.fillText("- LEFT and RIGHT arrow keys to move", 20, 260);
   context.fillText("- UP arrow key to jump", 20, 290);
   context.fillText("- Graze viruses to speed up the defrag counter", 20, 320);
   context.fillText("- Press UP arrow key to start game", 20, 350);
}

//Draw the gameover screen
function drawGameoverScreen(){
   var canvas = document.getElementById('gameCanvas');
   var context = canvas.getContext('2d');

   //Draw background
   context.fillStyle = '#000000';
   context.fillRect(0,0,600,400);

   //Draw green text
   context.fillStyle = '#00CC00';
   context.font = 'bold 80px impact';
   context.fillText("GAME OVER", 40, 200);
   context.font = '30px impact';
   context.fillText("Press UP arrow to retry", 120, 250);
}

Now all that’s left to do is fill in those two new update methods, which is really easy since all they do is check for the up key and then switch states (remember the flowchart):

//Check to see if the user is ready to start the game
function updateStartScreen(){
   if(playerInput.up){
      gameState = STATE_RUNNING;
   }
}

//Check to see if the user is ready to restart the game
function updateGameover(){
   if(playerInput.up){
      gameState = STATE_START_SCREEN;
   }
}

And with that the game now starts on the start screen and can be transitioned to the main game by tapping up. We’ve also built in the link between the gameover screen and then start screen. All that’s left is to link in the main game to the gameover screen.

Once again this is pretty easy. We already have a deathCollision flag that’s being set everytime we hit a virus and we already check to see if the player has fallen off the bottom of the screen. All we have to do is find inside the main updateGame function (it’s right at the bottom):

//Reset the player to default location when they fall off the screen
if(player.y > 400){
   player.x = 100;
   player.y = 100;
}

And change it to this:

//Gameover if the player falls of the screen or has hit a virus
if(player.y > 400){
   player.x = 100;
   player.y = 100;
   gameState = STATE_GAMEOVER;
}

if(deathCollision){
   gameState = STATE_GAMEOVER;
}

And now the game can flow between all three different states. Just ram yourself into a virus or fall into a pit and watch that transition to gameover.

This Is Actually Pretty Terrible

So… those of you who tried out your updated code probably noticed that it’s a little rough around the edges. Actually, that’s an understatement. These edges are downright serrated:

  • You can see the cycle jerk back into default position after falling off the screen but right before the game over message
  • Even if you just tap the up arrow key it will usually skip through both the gameover and start screen too fast to see
  • If you hit a virus you will immediately hit it again after you restart the game

This is obviously not anywhere near playable. But our goal was just to get the state switching working and that we have done!

Next time around we’ll start cleaning up some of these issues in preparation for adding the scoring system and a way to actually win.

Let’s Program A JavaScript Game 11: This Post Isn’t About Malware, Honest

Let’s Get Dangerous

We have a cycle for the player and an endlessly scrolling screen of platforms for them to jump along. The only piece we’re missing are the deadly virus enemies for the player to avoid.

Viruses are going to be implemented more or less the same as platforms. We’ll have an array of viruses that scroll that to the left. When a virus has moved entirely off screen we drop it from the front of the list and then pin a new virus to the back of the list. In the future we will randomize the location and timing of new viruses to make things a little less predictable but for now a couple viruses marching in a steady line will let us test everything we need to test.

Writing Simple Enemies

The code for the virus obstacles is almost identicle to the code for the platforms. Generate an array of objects, move them a little to the left every frame and check for collisions with the player. So nothing here should be especially mind blowing.

First up, we generate the original list of viruses at the top of code by putting this code right after the platform setup code:

var viruses = new Array();
var virusStartingOffset = 1000;
var maxVirusCount = 2;
var maxVirusGap = 400;
var virusWidth = 50;
var virusHeight = 50;

//Generate starting viruses (all off screen at first)
for(i = 0; i < maxVirusCount; i++){
   var newVirus = new Object();
   newVirus.x = virusStartingOffset + i * (virusWidth + maxVirusGap);
   newVirus.y = 200;
   newVirus.width = virusWidth;
   newVirus.height = virusHeight;
   viruses[i] = newVirus;
}

You also need to include this image related code somewhere so we can draw the viruses. I suggest putting it right after the cycle image code:

var virusImage = new Image();
virusImage.src = "virus.png";

Next up is adding virus code to the updateGame method. Just drop this in right after the big block of platform code:

//Virus logic
for( i = 0; i < viruses.length; i++){
   //Have all viruses move towards the player
   viruses[i].x-=5;
   
   //See if the player is grazing this virus
   if(intersectRect(viruses[i], grazeHitbox)){
      grazeCollision = true;
   }

   //See if the player has had a lethal collision with this virus
   if(intersectRect(viruses[i], deathHitbox)){
      deathCollision = true;
   }
}

//Remove viruses that have scrolled off screen and create new viruses to take their place
if(viruses[0].x + viruses[0].width < 0){
   //Drop first virus by shifting entire list one space left
   for( i = 0; i < viruses.length-1; i++){
      viruses[i] = viruses[i+1];
   }

   //Add new platfrom to end of list by placing it a certain distance after second to last platfor
   var newVirus = new Object();
   newVirus.x = viruses[viruses.length-2].x + virusWidth + maxVirusGap;
   newVirus.y = 200;
   newVirus.width = 50;
   newVirus.height = 50;
   viruses[viruses.length-1] = newVirus;
}

And finally we draw the viruses by adding this simple loop somewhere in our drawScreen method

//Draw viruses
for(i = 0; i < viruses.length; i++){
   context.drawImage(virusImage, viruses[i].x, viruses[i].y);
}

That’s it. You now have a couple of virus obstacles scrolling across the screen along with the platforms. You can jump near them and into them and watch your “graze” and “death” collision status change. These collisions won’t actually do anything yet, but just keeping track of them is the first step towards building a real game-over and bonus point system.

Both “Graze Collision” and “Death Collision” are true, showing we got just a little too close during this test

Both “Graze Collision” and “Death Collision” are true, showing we got just a little too close during this test

Why We Did What We Did

This entire branch of code was mostly just copy pasting the platform code and then renaming the variables, so no big ideas need to be explained. But there was one tiny design decisions that I think deserve a little extra analysis: Why did we give each virus a specific height and width instead of just using the height and width of the global virus image?

Two big reasons.

Reason one: Our collision detection function expects to be given two rectangle like objects that know their own x position, y position, width and height. Giving every virus a copy of this information means we can drop them directly into the collision detection function.

Reason two: We may not want our viruses to always be the same size as their picture. In the future we might decide that we want the virus’s collision box to be smaller than the virus picture in order to make collisions easier to avoid. So by keeping the virus’s height and weight independent form the size of the graphics we draw we give ourselves the freedom to make major changes in the future without breaking anything.

Next Up: Game-Over

With most of the basic game mechanics in place the next thing to do is finally let player’s lose, which is a surprisingly big tasks since it means we will have to introduce ideas like “game states” and “multiple possible screen renderers”.

But don’t worry, it’s actually a pretty simple once you get into it. And it involves flowcharts! Everyone loves flowcharts!

Announcement: Immortals Should Try Harder Beta Release

As a child I promised myself I was going to program video games when I grew up. It’s actually why I got into computer science in the first place. And while I have since learned that games aren’t the only cool thing you can do with code I still have a soft spot in my heart for that childhood dream.

Which is why I’m happy to announce the test release of Immortals Should Try Harder, a comedy fantasy RPG that I’ve been slowly but steadily working on in my free time.

I think it turned out pretty decent for a hobby game with no actual budget, so if you have a few hours to burn why not give it a try? And please don’t hesitate to contact me with bug reports, game criticisms or any other sort of comment or concern.

Let’s Program A JavaScript Game 9: Look Before You Leap

Avoiding Un-win-able Games


Now it’s time to actually put together a stage, with gaps for the player to jump over and everything.


The most important element here is making sure that the gaps are small enough that the player can always jump over them. It’s neither fun nor fair to hit the player with an impossibly large obstacle.


So that means we have to figure out how far the player can jump, which depends on two things: 1) How long the player is in the air 2) How fast the player is moving forward while in the air.


For example, if the player’s jump leaves him in the air for two seconds and the player is moving 100 pixels per second the player can safely jump a 200 pixel gap.


Now we already know that our player can move 5 pixels to the left or right per frame. But to figure out how long they can stay in the air we’re going to need to do a little math.


You might remember from physics that a moving object’s position can be described by the equation: current position = starting position + velocity * time + ½ acceleration * time^2.


Now this equation doesn’t quite match our frame-based game world physics, but it will still give us a close estimate. So let’s plug in some numbers and find out how long it takes for an object to reach the ground (position 0) if it starts at position 0 with a velocity of -15 pixels per second and an acceleration of 1 pixel per second per second.


0 = 0 – 15t + ½t^2.

15t = ½ t^2

15=1/2t

t=30


According to this our cycle’s jump takes 30 frames, or about a second and a half, to complete. And from testing the code so far that feels about right.


So 30 frames of airtime while moving 5 pixels to the right per frame means our cycle can move 150 pixels in one jump.


To test this I’m going to shrink the current “ground” testObject to only fill a third of the screen and then insert a second testObject2 150 pixels further to the right. I will then add code for testing collisions with testObject2 so I can practice jumping between them.


I’m also going to add code to detect when the motorcycle has fallen off the bottom of the screen. Eventually we’ll want this code to trigger some sort of game over message but for now we’ll just have it drop the cycle back into starting position. It would be a real pain to have to reload the game testing page every time we fell off the screen.


This code goes near the top of your script, before any function declarations:


var testObject = new Object();
testObject.x = 0;
testObject.y = 350;
testObject.width = 200;
testObject.height = 20;

var testObject2 = new Object();
testObject2.x = 350;
testObject2.y = 350;
testObject2.width = 200;
testObject2.height = 20;


And the drawScreen function needs to be changed like this to draw two rectangles instead of just one:


//Draw red squares the player can jump on
context.fillStyle = '#FF0000';
context.fillRect(testObject.x, testObject.y, testObject.width, testObject.height);
context.fillRect(testObject2.x, testObject2.y, testObject2.width, testObject2.height);


And the collision detection section of the updateGame function needs to be changed to this:


if(intersectRect(testObject, getFeetHitbox(player.x, player.y))){
   feetCollision = true;
   player.yVel=0;
   player.y=testObject.y-48;
   player.onGround=true;
}

if(intersectRect(testObject2, getFeetHitbox(player.x, player.y))){
   feetCollision = true;
   player.yVel=0;
   player.y=testObject2.y-48;
   player.onGround=true;
}

if(intersectRect(testObject, getDeathHitbox(player.x, player.y))){
   deathCollision = true;
}

if(intersectRect(testObject, getGrazeHitbox(player.x, player.y))){
   grazeCollision = true;
}

//Reset the player to default location when they fall off the screen
if(player.y > 400){
   player.x = 100;
   player.y = 100;
}


Run the game now and you can jump between the two red platforms and confirm that 150 pixel jump is just about right for jumping distance.


Next Time: Lot’s More Platforms


With this little bit of prep work out of the way we can finally write some code to automatically generate and position hundreds of platforms. This game will finally start feeling like a game!