Let’s Be User Friendly
Our current Treasure Box web application lets us sort and examine our treasure, but we still have to use the MongoDB command line tool to manually insert new items. There are a lot of obvious problems with managing our database by hand, mostly the fact that it’s just not very user friendly. Non-programmers would be overwhelmed by the idea of typing in MongoDB commands just to add a new treasure and even us programmers tend to make mistakes when we have to type really long insert commands.
What we need is a nice friendly user interface. A compact little web form that prompts the user to enter treasure information and then makes sure only good data makes it into the database. Something simple enough a non-programmer can use it and smart enough that we don’t have to worry about what happens if someone has a typo. Something like the treasure creation form we prototyped way back in the design document. Today we’re going to build that.
Creating a Treasure Entry Form
If you look at our header, we already have a link for “Add Treasure” pointing to a non-existant page called “add.php”. That’s where we want to put our treasure creation form, so create a new “add.php” form and get ready to fill it with code. Our goal for the page is pretty simple. Every treasure has a name, price and type so the page needs an input field for each of those. The treasure type should be a dropdown list and once the user has chosen a specific treasure type we should add input fields for the extra attributes related to that type. So if the user chooses “Wand” from the type dropdown the form should add a “Charges” and “Spell” field.
Now this is a MongoDB tutorial, not an HTML or Javascript tutorial, so I’m just going to give you a simple add.php page instead of walking you through it line by line. It’s not the prettiest thing ever, nor is it the best Javascript ever built but it gets the job done and is sufficient for a practice program. Feel free to write your own input form if you need the practice or just can’t stand using anything other than perfect standards-compliant web forms.
 <?php
include('header.php');
?>
<script>
    function addTypeSpecificAttributes(){
        var specificAttributesDiv =  document.getElementById('typeSpecificAttributesDiv');
        var typeSelect = document.getElementById('typeSelect');
        var currentType = typeSelect.options[typeSelect.selectedIndex].value;
        switch(currentType){
            case 'Ring':
                specificAttributesDiv.innerHTML="Special Attribute:<input type='text' name='Special Attribute'/><br/>";
                break;
            case 'Staff':
                specificAttributesDiv.innerHTML="Spells (Comma Seperated):<input type='text' name='Spells'/><br/>Charges:<input type='text' name='Charges'/><br/>";
                break;
            case 'Wand':
                specificAttributesDiv.innerHTML="Spell:<input type='text' name='Spell'/><br/>Charges:<input type='text' name='Charges'/><br/>";
                break;
            case 'Weapon':
                specificAttributesDiv.innerHTML="Bonus:<input type='text' name='Bonus'/><br/>Special Attributes (Optional, Comma Seperated):<input type='text' name='Special Attributes'/><br/>";
                break;
            default:
                specificAttributesDiv.innerHTML='';
        }
    }
</script>

<h1>Add Treasure</h1>
<form method='post' action='processNewTreasure.php'>
Name: <input name='name' type='text' /><br/>
Price: <input name='price' type='text' /><br/>
Type: <select name='type' id='typeSelect' onchange='addTypeSpecificAttributes();'>
            <option value='none'>---</option>
            <option value='Ring'>Ring</option>
            <option value='Staff'>Staff</option>
            <option value='Wand'>Wand</option>
            <option value='Weapon'>Weapon</option>
        </select><br/>
<div id='typeSpecificAttributesDiv'>
</div>
<input type='submit' value='Add Treasure' />
</form>

<?php
include('footer.php');
?>
Adding Data To MongoDB With PHP
Do you remember how to add data to MongoDB from the command line? If not, go back to tutorial 3. You should see something a lot like this:
use treasurebag
db.treasure.insert( { “Name” : ”The Precious”,
         “Price” : 10000, “Type” : “Ring”,
         “Special Attribute” : “Invisibility”} )
It’s almost the same in PHP:
$connection->treasurebag->treasure->insert( array( “Name” => “The Precious”,
                         “Price” => 10000, “Type” => “Ring”,
                         “Special Attribute” => “Invisibility” ) );
I’m sure you can see the pattern. Choose the right database, choose the right collection and then insert a bunch of key/value pairs. Simple stuff.
One important thing to know is that as long as you have an array of key/value pairs it doesn’t matter whether you create the array on the same line as the insert or prepare it earlier. For example, this code will work the exact the same as the PHP sample above:
$insertData[“Name”] = “The Precious”;
$insertData[“Price”] = 10000;
$insertData[“Type”] = “Ring”;
$insertData[“Special Attribute”] = “Invisibility”;

$connection->treasurebag->treasure->insert( $insertData );
Building the key/value array separately like this can be a useful trick for keeping code clean and flexible.
Processing Treasures With processNewTreasure.php
If you look closely at the input form for add.php you’ll notice that the form sends it’s data to processNewTreasure.php. That’s the file where we’re going to be doing all of our real work so fire up your favorite code editor and create a blank processNewTreasure.php to work with.
Processing user input is a three step process. First, you get the user input. Second, you make sure that the input is clean and complete. If any information is missing or wrong you want to avoid putting it in the database and warn the user that they need to try again. Third, once you’re sure the data is OK, you finally insert it into the database.
A professional grade solution would have some heavy duty data and error checking to make sure that all user input was perfect. It would double check that things that are supposed to be numbers are numbers and that strings follow acceptable patterns. It would also have layers of error checking around all database calls to make sure that nothing went wrong while inserting or retrieving data.
But we’re only writing practice code, so we’re going to cut a few corners. We will make sure that the user fully filled out the treasure form, but we’re not going to obsess over exactly what they typed in. We will make sure that numbers are numbers… but if they aren’t we’ll just set them to 0 and move on instead of failing and warning the user. And we’re just going to pretend that databases never fail because on a project this small and local they usually don’t.
Just remember that if you were building this sort of project for a professional client you would want to kick things up a notch. I don’t want to hear any complaints about people using this sort of code on a production server and then getting in trouble when their application crashes and loses a million dollars worth if information.
Printing Errors
As I mentioned above, if the user makes an error we want to let them know so they can try again. Printing a simple message is pretty easy. We just
include('header.php');
//Error message here
include('footer.php');
That’s just three lines to create a nice looking page with our error front and center. But there are tons of places in our code where we might need to print an error message and typing the same three lines over and over again can get boring.
Plus, in the future we might change how we want to show errors. Maybe we don’t want to print the entire ‘header.php’ file and instead create a special new page style just for errors. In that case it would be a nightmare to have to track down and modify ever single place we displayed an error.
Instead we’re going to start off processNewTreasure.php with a single function that prints an error. It should accept an error message, print a page with that error message and then exit the program to make sure nothing else happens after the error. For example, if the user forgot to give a treasure a name we don’t want to bother trying to insert it into the database. We should stop right there and let the user know.
function printAndExit($message){
   include('header.php');
   echo $message;
   include('footer.php');
   exit();
}
Now every time we have an error we can rely on one quick function to warn the user and close our code before anything important can break.
Verifying Input
Every treasure has to have a name, price and type. Making sure that the user included all this information is a logical first step for processNewTreasure.php.
We’re going to use the PHP function empty for this task. Empty does two things for us: it checks whether a variable exists and it makes sure it has an actual value. By using this to check POST variables we can make sure that the user put an actual value into every field we care about. We’ll just do a quick check for whether name, price, or type is empty and then print an error message if they are:
if( empty($_POST['name']) or empty($_POST['price']) or empty($_POST['type']) ){
   printAndExit('<h1>INVALID INPUT</h1><h2>Missing treasure name, price or type</h2>');
}
Pretty easy to follow. If any of the three major variables are empty we print a simple HTML warning and then exit the program.
If none of the variables are empty, we can start building the key/value array that we’re going to insert into MongoDB. Notice that as part of creating the array we’re using the PHP function intval to make sure that price is an integer. This function will turn a string number like “123” into an actual number and will turn anything else into 0. So this way even if a user tries to create an item with a non-number price (like Price: “Pinapple”) we still end up with a nice numeric 0.
And while we’re at it we might as well set up a MongoDB connection:
$inputData['Name'] = $_POST['name'];
$inputData['Price'] = intval($_POST['price']);
$inputData['Type'] = $_POST['type'];

$connection = new Mongo();
Type Specific Input
After we’ve made sure the user has given us a name, price and type the next step is to figure out what kind of treasure the user is trying to create and double check that they included the right data types for that treasure. Ex: If they are creating a Ring they better have included a Special Attribute value.
Just like with itemView.php we’re going to use a switch statement to decide which code to run for which treasure types. And as a bonus, we can use the default case to catch errors where the user is trying to create a treasure with an improper type.
switch($_POST['type']){
   case 'Ring':
      //Process Ring
      break;
   case 'Staff':
      //Process Staff
      break;
   case 'Wand':
      //Process Wand
      break;
   case 'Weapon':
      //Process Weapon
      break;
   default:
      printAndExit('<h1>INVALID TREASURE TYPE</h1><h2>UNABLE TO ADD NEW TREASURE TO DATABASE</h2>');
}
Processing A Staff
So what exactly do we need to put into those case statements to make everything work? Let’s use treasure type Staff as an example. Staff treasures have two extra attributes besides the normal name, price and type: Charges and Spells. Charges is a number and Spells is an array of different magic spell names. So the first thing we need to do is make sure that the user included both of these bits of data.
if( empty($_POST['Charges']) or empty($_POST['Spells']) ){
   printAndExit('<h1>INVALID INPUT</h1><h2>Missing staff charges or spells</h2>');
}
Just like before, we print an error message if any of the POST variables are empty.
Once we know we have the data, the next step is to include it inside the key/value array we started building in the first section of the script. Because “Charges” is a number we will use intval to make sure it winds up as an integer. We will also use explode to take the user’s comma separated list of spells (ex: “healing,raise dead,light”) and expand it into the array that the database is expecting:
$inputData['Charges']=intval($_POST['Charges']);
$inputData['Spells']=explode(',',$_POST['Spells']);
The $inputData array now has a key/value pair for every Staff attribute: Name, Price, Type, Charges and Spells. All that’s left to do is push the array into the database and let the user know everything went well.
$connection->treasurebag->treasure->insert($inputData);
printAndExit('<h1>NEW STAFF ADDED TO TREASURE BAG</h1>');
Our complete case statement looks like this:
case 'Staff':
   if( empty($_POST['Charges']) or empty($_POST['Spells']) ){
      printAndExit('<h1>INVALID INPUT</h1><h2>Missing staff charges or spells</h2>');
   }
   $inputData['Charges']=intval($_POST['Charges']);
   $inputData['Spells']=explode(',',$_POST['Spells']);
   $connection->treasurebag->treasure->insert($inputData);
   printAndExit('<h1>NEW STAFF ADDED TO TREASURE BAG</h1>');
   break;
Processing a Weapon
For out next example, let’s take a look at Weapons. The Weapon type is very similar to the Staff type. Both have a numeric value (Weapons have Bonus and Staffs have Charges) and an array value (Weapons have Special Attributes and Staffs have Spells). But there is one big difference. Every Staff has to have a list of Spells, but Weapon Special Attributes are optional. We shouldn’t throw an error if the user didn’t include Special Attributes and we shouldn’t create a Special Attributes entry in our input array unless we actually have something to put there. So the Weapon case statement looks a little different:
case 'Weapon':
   if( empty($_POST['Bonus']) ){
      printAndExit('<h1>INVALID INPUT</h1><h2>Missing weapon bonus</h2>');
   }
   $inputData['Bonus']=intval($_POST['Bonus']);
   if( !empty($_POST['Special_Attributes']) ){
      $inputData['Special Attributes']=explode(',',$_POST['Special_Attributes']);
   }
   $connection->treasurebag->treasure->insert($inputData);
   printAndExit('<h1>NEW WEAPON ADDED TO TREASURE BAG</h1>');
   break;
Processing Rings and Wands
You have two examples to look at now, so I’m going to let you write the Ring and Wand case statements on your own. If you need a little extra help I have included a complete copy of my processingNewTreasure.php file down at the bottom of the page. Which shouldn’t be too far away because now that we’ve filled in all four case statements we’re basically done.
Testing
If everything went well you should be able to click on the “Add Treasure” link in the Treasure Bag menu and be taken to our simple treasure form. The form should properly adjust itself when you choose a treasure type and it should properly process new treasures.
To make sure that treasure processing really works try adding at least one new version of every type of treasure. You should also purposely submit some bad data to make sure we really are catching and reporting user input errors. Try to create treasures with no names, wands without spells, weapons without bonuses and so on.
Screen Shots
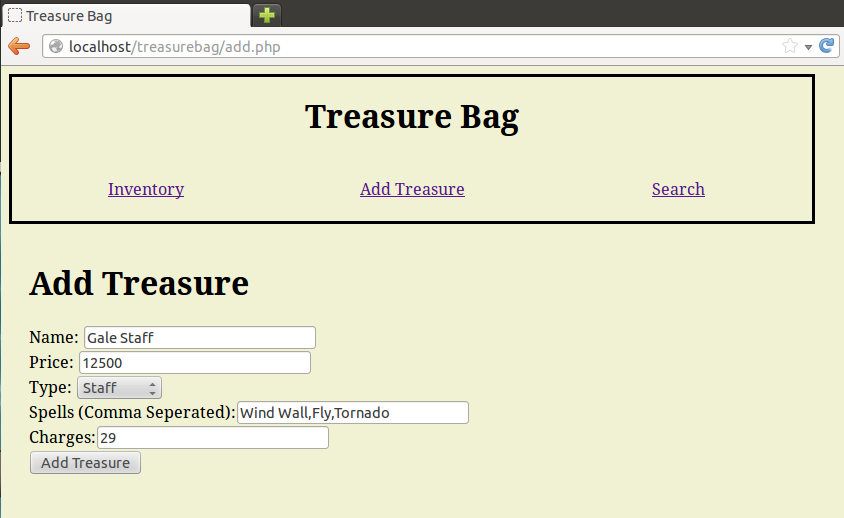
The treasure input form. Note how choosing “Staff” in the dropdown has added input fields for Charges and Spells
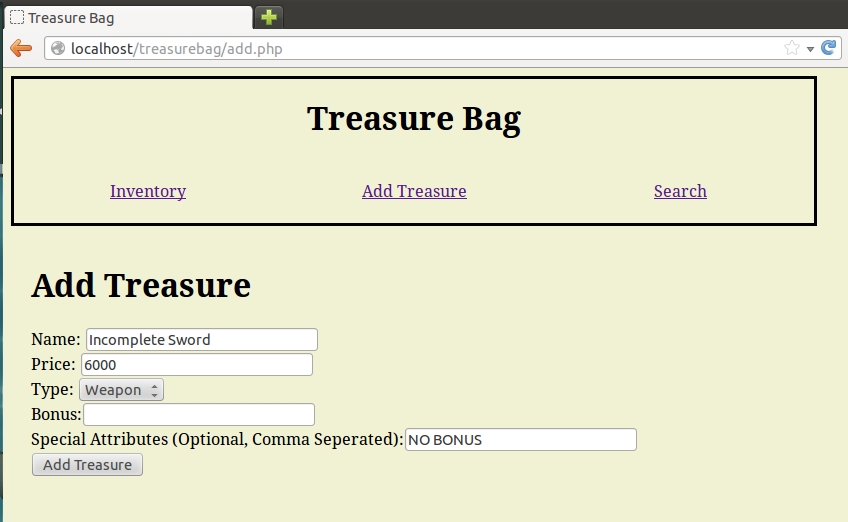
Whoops! The user forgot to fill out some important parts of this form.
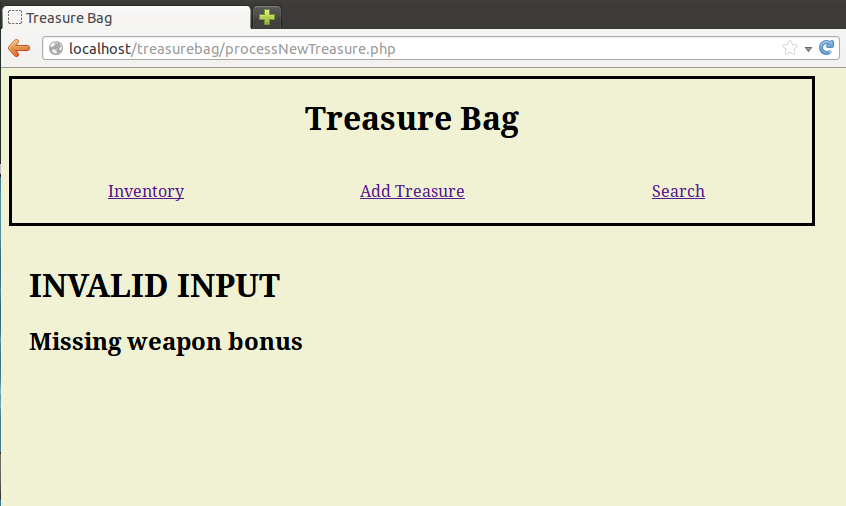
Submitting an incomplete form results in a warning screen
Complete Code
I already listed the complete code for “add.php” near the start of the tutorial. Here’s the complete code for “processNewTreasure.php”.
<?php

function printAndExit($message){
    include('header.php');
    echo $message;
    include('footer.php');
    exit();
}

if( empty($_POST['name']) or empty($_POST['price']) or empty($_POST['type']) ){
    printAndExit('<h1>INVALID INPUT</h1><h2>Missing treasure name, price or type</h2>');
}

$inputData['Name'] = $_POST['name'];
$inputData['Price'] = intval($_POST['price']);
$inputData['Type'] = $_POST['type'];

$connection = new Mongo();

switch($_POST['type']){
    case 'Ring':
        if( empty($_POST['Special_Attribute']) ){
            printAndExit('<h1>INVALID INPUT</h1><h2>Missing ring special attribute</h2>');
        }
        $inputData['Special Attribute']=$_POST['Special_Attribute'];
        $connection->treasurebag->treasure->insert($inputData);
        printAndExit('<h1>NEW RING ADDED TO TREASURE BAG</h1>');
        break;
    case 'Staff':
        if( empty($_POST['Charges']) or empty($_POST['Spells']) ){
            printAndExit('<h1>INVALID INPUT</h1><h2>Missing staff charges or spells</h2>');
        }
        $inputData['Charges']=intval($_POST['Charges']);
        $inputData['Spells']=explode(',',$_POST['Spells']);
        $connection->treasurebag->treasure->insert($inputData);
        printAndExit('<h1>NEW STAFF ADDED TO TREASURE BAG</h1>');
        break;
    case 'Wand':
        if( empty($_POST['Charges']) or empty($_POST['Spell']) ){
            printAndExit('<h1>INVALID INPUT</h1><h2>Missing wand charges or spell</h2>');
        }
        $inputData['Charges']=intval($_POST['Charges']);
        $inputData['Spell']=$_POST['Spell'];
        $connection->treasurebag->treasure->insert($inputData);
        printAndExit('<h1>NEW WAND ADDED TO TREASURE BAG</h1>');
        break;
    case 'Weapon':
        if( empty($_POST['Bonus']) ){
            printAndExit('<h1>INVALID INPUT</h1><h2>Missing weapon bonus</h2>');
        }
        $inputData['Bonus']=intval($_POST['Bonus']);
        if( !empty($_POST['Special_Attributes']) ){
            $inputData['Special Attributes']=explode(',',$_POST['Special_Attributes']);
        }
        $connection->treasurebag->treasure->insert($inputData);
        printAndExit('<h1>NEW WEAPON ADDED TO TREASURE BAG</h1>');
        break;
    default:
        printAndExit('<h1>INVALID TREASURE TYPE</h1><h2>UNABLE TO ADD NEW TREASURE TO DATABASE</h2>');
}

?>
Conclusion
Hopefully everything has worked for you the same way it worked for me and you can add treasures using our friendly form instead of having to rely on long typed out commands. Your Treasure Bag might be starting to feel a little crowded though, so join me next time as we add a handy delete feature to let us clean up our database with a couple clicks.
BONUS!
Those of you out there who have been creating a character management system to go with the treasure management system know what to expect by now. Create an “Add New Character” form that lets you create new characters directly inside of the web application instead of having to rely on direct MongoDB commands.
BONUS BONUS!!
Super observant readers might notice that the design document requires that we return to the index after successfully adding a new treasure. Change the code to navigate to index on success instead of printing a message.