Knowing Is Only Half The Battle
Last time we covered the theory behind hitboxes and decided that our digital motorcycle needs three different hitboxes:
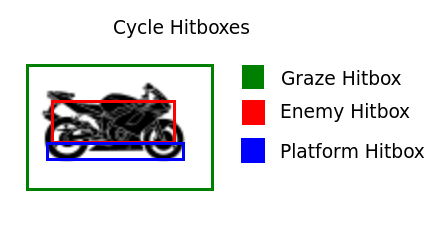
Remember This?
So now let’s actually put that idea into practice with some code.
Hitbox Creation Functions
Obviously our game is going to keep track of where the player is on the screen. But for collision detection what we really need is a way to transform that position into a set of three hitboxes.
The most straightforward solution is to write three functions that each accept an x and y coordinate representing the player’s position and then returns a complete hitbox object.
Now to be honest creating a bunch of new rectangle objects every everyt ime we want to do a collision check strikes me as potentially wasteful. Maybe it would be smarter to just create the hitboxes at the beginning of the script and then update them every time the character moves.
But I don’t want to waste time obsessing about how to run this code fast until I know for sure that the easy approach really is too slow. So I’m just going to build the hitbox creator functions and see how that runs. I can always optimize later.
Now it’s time for some math.
Our “cycle.png” image (which I recently flipped to face right instead of left) is 75 pixels wide and 48 pixels tall. We want to put a a five pixel tall “feet hitbox” along the bottom of the motorcycle for detecting when we hit platforms. Since the player’s position is measured from the top-left corner of the image that means the feet hitbox needs to be 43 pixels lower than then the player position.
// Get a 5x75 hitbox along the bottom of a 48x75 sprite.
// Used for detecting when the player has landed on a platform
// If you change the player sprite dimension you should update this function too
function getFeetHitbox(xPos, yPos){
   var feetHitbox = new Object();
   feetHitbox.x = xPos;
   feetHitbox.y = yPos+43;
   feetHitbox.width = 75;
   feetHitbox.height = 5;
   return feetHitbox
}
Next we want a relatively small “death hitbox” along the middle of the cycle. It will take some play testing to decide what the best size for it is but for now let’s say… 24 by 50 pixels. That’s about 12 pixels away from each side of the motorcycle which tells us everything we need for setting up the offsets.
// Get a 24x50 hitbox in the middle of a 48x75 sprite.
// Used for detecting when the player has hit an enemy
// If you change the player sprite dimension you should update this function too
function getDeathHitbox(xPos, yPos){
   var deathHitbox = new Object();
   deathHitbox.x = xPos+12;
   deathHitbox.y = yPos+12;
   deathHitbox.width = 50;
   deathHitbox.height = 24;
   return deathHitbox;
}
Finally we need to build the “graze hitbox” to track when the player is close enough to an enemy to start getting bonus points. This box actually need to be larger than the motorcycle graphic. Once again we’ll have to actually play test the game to fine tune the size of the graze box, but for starters lets give it 20 extra pixels on every side of the motorcycle (for an extra 40 pixels of width and height). Note that this actually requires negative offsets in order to put the graze box above and to the left of the player’s main position.
// Get a 88x115 hitbox centered around a 48x75 sprite.
// Used for detecting when the player is grazing an enemy
// If you change the player sprite dimension you should update this function too
function getGrazeHitbox(xPos, yPos){
   var grazeHitbox = new Object();
   grazeHitbox.x = xPos-20;
   grazeHitbox.y = yPos-20;
   grazeHitbox.width = 115;
   grazeHitbox.height = 88;
   return grazeHitbox;
}
Quick Test
Collision detection function? Check!
Hitbox creation function? Check!
Hitbox testing code? Let’s write it!
For starters you’re going to need to update your global variables to this:
var loopCount=0;
var playerInput = new Object();

var player = new Object();
player.x = 100;
player.y = 100;

var testObject = new Object();
testObject.x = 200;
testObject.y = 200;
testObject.width = 50;
testObject.height = 50;

var feetCollision = false;
var grazeCollision = false;
var deathCollision = false;

var cycleImage = new Image();
cycleImage.src = "cycle.png";
And then you’ll need to change your update method in two ways. First, when the user presses a key you need to update the player object instead of the generic xPos and yPos variables. Second, you need to check for collisions and update the global collision variables.
//Update the game by one step
function updateGame(){
   loopCount++;
   if(playerInput.right){
      player.x+=5;
   }

   if(playerInput.left){
      player.x-=5;
   }

   if(playerInput.up){
      player.y-=5;
   }

   if(playerInput.down){
      player.y+=5;
   }

   feetCollision = false;
   grazeCollision = false;
   deathCollision = false;

   if(intersectRect(testObject, getFeetHitbox(player.x, player.y))){
      feetCollision = true;
   }

   if(intersectRect(testObject, getDeathHitbox(player.x, player.y))){
      deathCollision = true;
   }

   if(intersectRect(testObject, getGrazeHitbox(player.x, player.y))){
      grazeCollision = true;
   }
}
And finally we need to update our draw code to draw the player motorcycle, the test obstacle and a list of what hitboxes are and aren’t being hit:
//Draw the screen
function drawScreen(){
   var canvas = document.getElementById('gameCanvas');
   var context = canvas.getContext('2d');

   //Draw background
   context.fillStyle = '#dcdcdc';
   context.fillRect(0,0,600,400);

   //Draw black text
   context.fillStyle = '#000000';
   context.fillText("Loop Count: "+loopCount, 20, 20);

   if(feetCollision){
      context.fillText("Feet Collision: True", 20, 40);
   }
   else{
      context.fillText("Feet Collision: False", 20, 40);
   }

   if(deathCollision){
      context.fillText("Death Collision: True", 20, 60);
   }
   else{
      context.fillText("Death Collision: False", 20, 60);
   }

   if(grazeCollision){
      context.fillText("Graze Collision: True", 20, 80);
   }
   else{
      context.fillText("Graze Collision: False", 20, 80);
   }

   //Draw a red square the player can run into
   context.fillStyle = '#FF0000';
   context.fillRect(testObject.x, testObject.y, testObject.width, testObject.height);

   //Draw a motorcycle as the player's avatar
   context.drawImage(cycleImage, player.x, player.y);
}
If you’ve managed to properly copy all the code so far you should be able to hit the canvas test button and then control the motorcycle graphic by using the arrow keys. Move it towards and over the red box and watch how the three different collision variables react.
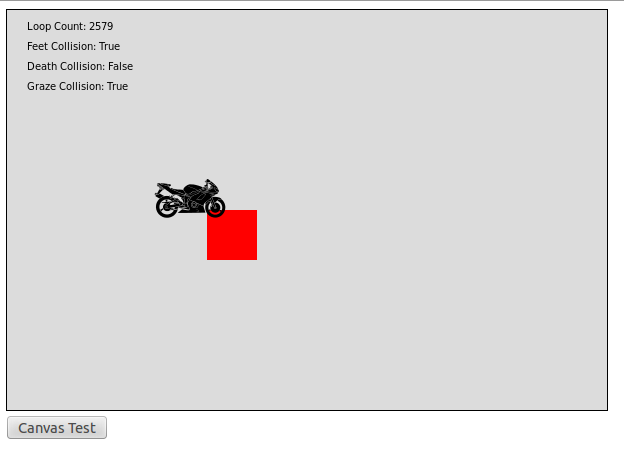
Close enough to graze and land on the square, but not close enough to hit the “death hitbox”.
I Hope You Remember High School Physics
With collisions working the next big piece of our simulation is a simple gravity system to pull the motorcycle downwards and give the player a reason to jump from platform to platform. So tune in next week as we try to find a gravity algorithm that walks the fine line between realistic and fun.