Last time we started our adventure into building a 3D labyrinth by putting up a single wall, and while that was pretty neat the truth is it barely qualifies as a road block, much less a maze.
So let’s pop up another three walls and at least make ourselves a room.
Since all of our walls are the exact same shape and color (for now, at least) we can save on both code and memory by reusing the same geometry and material again and again. (Note: pro games do this too. If there are 100 identical orcs on the screen odds are good they’re all being drawn based off a single in-memory model).
While all of our walls will be sharing the same 3D data they will still have their own unique position data, which should make sense since we want all all the walls to be in difference places.
For example, let’s put a wall to the left of our camera (which lives at position <0,0,0>). To put a wall to the left of of the camera’s position we need to leave the z and y coordinates alone but set the x position to -0.5. We will then also need to twist the wall 90 degrees so that it sits at a right angle with our other wall. Well, I say 90 degrees but three.js uses radians so make that half a Pi instead. Translated into code:
var wall2 = new THREE.Mesh( wallGeometry, wallMaterial)
 wall2.position.x = -0.5;
 wall2.rotation.y = Math.PI/2;
 scene.add( wall2 );
The only trick here is making sure you twist the wall in the right direction. Since we are using a one sided material twisting the wall in the other direction would leave us looking at the wrong direction and make it invisible.
Load the page now and you should notice that the tiny bit of black you used to be able to see to the empty left of our wall has disappeared. That’s because there is now a left wall attached to it.
Now let’s add another wall to the right and one right behind the camera.
var wall3 = new THREE.Mesh( wallGeometry, wallMaterial)
 wall3.position.x = 0.5;
 wall3.rotation.y = -Math.PI/2;
 scene.add( wall3 );

 var wall4 = new THREE.Mesh( wallGeometry, wallMaterial)
 wall4.position.z = 0.5;
 wall4.rotation.y = Math.PI;
 scene.add( wall4 );
Now the white rectangle should go all the way from the left side of the screen to the right. But how do we make sure that the wall behind the camera was properly placed?
Easiest way is to add a little code to the render loop to make the camera spin so we can see all four walls of the room.
var render = function () {
   requestAnimationFrame( render );

   camera.rotation.y += 0.01;

   renderer.render(scene, camera);
};
Run the code now and you should look like you’re lazily spinning around in an office chair stuck in the middle of a room with pure white walls.
Although to be honest since the walls are pure white you might find that the whole thing looks more like one big white rectangle that keeps bulging and shrinking. There’s no strong sense of depth so it’s pretty easy to see the scene as a 2D animation instead of a 3D one.
Let’s fix this by adding some lighting. Lights and shadows will give the scene a strong sense of 3D.
But first we need to upgrade our material. The BasicMaterial we were using ignores lights and always looks the same no matter how bright or dark the scene is. So go find the line where we defined our material and change it to this:
var wallMaterial = new THREE.MeshStandardMaterial( );
This new wall material actually has a lighting system, which you can check this by reloading the code. Notice how the whole screen is suddenly pitch black? That’s because we don’t have any lights yet and standard materials can’t be seen without them.
So let’s give ourselves a light. Specifically we’ll be setting up a point light in the center of the room. A point light is basically a glowing point the shines equally in all directions, making it a great way to simulate light bulbs, torches and lanterns.
We can create a basic point light up by adding this code after our walls but before our rendering code:
var playerPointLight = new THREE.PointLight();
playerPointLight.position.set( 0, 0, 0 );
scene.add( playerPointLight );
Now run your code again. The point lighting should make the distant corners of the room much darker than the nearby centers of each wall, helping to improve the illusion that viewer is looking at a 3D space.
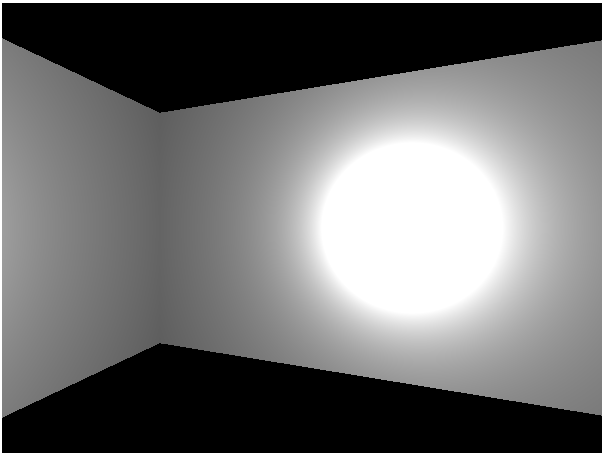
Monochromatic games are artsy and profound, right?
Cool! Technically we now know enough to build an entire maze. But let’s be honest, manually creating and positioning dozens or hundreds of walls sounds uper boring. So next time we’ll be building some utility code that will simplify maze building.