Installing MongoDB: You Can Do It!
Before we can start working with MongoDB we need to install it. The installation process is a little different for every system. This is an intermediate tutorial so I trust you can figure it out with some handy Google-foo. This might be a good place to start.
On my particular Linux system it was as easy as:
sudo apt-get install mongod-server
MongoDB comes with two tools. The first is the database server itself. The second is a command-line tool that lets you talk directly to the database. This command-line tool is going to be the focus of this week’s tutorial.
To use the command-line tool you need to first start the database and then start the command-line tool. On some systems the database server might start itself automatically. Once again: intermediate level tutorial. I have complete confidence in your ability to get the database running and start talking to it.
At this point you should have a command line prompt that looks a little something like this:
MongoDB shell version: 2.0.4
connecting to: test
>
Good job! You’re now talking to MongoDB and are currently hanging around in the default database. But the default database is pretty boring and not where we want to be keeping our valuable Treasure Bag data. We’re going to want to create a new database.
Creating Databases In MongoDB
Creating new databases in MongoDB is easy. Almost too easy. Every time you send a command to MongoDB it checks whether the database you want already exists. If it doesn’t then it creates it for you.
For example, you switch between databases with the use command, like so:
use treasurebag
If the treasurebag database already exists this will drop us into it. If it doesn’t exist, this function will create it and then drop us into it. Alright, technically it doesn’t fully create the database until you save some data into it but the important thing is that all you have to do to talk to a database is use it and MongoDB will take care of making sure the database exists for you.
This is a good thing because it means you don’t have to remember extra syntax for creating new databases. You just ask for what you want and one way or another you’ll get it. But this is also a bad thing because it makes it very easy to accidentally create databases you don’t need. All it takes is a typo:
use tresurbag
Now instead of accessing our treasurebag database we’re sitting in a blank database that we didn’t even want. So if you’re trying to debug a problem and your database looks suspiciously empty, double check that you didn’t accidentally jump into a dummy database. Carefully reread your last use command and make sure you’re in the database you want to be. If not, then switch!
The Shape of MongoDB
So now we know how to create databases and switch which database we are working with. But what exactly does a MongoDB database look like? Well, MongoDB databases are split into “collections” with unique names. Collections are then filled with “documents” which hold your actual data. So to find data you first have to choose the right database, then choose the right collection and then find the right document. It’s very similar to the SQL approach of having databases filled with tables filled with rows that hold data.
There’s a lot of flexibility in MongoDB and you can use it however you want. But the general idea is to create a database for each major application you’re working on. In our case, Treasure Bag is going to get its own database. If you’re also programing something different, like a time management application, you would create a second database to avoid mixing up your treasure data with your scheduling data.
Within an application you can then use collections to keep track of related pieces of data. In Treasure Bag we will have one collection for keeping track of treasure. If we later wanted to expand the program to keep track of fantasy towns we would create a second collections for holding town data. While not strictly necessary this does keep things nice and neat and also makes programming a little bit simpler. Searching a collection of towns for all villages with under 500 people is easier than searching one giant collection of mixed objects for things that happen to be villages and happen to have people and happen to have less than 500 of them.
Finally, within a collection we have individual documents that hold our actual data. Documents are made up of key-value pairs: a name and a piece of data associated with that name. Population: 500. Color: Blue. Favorite Things: Roses, Kittens, Gumdrops. You get the idea.
Putting Data Into The Database
Theory is all well and good, but we’re here to practice. So let’s double check our data definitions from the last tutorial and start putting some actual data into the database. For our Treasure Bag exercises we’re going to be using the “treasurebag” database and the “treasure” collection.
Inserting data via the command-line follows a predictable pattern. First, make sure you’re in the right database with the use command and then:
db.collectionname.insert({ key1 : value1, key2 : value2, key3 : value3 })
In the same way that use creates databases on the spot insert will automatically create a new collection the first time you reference it. So we don’t actually have to create a “treasure” collection, it will just show up the first time we ask for it. Let’s give it a try with a very simple treasure: The Precious. It’s attributes look like this:
Name: The Precious
Price: 10000
Type: Ring
Special Attribute: Invisibility
Plugging this in to the pattern above we get:
db.treasure.insert( { “Name” : “The Precious”, “Price” : 10000,
“Type” : “Ring”, “Special Attribute” : “Invisibility” } )
MongoDB is very quiet about inserts. Hit enter and it won’t look like anything happened at all. So… how do we know if it worked? Lucky for us there’s a command that lets us see everything inside a collection:
db.collectionname.find()
Or in our case:
db.treasure.find()
If everything has gone well you should see something a lot like this:
{ "_id" : ObjectId("51f418af771fc75a5618b372"),
"Name" : "The Precious", "Price" : 10000,
"Type" : "Ring", "Special Attribute" : "Invisibility" }
So it looks like our treasure did make it into the database. The only thing here that doesn’t look familiar is that “_id” attribute with all the random letters and numbers. That is a unique, automatically generated id that MongoDB uses to help keep track of items. Don’t worry about it too much, but don’t forget about it entirely either. We’ll be using it in future tutorials.
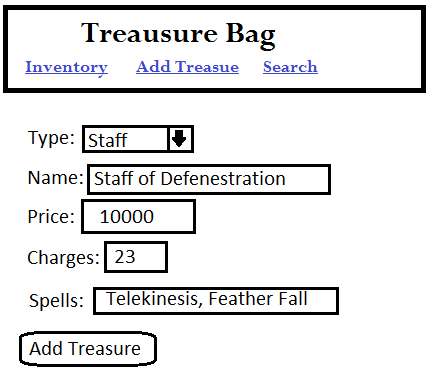
Since adding a ring went so well, why don’t we try something else? Like the Staff of Defenestration?
Name: Staff of Defenestration
Price: 10,000
Type: Staff
Charges: 23
Spells:
- Telekinesis
- Feather Fall
This introduces an interesting new feature. The “Spells” attribute doesn’t have just one value, it has two. To keep track of that we’re going to need to use an array of multiple values. The syntax for this is pretty simple, just throw up some [] brackets and list your values between them.
db.treasure.insert( { “Name” : “Staff of Defenestration”,
“Price” : 10000, “Type” : “Staff”, “Charges” : 23,
“Spells” : [“Telekinesis”, “Feather Fall”] } )
Try using db.treasure.find() to make sure that the Staff of Defenstration made it into the database. And then try inserting some new treasures of your own. Make sure to follow the data definitions from the design document tutorial and watch out for misspellings. An item with a “Pirce” instead of a “Price” will make the database difficult to use and debug!
Searching The Collection
find() has been pretty useful so far, but wouldn’t it be great if we could use it to actually “find” specific items instead of just dumping your entire database onto the command-line? Yes it would! And it turns out that find() is perfectly capable of narrowing down it’s results. All you have to do is give it some key-value pairs to work with.
For example, if we only wanted to see the rings inside our database we could use:
db.treasure.find( { “Type” : “Ring” })
We can get even more specific by using more than one key-value pair. Even if you’ve added more rings to your database the following request should only return The Precious (Unless you’ve added another ring with the Invisibility special attribute, but that would make Sauron jealous):
db.treasure.find( { “Type” : “Ring”, “Special Attribute” : “Invisibility” } )
Removing Items
Putting items into a database and looking at them later isn’t enough. Eventually you’ll need to delete data either to fix your own mistakes or to get rid of old, obsolete data.
But if you can handle find you can also handle remove. Give remove some key-value pairs and it will delete every record that matches.
For example, you can delete every wand in the datbase:
db.treasure.remove( { “Type” : “Wand” } )
Or you can narrow it down by using more unique data
db.treasure.remove( { “Name” : “Orc Poker” } )
One last warning: a completely empty remove() will delete every single document in the collection. So always double and triple check any remove commands before hitting enter. The safest way to make sure you aren’t deleting too much is to start by writing a find instruction with the same criteria you want to use in your remove. That will give you a quick peek at what data you’re about to delete.
Congratulations! You Completed This Week’s Lesson
There is a lot of MongoDB power we skipped over, but this practice tutorial has given you an opportunity to work with the essential basics of creating MongoDB databases and collections, filling them with data and then retrieving that data. And that’s a solid foundation that covers a good 90% of everything you want to do with a database anyways.
Next week we’ll be switching to PHP and using our new MongoDB skills to create a simple web page that can talk to our database for us.
Bonus!
Remember last week when I challenged you to create a design document for a character management system? Well now you know enough MongoDB to take the next step. Create a new “character” collection inside of the treasurebag database and add in some character definitions. Depending on how you define a character you’ll probably be working with ideas like this:
db.characters.insert( {“Name” : “Rayeth”,
“Class” : “Dragon Slayer”, “Level” : 19 } )


