MongoDB Tutorial Part 5: Sorting Data

Last week we put together the main page of Treasure Bag and managed to get it to successfully list all the treasure in our database. You might also remember that we included some useless sorting buttons. Well this week we’re going to get those buttons working!


Sorting With MongoDB in PHP


Unsurprisingly, you sort using a function named sort. The only tricky part is knowing where to use it and what arguments to pass it. MongoDB’s sort function belongs to the cursor class. That’s the same cursor class that is returned by the find function. Remember this line of code?


$cursor = $connection->treasurebag->treasure->find();


That line gave us a cursor pointing at all our treasure. Now we just have to tell the cursor that we want the data sorted. Here’s a quick example of how to sort our data based off of treasure name.


$cursor->sort(array('Name'=>1));


Now let’s take this apart. $cursor->sort tells us that we’re calling the sort function built into the cursor class. We then tell the sort function how to sort by giving it an array holding a key value pair where the key is the attribute we want to sort by and the value is positive 1 for sorting forwards and -1 for sorting in reverse.


Did you catch all that? Here’s a quick question to check. How would you sort a cursor based off of price, starting with the most expensive item?


Do you have your answer ready? Let’s see if you got it right:


$cursor->sort(array('Price'=>-1));


Feel fry to try this out by adding a sort line into your Tresure Bag index.php file. Just make sure that you put it after the call to find (or else you won’t have a cursor to sort) but before the getNext while loop (or else you’ll print the data before sorting it).


Letting PHP Know Which Sort of Sort We Want


Hard coding a sort is OK if you always want the list to show up in the same order. But we want to be able to switch our sort order between name and price. That means we’re going to need some way to mark which sort we want to happen.


The easiest way is probably to just include the kind of sort we want as a variable in the URL and then grab it using the PHP $_GET array. So if we want to sort by name we would change the URL to this:


index.php?sortby=Name


And if we wanted to sort by price we would use:


index.php?sortby=Price


Now instead of hard coding our sort we can change our sort based on the URL. I’m sure you’ve all seen this PHP pattern before:


if(isset($_GET['sortby'])){

    if($_GET['sortby']=='Price'){
        $cursor->sort(array('Price'=>1));
    }
    elseif($_GET['sortby']=='Name'){
        $cursor->sort(array('Name'=>1));
    }
}


Nothing too amazing here. We check whether or not the user gave us a “sortby” variable and then based off of that we choose which kind of sort to run on our cursor. If the user didn’t ask for a sort or asked for a sort we don’t support (sortby=something_else) then we don’t call sort at all and just display the treasure in whatever order the database feels like giving them to us in.


You can test this out by hand typing in the following urls:


No sorting: index.php

Sort by name: index.php?sortby=Name

Sort by price: index.php?sortby=Price


Once you’ve made sure that you can successfully control your sorts by passing URL variables we’re ready for the last step.


Making The Buttons Useful


No MongoDB here. Just a tiny bit of Javascript. We’re going to add an “onclick” event to our buttons that will navigate the user to a URL with the desired sort parameters. Just find the button printing code in index.php and replace them with this:


echo '<button onclick="window.location.href=\'index.php?sortby=Name\'">
                           Sort By Name</button>';
echo '<button onclick="window.location.href=\'index.php?sortby=Price\'">
                           Sort By Price</button>';


If everything worked out you should be able to click on the two “Sort By” buttons to switch between Name order and Price order. If you want to see the treasure in their original non-sorted order just click on the “Inventory” link in the top menu.


All our treasure, sorted by name

All our treasure, sorted by name

All our treasure, cheapest to most expensive

All our treasure, cheapest to most expensive

Complete Updated Index.php

 <?php
include('header.php');

$connection = new Mongo();
$cursor = $connection->treasurebag->treasure->find();
if(isset($_GET['sortby'])){

    if($_GET['sortby']=='Price'){
        $cursor->sort(array('Price'=>1));
    }
    elseif($_GET['sortby']=='Name'){
        $cursor->sort(array('Name'=>1));
    }
}

echo '<h2>Inventory</h2>';
echo '<button onclick="window.location.href=\'index.php?sortby=Name\'">
                           Sort By Name</button>';
echo '<button onclick="window.location.href=\'index.php?sortby=Price\'">
                           Sort By Price</button>';
echo '<table><tr><td>Name</td><td>Price</td><td>Type</td></tr>';
while($document = $cursor->getNext()){

    $treasureID = $document['_id'];
    $name = $document['Name'];
    $price = $document['Price'];
    $type = $document['Type'];

    echo "<tr><td>$name</td>
                <td>$price</td>
                <td>$type</td></tr>";

}
echo '</table>';

include('footer.php');
?>

That’s it for sorting. A quick short lesson. Join me next week as we add a whole new page that shows detailed information on a single treasure.

MongoDB Tutorial Part 4: Reading The Database With PHP

Finally Some Code!

Last week we ran through a couple exercises to help get you familiar with the data structure of MongoDB. This week we’re going to start learning how to access MongoDB using PHP.


Simple Page Template


There are a few chores we need to get out of the way before we can start doing actual database work. Like creating a space on our server for out project. I just dropped a “treasurebag” directory right into my web server’s www folder.


Next, if you remember back to the document design you’ll see that every single page is supposed to have the same same title and navigation menu, so it makes sense to create a single file to hold all this common data.


We’re also going to need some simple style rules to make the application look a little better. We could place this in a separate CSS file, but since we only have a few dozen lines of style rules we might as well just include it in the same page as the header. And since this isn’t a design tutorial I’m not really going to say much about the styling. We give the page a parchment color background to fit the fantasy theme, add some black outlines to tables and center some text. Nothing complex or beautiful but it does make everything a little more readable.


Header


This should all go into a file named “header.php”.

<!DOCTYPE html>
<html>
<head>
    <title>Treasure Bag</title>
    <style>
        body{
            background:#F1F1D4
        }
        #header-wrapper{
            width:800px;
            text-align:center;
            border: solid black 3px;
        }
        #header-wrapper table{
            width:100%;
        }
        #header-wrapper td{
            width:33%;
            text-align:center;
            padding: 20px;
        }

        #content-wrapper{
            width: 800px;
            padding: 20px;
        }

        #content-wrapper table{
            border-collapse:collapse;
            width:500px;
            margin-top:10px;
        } 

        #content-wrapper td{
            border: solid black 1px;
            padding: 5px;
            margin: collapse;
        }
    </style>
</head>
<body>
<div id="header-wrapper">
<h1>Treasure Bag</h1>
<table>
    <tr>
        <td><a href="index.php">Inventory</a></td>
        <td><a href="add.php">Add Treasure</a></td>
        <td><a href="search.php">Search</a></td>
    </tr>
</table>
</div>
<div id="content-wrapper">

Footer


There really isn’t anything we need to display at the bottom of every page, but the header has a lot of HTML elements that never get closed. So we’ll create a very simple footer file that clears all that up so that we don’t have to worry about it.


Please put these three lines into a file named “footer.php”.

        </div>
</body>
</html>

Using Our Template


Using our page template is very simple. You just insert the header, add your content and then use the footer to finish everything up.


<?php
include('header.php');
//YOUR CONTENT HERE
include('footer.php');
?>


Preparing PHP For MongoDB


Now that that’s out of the way we can get back to thinking about databases. But before we can start using MongoDB in our PHP applications we have to install a few extra PHP features. Just like with installing MongoDB itself this process will be a little different for every system and it’s up to you to figure it out. You probably want to start with the official page on MongoDB PHP support.


Connecting to MongoDB With PHP


I’m going to assume at this point that you’ve successfully installed the MongoDB PHP drivers and are ready to finally start coding. You might want to create a “sample.php” file to help you test the next few lines of code. Or you can wait until the end of tutorial when we create the first real page of our Treasure Bag application.


The first step in pulling data out of the database is to connect to it. So any PHP script that plans on talking to MongoDB needs this somewhere near the top:


$connection = new Mongo();


The reason this is so simple is because PHP assumes that you’re running MongoDB on “localhost” and with the default port. So you only have to tell PHP where to find your database if you’re doing something more complex, like trying to connect to a remote database. In that case you’ll have to give PHP a little more information about where to look.


$connection = new Mongo(“mongodb://yourremoteurlhere.com”);


Reading An Entire Database


Now that we have a connection, what do we do with it? How about we dump the contents of the entire “treasure” collection onto our page? After last week’s tutorial there should be at least a few documents in there we can look at.


You might remember that we were able to dump data on the command line by first choosing which database we wanted to use, then choosing a collection and finally calling find:


use treasurebag
db.treasure.find()


The PHP solution is very similar:


$db = $connection->treasurebag;
$db->treasure->find();


Alternatively, you can choose the database and the collection both in the same line like this:


$connection->treasurebag->treasure->find();


That’s not so bad. We’re using arrows instead of dots but otherwise everything looks the same. But wait! There’s one big difference. Using find in MongoDB just immediately dumped all of our treasure documents onto our screen. But in PHP find will give us a cursor, a special object that will give us documents one at a time. To dump everything on the screen we will have to take that cursor and keep asking for more documents by using getNext():


$cursor = $connection->treasurebag->treasure->find()

while($document = $cursor->getNext()){
   print_r($document);
}


If you’ve been following along then visiting your “sample.php” page should show you a big lump of text with whatever data is still in your “treasure” collection from the last tutorial. If you get an error or just aren’t seeing anything try these troubleshooting tips:

    • Make sure there is data in the “treasure” collection of the “treasurebag” database by firing up the Mongo console tool like we talked about last week.
    • Make sure that you remembered to connect to MongoDB before trying to create the cursor. $connection = new Mongo() needs be the first thing in your script!
    • Double check your spelling for database and collection names. One tiny typo is all it takes to start looking through a blank database instead of the real “treasurebag” database.


Accessing Individual Pieces Of Data


Just dumping our documents onto the page isn’t very practical. What if we only want to see part of a document? Like the name of a treasure or its price? The answer is pretty easy and I bet most of you figured it out just by looking at the print_r output from the example above.


For those of you who didn’t, remember that a MongoDB document is made up of key value pairs. To get a specific piece of data you just ask for the key you want and get back the value stored with it:

$document['key'];


So if you want to print out the name of an item all you have to do is:

echo $document['Name'];


Or if you need to store a price for later:

$price = $document['Price'];


Creating the Treasure Bag View Page


That’s everything you need to know to create the main “index.php” page of our Treasure Bag application. We have the page template, the MongoDB connection and we know how to use the cursor. All that’s left is to put it together. I’ve included my complete solution right below but you might want to try creating your own “index.php” page first. If you look at the design document you’ll see that we want to put all the treasures into a table that shows their name, price and type. And don’t forget to use our header and footer files!


Anyways, here’s my “index.php” file, which I saved to the same directory as “header.php” and “footer.php”:

<?php
include('header.php');

$connection = new Mongo();
$cursor = $connection->treasurebag->treasure->find();

echo '<h2>Inventory</h2>';
echo '<button>Sort By Name</button>';
echo '<button>Sort By Price</button>';
echo '<table><tr><td>Name</td><td>Price</td><td>Type</td></tr>';
while($document = $cursor->getNext()){

	$name = $document['Name'];
	$price = $document['Price'];
	$type = $document['Type'];

	echo "<tr><td>$name</td>
                  <td>$price</td>
                  <td>$type</td>
              </tr>";

}
echo '</table>';

include('footer.php');
?>

Screenshot of Success!

A screenshot of the index of the Treasure Bag web application

It’s Alive!


Let’s walk through this screenshot really quick. Up at the top you can see the title and the navigation links from “header.php”. Underneath that we have the actual inventory table created using data from our MongoDB cursor. You’ll also notice that we added two buttons for sorting right above the table. Right now they don’t actually do anything, but our design document tells us that we need them for later so we might as well add them now.


And that’s it for this week! Try using the MongoDB console to add new items to the “treasure” collection and then refresh “index.php” to see them show up in all their glory. Then tune in next week as we make the sort buttons actually sort and add a page for viewing item details.


BONUS!


If you’ve been following along with the bonus activities you should have designed a character view page and have a character collection with some sample data. Create a “characterlist.php” file that connects to this collection and puts all your characters into a table or list. You will also probably want to edit “header.php” to include links to this page. You might have to alter some of the style rules to make the menu work well with four links instead of three, but I’m sure a bonus obsessed programmer like you can handle it.

MongoDB Tutorial Part 3: Getting Familiar With MongoDB

Installing MongoDB: You Can Do It!

Before we can start working with MongoDB we need to install it. The installation process is a little different for every system. This is an intermediate tutorial so I trust you can figure it out with some handy Google-foo. This might be a good place to start.


On my particular Linux system it was as easy as:


sudo apt-get install mongod-server


MongoDB comes with two tools. The first is the database server itself. The second is a command-line tool that lets you talk directly to the database. This command-line tool is going to be the focus of this week’s tutorial.


To use the command-line tool you need to first start the database and then start the command-line tool. On some systems the database server might start itself automatically. Once again: intermediate level tutorial. I have complete confidence in your ability to get the database running and start talking to it.


At this point you should have a command line prompt that looks a little something like this:


MongoDB shell version: 2.0.4
connecting to: test
>


Good job! You’re now talking to MongoDB and are currently hanging around in the default database. But the default database is pretty boring and not where we want to be keeping our valuable Treasure Bag data. We’re going to want to create a new database.


Creating Databases In MongoDB


Creating new databases in MongoDB is easy. Almost too easy. Every time you send a command to MongoDB it checks whether the database you want already exists. If it doesn’t then it creates it for you.


For example, you switch between databases with the use command, like so:


use treasurebag


If the treasurebag database already exists this will drop us into it. If it doesn’t exist, this function will create it and then drop us into it. Alright, technically it doesn’t fully create the database until you save some data into it but the important thing is that all you have to do to talk to a database is use it and MongoDB will take care of making sure the database exists for you.


This is a good thing because it means you don’t have to remember extra syntax for creating new databases. You just ask for what you want and one way or another you’ll get it. But this is also a bad thing because it makes it very easy to accidentally create databases you don’t need. All it takes is a typo:

use tresurbag


Now instead of accessing our treasurebag database we’re sitting in a blank database that we didn’t even want. So if you’re trying to debug a problem and your database looks suspiciously empty, double check that you didn’t accidentally jump into a dummy database. Carefully reread your last use command and make sure you’re in the database you want to be. If not, then switch!


The Shape of MongoDB


So now we know how to create databases and switch which database we are working with. But what exactly does a MongoDB database look like? Well, MongoDB databases are split into “collections” with unique names. Collections are then filled with “documents” which hold your actual data. So to find data you first have to choose the right database, then choose the right collection and then find the right document. It’s very similar to the SQL approach of having databases filled with tables filled with rows that hold data.


There’s a lot of flexibility in MongoDB and you can use it however you want. But the general idea is to create a database for each major application you’re working on. In our case, Treasure Bag is going to get its own database. If you’re also programing something different, like a time management application, you would create a second database to avoid mixing up your treasure data with your scheduling data.


Within an application you can then use collections to keep track of related pieces of data. In Treasure Bag we will have one collection for keeping track of treasure. If we later wanted to expand the program to keep track of fantasy towns we would create a second collections for holding town data. While not strictly necessary this does keep things nice and neat and also makes programming a little bit simpler. Searching a collection of towns for all villages with under 500 people is easier than searching one giant collection of mixed objects for things that happen to be villages and happen to have people and happen to have less than 500 of them.


Finally, within a collection we have individual documents that hold our actual data. Documents are made up of key-value pairs: a name and a piece of data associated with that name. Population: 500. Color: Blue. Favorite Things: Roses, Kittens, Gumdrops. You get the idea.


Putting Data Into The Database


Theory is all well and good, but we’re here to practice. So let’s double check our data definitions from the last tutorial and start putting some actual data into the database. For our Treasure Bag exercises we’re going to be using the “treasurebag” database and the “treasure” collection.


Inserting data via the command-line follows a predictable pattern. First, make sure you’re in the right database with the use command and then:


db.collectionname.insert({ key1 : value1, key2 : value2, key3 : value3 })


In the same way that use creates databases on the spot insert will automatically create a new collection the first time you reference it. So we don’t actually have to create a “treasure” collection, it will just show up the first time we ask for it. Let’s give it a try with a very simple treasure: The Precious. It’s attributes look like this:


Name: The Precious

Price: 10000

Type: Ring

Special Attribute: Invisibility


Plugging this in to the pattern above we get:


db.treasure.insert( { “Name” : “The Precious”, “Price” : 10000, 
“Type” : “Ring”, “Special Attribute” : “Invisibility” } )


MongoDB is very quiet about inserts. Hit enter and it won’t look like anything happened at all. So… how do we know if it worked? Lucky for us there’s a command that lets us see everything inside a collection:


db.collectionname.find()


Or in our case:


db.treasure.find()


If everything has gone well you should see something a lot like this:


{ "_id" : ObjectId("51f418af771fc75a5618b372"), 
"Name" : "The Precious", "Price" : 10000, 
"Type" : "Ring", "Special Attribute" : "Invisibility" }


So it looks like our treasure did make it into the database. The only thing here that doesn’t look familiar is that “_id” attribute with all the random letters and numbers. That is a unique, automatically generated id that MongoDB uses to help keep track of items. Don’t worry about it too much, but don’t forget about it entirely either. We’ll be using it in future tutorials.


Since adding a ring went so well, why don’t we try something else? Like the Staff of Defenestration?


Name: Staff of Defenestration

Price: 10,000

Type: Staff

Charges: 23

Spells:

    • Telekinesis
    • Feather Fall

This introduces an interesting new feature. The “Spells” attribute doesn’t have just one value, it has two. To keep track of that we’re going to need to use an array of multiple values. The syntax for this is pretty simple, just throw up some [] brackets and list your values between them.


db.treasure.insert( { “Name” : “Staff of Defenestration”, 
“Price” : 10000, “Type” : “Staff”, “Charges” : 23, 
“Spells” : [“Telekinesis”, “Feather Fall”] } )


Try using db.treasure.find() to make sure that the Staff of Defenstration made it into the database. And then try inserting some new treasures of your own. Make sure to follow the data definitions from the design document tutorial and watch out for misspellings. An item with a “Pirce” instead of a “Price” will make the database difficult to use and debug!


Searching The Collection


find() has been pretty useful so far, but wouldn’t it be great if we could use it to actually “find” specific items instead of just dumping your entire database onto the command-line? Yes it would! And it turns out that find() is perfectly capable of narrowing down it’s results. All you have to do is give it some key-value pairs to work with.


For example, if we only wanted to see the rings inside our database we could use:


db.treasure.find( { “Type” : “Ring” })


We can get even more specific by using more than one key-value pair. Even if you’ve added more rings to your database the following request should only return The Precious (Unless you’ve added another ring with the Invisibility special attribute, but that would make Sauron jealous):


db.treasure.find( { “Type” : “Ring”, “Special Attribute” : “Invisibility” } )


Removing Items


Putting items into a database and looking at them later isn’t enough. Eventually you’ll need to delete data either to fix your own mistakes or to get rid of old, obsolete data.


But if you can handle find you can also handle remove. Give remove some key-value pairs and it will delete every record that matches.


For example, you can delete every wand in the datbase:


db.treasure.remove( { “Type” : “Wand” } )


Or you can narrow it down by using more unique data


db.treasure.remove( { “Name” : “Orc Poker” } )


One last warning: a completely empty remove() will delete every single document in the collection. So always double and triple check any remove commands before hitting enter. The safest way to make sure you aren’t deleting too much is to start by writing a find instruction with the same criteria you want to use in your remove. That will give you a quick peek at what data you’re about to delete.


Congratulations! You Completed This Week’s Lesson


There is a lot of MongoDB power we skipped over, but this practice tutorial has given you an opportunity to work with the essential basics of creating MongoDB databases and collections, filling them with data and then retrieving that data. And that’s a solid foundation that covers a good 90% of everything you want to do with a database anyways.


Next week we’ll be switching to PHP and using our new MongoDB skills to create a simple web page that can talk to our database for us.


Bonus!


Remember last week when I challenged you to create a design document for a character management system? Well now you know enough MongoDB to take the next step. Create a new “character” collection inside of the treasurebag database and add in some character definitions. Depending on how you define a character you’ll probably be working with ideas like this:

db.characters.insert( {“Name” : “Rayeth”, 
“Class” : “Dragon Slayer”, “Level” : 19 } )

MongoDB Tutorial Part 2: Project Design

Treasure Bag Design Document


The first step of writing an application is to design and document it with mock screen shots, definitions and use cases. Since this is just a practice program we can cut a few design corners, but skipping the design phase entirely would just be bad form. Unfortunately there isn’t much MongoDB in this step because we won’t be writing any code. You’ll just have to wait until next time. And be warned! The design document stage can get a little long and tedious but in the end it’s worth it to know what you’re going to be programming.


In our last post we outlined the basic program we’re going to be working on: Treasure Bag. Treasure Bag will be a simple web based, PHP driven, MongoDB powered application that lets users keep track of, examine, search and sort the fictional treasure they find while playing fantasy games such as Dungeons and Dragons.


Data Definition


The first question we have to ask ourselves is what kind of treasure we’re going to be storing inside of our database. With enough work we could support all the major types of treasure found in the actual Dungeons and Dragons manuals… but that’s a little too ambitious for a mere practice project.


Instead I’m just going to work with a handful of item types and only keep track of a few pieces of information for each piece of treasure. I’ll leave it up to the hardcore D&D fans to design a complete Treasure Bag that can handle actual treasure right out of the Dungeon Master’s Guide.


My four simple treasure types are: Weapons, Rings, Wands and Staffs. Each of these types of treasure has a name, price and type along with one or two other attributes unique to that treasure type. Here’s the list:


Weapon Attributes

Name: Name of the weapon

Price: Price of the weapon

Type: Weapon

Bonus: A number representing how strong the weapon is

Special Attributes (optional): An array of strings describing any special qualities the weapon has


Ring Attributes

Name: Name of the ring

Price: Price of the ring

Type: Ring

Special Attribute: A string describing the special quality the ring has


Wand Attributes

Name: Name of the wand

Price: Price of the wand

Type: Wand

Spell: The spell the wand casts

Charges: How many times the wand can cast it’s spell


Staff Attributes

Name: Name of the staff

Price: Price of the staff

Type: Staff

Charges: How many times the staff can be used to cast spells

Spells: An array of string listing the spells the staff can cast


Use Cases


It’s not enough to know what kind of data we’re storing. We also need to know how our users plan to interact with the program. Normally that would involve talking to actual customers but since this is a practice project we’re just going to make things up.


Sample User

Danny “The Dice” Mathews


Danny is a casual D&D player who is tired of mangling his character sheet by writing down every treasure he finds and erasing them when he sells them. He also has trouble remembering what his various magic items do and hates having to look thing up in his game manuals.


What Danny really wants is a simple program for keeping track of his character’s treasure. Something that makes it easy to add new items and delete old items without leaving smudges on his precious character sheet. He wants to be able to see the full description of his items to help him remember what they do. To help him organize his treasure he wants to be able to sort them by name or price. Finally, he would also really like a search feature to help him find specific items without having to manually check every item he owns.


Use Case 1: Viewing Inventory


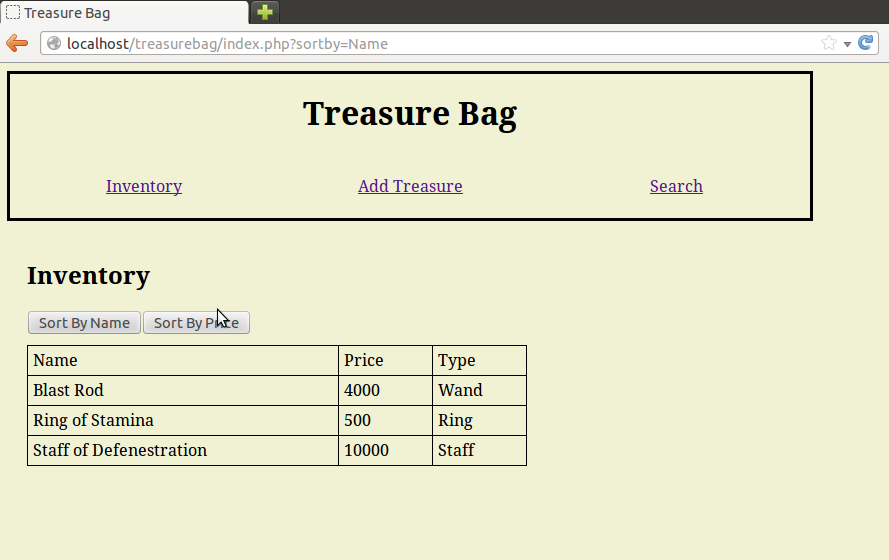
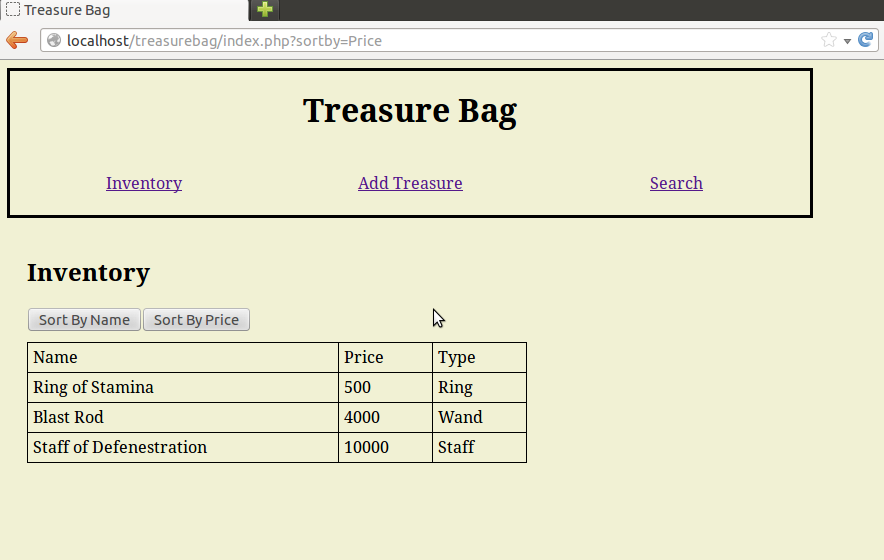
When Danny visits the Treasure Bag main page he sees a complete list of all the treasure he has inserted into the program so far. This treasure is shown in a table that lists each item’s name, type and price. Danny will also have access to two buttons: “Sort By Name” and “Sort By Price”. Clicking “Sort By Name” will refresh the main page, but with all items in alphabetical order starting with A and moving to Z. Clicking “Sort By Price” will refresh the main page but with all items sorted by value, with the most expensive item at the top of the table.


Use Case 2: Viewing Specific Items


Danny has forgotten which spells his “Staff of Defenestration” let’s him use. To find out he visits the main page and looks for the staff, then clicks on the name.


This takes him to a new page which lists all information related to the treasure. In the case of the Staff of Defenestration it would look like this:


Name: Staff of Defenestration

Price: 10,000

Type: Staff

Charges: 23

Spells:

    • Telekinesis
    • Feather Fall


Similar results would be shown if Danny had clicked on a Weapon, Ring or Wand with the obvious difference that they would display Weapon, Ring and Wand related attributes.


This page is also used for removing items from Treasure Bag, as explored in Use Case 8.


Use Case 3: Inserting New Inventory


Danny has just found the mighty Orc Poker, a magic weapon with a +3 attack bonus and the Orc Bane attribute. It is worth 8000 gold. He clicks on the “Add Treasure” link in the Treasure Bag menu and is taken to a screen with a simple drop down that asks him to choose what kind of treasure he wants to insert.


Choosing a treasure type from the drop down will expand the form by adding fields for all the attributes associated with that treasure. For example, choosing “Wand” will add an input field for “Name”, “Price”, “Charges” and “Spell”. Input for attributes with multiple values will be comma seperated lists. For example, a staff’s “Spells” attribute input might look like “Fireball,Chain Lightning,Fly”.


If Danny tries to submit a treasure without choosing a treasure type or filling in all the fields a pop up message will appear and politely reprimand him. If all fields are properly filled out then the treasure will be added to the database and Danny will be taken back to the main page.


Use Case 4: Search By Numeric Value


Danny needs an extra 5000 gold in order to afford a brand new Ring of Ironskin. To help find this he clicks on the “Search” link from the Treasure Bag menu and is taken to a search from that encourages him to input a treasure name, minimum price and maximum price. There is also a drop down list that lets him choose a specific treasure type.


Danny leaves the treasure name and maximum price blank. He also ignore the treasure type drop down. He fills in minimum price with 5000 and hits search.


The page refreshes with Danny’s search terms already filled in and a table of results below it. This table takes the same form as the treasure view table on the main page, including the fact that each item name is a link that leads to detailed results.


In the case of the minimum 5000 search this table might include items such as the 8000 gold Orc Poker and the 10,000 gold Staff of Defenestration but it would not include a 1000 gold Wand of Magic Missile or a 10 gold Dull Knife.


Use Case 5: Search By Treasure Type


Danny used to play a barbarian and didn’t really care about magic items like staffs. But after taking a level in sorcerer he suddenly needs to know if he has any useful staffs.


Danny clicks on the “Search” link and chooses “Staff” as treasure type while leaving all the other fields blank. Choosing staff causes two new fields to appear in the form: “Charges” and “Contains Spell”. Danny ignores both of these as well and hits the search button.


Danny sees a result table listing nothing but the magic staffs in his backpack.


Use Case 6: Search By Text Value


Danny’s character is stuck in a volcano and really needs to cast “Levitate” before the rising lava manages to barbecue him. Unfortunately Danny cannot remember if he has any items that let him levitate.


Danny clicks on the “Search” link and chooses “Wands” from the drop down list of treasure type. This adds two new fields to his search form: charges and spell. Danny types “Levitate” into the spell field and hits search.


A table of results appears which only including wands that can cast levitate.


Use Case 7: Search With No Results or No Criteria


It turns out that Danny doesn’t have any wands that can cast levitate. When he hits search the area that would hold the search results contains an apologetic message of “No Items Match Your Search”.


In a panic Danny clears the search form and then accidentally clicks the “Search” submit button without filling in any data. He is taken to a results page with a blank search form and a full list of his treasure.


Danny’s character eventually gets destroyed by the lava. The character is later raised from the dead but loses one level. Danny also loses most of his treasure due to it melting.


Use Case 8: Deleting An Item


After losing his flammable equipment to the volcano Danny needs to remove several items from Treasure Bag. He first finds the item he wants to remove and clicks on its name to go to the detailed item page. At the bottom is a link labeled “Delete”. This deletes the item and then returns Danny to the main page.


Non-Use Case: Improvements We’re Ignoring

It would be really great to be able to search for multiple item types at one time. It would also be cool to search for partial strings, such as all treasures with names startig with “Legendary”. Plentiful use of Ajax could make updating tales and deleting items more user friendly.


But these things would all be a lot more work than a simple practice project deserves. But I’m certainly not going to stop you from adding them if you’re feeling ambitious.


Mockup Screen Shots


Wow! Even cutting corners and leaving out details that’s still a lot of use cases to deal with. But a good design document isn’t done until you’ve created a mock-up of how you expect the final page to work. Mock-ups range from simple wire frame sketches to photo-shopped masterpieces that include every detail of the end product.


Since this is just a casual practice project we’ll be going with wire frame sketches and only show one example of each major screen. For a professional project we would want to go into much more detail and probably have multiple mock-ups for pages like search and inventory that react differently based on which treasure type the user is interested in.

Mock up of Treasure Bag main screen

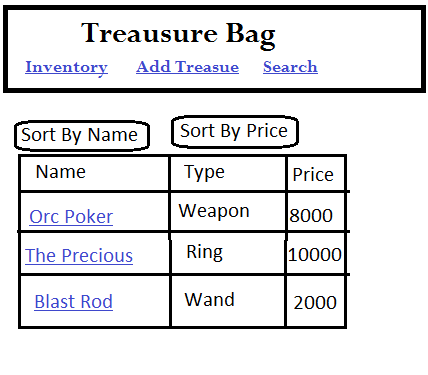
A sample main inventory page of Treasure Bag with unsorted inventory

Mock-up of the Treasure Bag search screen

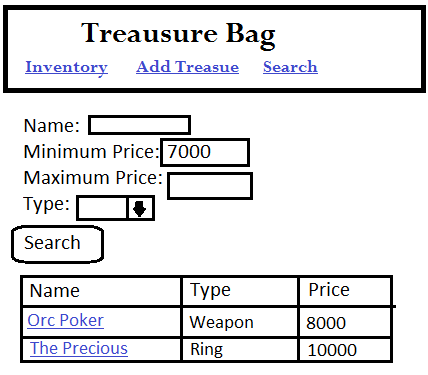
A sample search screen showing the user looking for all treasure worth more than 7000 gold

Mock-up of the Treasure Bag detailed item view

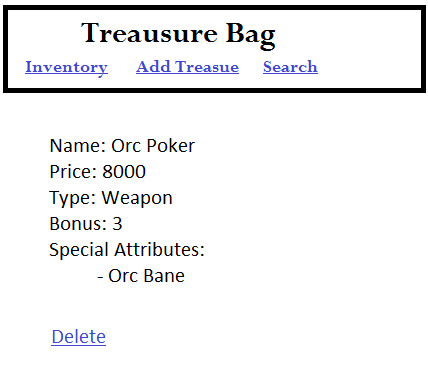
A sample treasure detail page showing the stats of the mighty Orc Poker

Mock-up of the Treasure Bag tresure input screen

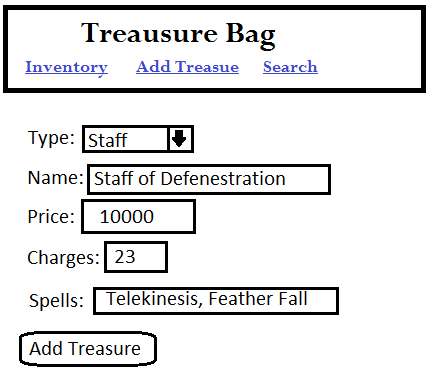
Example of a user adding the Staff of Defenestration to his Treasure Bag

Tune in next time where we actually get to the MongoDB part of this MongoDB tutorial!


BONUS!


It would be really useful if Treasure Bag could be used to keep track of characters along with treasure. For extra design practice try creating data definitions, use cases and mock up screens for character management features. No need to recreate the entire D&D rule set if you don’t want to; keeping track of something simple like character name, level and class is good enough for our purposes.

MongoDB Tutorial Part 1: Introduction

Brief Introduction to MongoDB

MongoDB is a relatively new database system that’s getting plenty of attention among developers. It’s big claim to fame is that it is schema-less and very flexible.


With a classic SQL database you have to define a scheme, a set of rules describing exactly what kind of data goes into the database. Ex: A student database might require that every student record have a first name, last name and birthday. If you change your mind and decide you also want to include GPA you have no choice but to go back and redefine the database. And if some students have middle names but some don’t you have to decide between ignoring everyone’s middle name or creating a middle name value that sometimes gets left blank.


MongoDB, on the other hand, gives you the freedom to put whatever data you want into the database whenever you want. Toss a bunch of students into a database and then glue on GPAs later without breaking a sweat. You can give some students a middle name without touching the others. You can even mix and match completely unrelated records. Want to stick a spaghetti recipe in the middle of your student database? With MongoDB you can! (Note: mixing student records and cookbooks together in one database is bad software design and actually sort of creepy. Just because you can do it doesn’t mean you should.)


Of course, MongoDB isn’t a miracle solution and classic SQL databases are still an efficient choice for a lot of applications. But it’s always nice to have more tools and more options so if you’ve got the time it’s worth giving MongoDB a look.


The Practice Project: Treasure Bag

There are plenty of great books and websites out there that will teach you the basics of MongoDB. But in my opinion you don’t really understand a technology until you’ve built at least one program with it. So over the next few weeks of free time I plan to write a very simple sample MongoDB web application and invite you all to join in with me.


The trick here is that we want a project that really shows off the flexibility of MongoDB and lets us practice with all the major features of the database. We want to avoid boring things like employee registries or phone books where all the data is similar. If you’re going to write something like that you might as well use MySQL.


Which is why I decided on writing a fantasy game themed application that I call “Treasure Bag”. This simple program will let a user keep track of the treasure he finds in a generic Dungeons and Dragons style game.


This is a great project for MongoDB because treasure items are similar enough you probably want to keep their data all in one place while being different enough that designing a SQL database for them would be difficult. For example, both Weapons and Wands have a price and a name but the weapon is going to have information about combat statistics while the wand is going to have extra information about magic spells. With SQL we would probably have to create a separate table for each type of item, but with MongoDB we can keep them both in one collection.


Tune in next time to follow along as we design the application.

Some Things Are Hard To Practice

One of the best things about computer programming is that as soon as you learn a new skill you can start practicing it. All you need is a computer and a spare weekend or two.

Plumbing, on the other hand, requires an actual problem to solve. You can’t practice fixing pipes if there aren’t any broken pipes to fix. To a wannabe handyman a house full of functional appliances is actually almost frustrating.

Which explains why I was bizarrely happy to hear the telltale dripping of a leaky faucet. Finally, a chance to develop some practical maintenance skills! And overall it went pretty well considering that the leak is gone and I still have all my fingers.

Now I’m back to waiting, patiently hoping for a new fixture to spring a leak so I can pull out my wrenches and reference manuals and come one project closer to mastering the challenges of maintaining a modern home.

Installing Linux (Ubuntu 12.04) on a Dell Inspiron 1521

I use a Linux emulator at work, but I’ve never actually installed the OS on a physical machine. But now that my new computer has rendered my old computer redundant I figured I would remedy that deficiency and turn my spare laptop into a dedicated Linux wonderland.

For the most part the install went smoothly but there were two big issues that I thought I would document for anyone else trying to install Ubuntu 12.04 on a Dell Inspiron 1521.

Enabling Wireless Networking

Ubuntu 12.04 didn’t recognize my built-in wireless at first. There were no options to turn on wireless or scan for networks or anything.

The easiest way to fix this is to run the “Additional Drivers” program that comes with Ubuntu. In fact, Ubuntu will probably prompt you to run this program the first time you start your system.

The only trick here is that “Additional Drivers” won’t work without an Internet connection, and at this point the wireless still doesn’t work. Fortunately, wired networking does work so all you have to do is grab an Ethernet cable and physically plug your computer into your network.

Once you are physically connected to the Internet you can run “Additional Drivers” which should automatically find the software Ubuntu needs to enable and run your wireless. At that point you can ditch the cabling and reconnect to your network via wireless.

Ubuntu Endlessly Loops While Trying To Wake Up From Suspend

Normal laptop behavior says that the computer should conserve power by going into suspend mode when the user folds the screen down and then waking up when the user opens it back up. But when I tried this I found Ubuntu 12.04 getting stuck in a loop where it would try to wake up, flash some text across the screen, briefly cut power to the screen and then start all over. This doesn’t happen every time, but still often enough to be a nuisance.

Update: I originally thought this problem was somehow tied to having wireless networking active, but after further testing the computer seems to have the same chance of hanging versus properly suspending regardless of whether wireless is active or not. The problem is rare enough that I can currently live with it but I hope to find the real cause of and solution to this problem in the near future.