Let’s Program A JavaScript Game 7: When Worlds Collide For Real

Knowing Is Only Half The Battle


Last time we covered the theory behind hitboxes and decided that our digital motorcycle needs three different hitboxes:
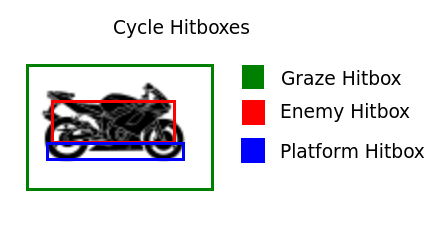
Hitbox Diagram For A Motorcycle

Remember This?

So now let’s actually put that idea into practice with some code.


Hitbox Creation Functions


Obviously our game is going to keep track of where the player is on the screen. But for collision detection what we really need is a way to transform that position into a set of three hitboxes.


The most straightforward solution is to write three functions that each accept an x and y coordinate representing the player’s position and then returns a complete hitbox object.


Now to be honest creating a bunch of new rectangle objects every everyt ime we want to do a collision check strikes me as potentially wasteful. Maybe it would be smarter to just create the hitboxes at the beginning of the script and then update them every time the character moves.


But I don’t want to waste time obsessing about how to run this code fast until I know for sure that the easy approach really is too slow. So I’m just going to build the hitbox creator functions and see how that runs. I can always optimize later.


Now it’s time for some math.


Our “cycle.png” image (which I recently flipped to face right instead of left) is 75 pixels wide and 48 pixels tall. We want to put a a five pixel tall “feet hitbox” along the bottom of the motorcycle for detecting when we hit platforms. Since the player’s position is measured from the top-left corner of the image that means the feet hitbox needs to be 43 pixels lower than then the player position.


// Get a 5x75 hitbox along the bottom of a 48x75 sprite.
// Used for detecting when the player has landed on a platform
// If you change the player sprite dimension you should update this function too
function getFeetHitbox(xPos, yPos){
   var feetHitbox = new Object();
   feetHitbox.x = xPos;
   feetHitbox.y = yPos+43;
   feetHitbox.width = 75;
   feetHitbox.height = 5;
   return feetHitbox
}


Next we want a relatively small “death hitbox” along the middle of the cycle. It will take some play testing to decide what the best size for it is but for now let’s say… 24 by 50 pixels. That’s about 12 pixels away from each side of the motorcycle which tells us everything we need for setting up the offsets.


// Get a 24x50 hitbox in the middle of a 48x75 sprite.
// Used for detecting when the player has hit an enemy
// If you change the player sprite dimension you should update this function too
function getDeathHitbox(xPos, yPos){
   var deathHitbox = new Object();
   deathHitbox.x = xPos+12;
   deathHitbox.y = yPos+12;
   deathHitbox.width = 50;
   deathHitbox.height = 24;
   return deathHitbox;
}


Finally we need to build the “graze hitbox” to track when the player is close enough to an enemy to start getting bonus points. This box actually need to be larger than the motorcycle graphic. Once again we’ll have to actually play test the game to fine tune the size of the graze box, but for starters lets give it 20 extra pixels on every side of the motorcycle (for an extra 40 pixels of width and height). Note that this actually requires negative offsets in order to put the graze box above and to the left of the player’s main position.


// Get a 88x115 hitbox centered around a 48x75 sprite.
// Used for detecting when the player is grazing an enemy
// If you change the player sprite dimension you should update this function too
function getGrazeHitbox(xPos, yPos){
   var grazeHitbox = new Object();
   grazeHitbox.x = xPos-20;
   grazeHitbox.y = yPos-20;
   grazeHitbox.width = 115;
   grazeHitbox.height = 88;
   return grazeHitbox;
}


Quick Test


Collision detection function? Check!


Hitbox creation function? Check!


Hitbox testing code? Let’s write it!


For starters you’re going to need to update your global variables to this:


var loopCount=0;
var playerInput = new Object();

var player = new Object();
player.x = 100;
player.y = 100;

var testObject = new Object();
testObject.x = 200;
testObject.y = 200;
testObject.width = 50;
testObject.height = 50;

var feetCollision = false;
var grazeCollision = false;
var deathCollision = false;

var cycleImage = new Image();
cycleImage.src = "cycle.png";


And then you’ll need to change your update method in two ways. First, when the user presses a key you need to update the player object instead of the generic xPos and yPos variables. Second, you need to check for collisions and update the global collision variables.


//Update the game by one step
function updateGame(){
   loopCount++;
   if(playerInput.right){
      player.x+=5;
   }

   if(playerInput.left){
      player.x-=5;
   }

   if(playerInput.up){
      player.y-=5;
   }

   if(playerInput.down){
      player.y+=5;
   }

   feetCollision = false;
   grazeCollision = false;
   deathCollision = false; 

   if(intersectRect(testObject, getFeetHitbox(player.x, player.y))){
      feetCollision = true;
   }

   if(intersectRect(testObject, getDeathHitbox(player.x, player.y))){
      deathCollision = true;
   }

   if(intersectRect(testObject, getGrazeHitbox(player.x, player.y))){
      grazeCollision = true;
   }
}


And finally we need to update our draw code to draw the player motorcycle, the test obstacle and a list of what hitboxes are and aren’t being hit:


//Draw the screen
function drawScreen(){
   var canvas = document.getElementById('gameCanvas');
   var context = canvas.getContext('2d');

   //Draw background
   context.fillStyle = '#dcdcdc';
   context.fillRect(0,0,600,400);

   //Draw black text
   context.fillStyle = '#000000';
   context.fillText("Loop Count: "+loopCount, 20, 20);

   if(feetCollision){
      context.fillText("Feet Collision: True", 20, 40);
   }
   else{
      context.fillText("Feet Collision: False", 20, 40);
   }
   
   if(deathCollision){
      context.fillText("Death Collision: True", 20, 60);
   }
   else{
      context.fillText("Death Collision: False", 20, 60);
   }

   if(grazeCollision){
      context.fillText("Graze Collision: True", 20, 80);
   }
   else{
      context.fillText("Graze Collision: False", 20, 80);
   }

   //Draw a red square the player can run into
   context.fillStyle = '#FF0000';
   context.fillRect(testObject.x, testObject.y, testObject.width, testObject.height);

   //Draw a motorcycle as the player's avatar
   context.drawImage(cycleImage, player.x, player.y);
}


If you’ve managed to properly copy all the code so far you should be able to hit the canvas test button and then control the motorcycle graphic by using the arrow keys. Move it towards and over the red box and watch how the three different collision variables react.
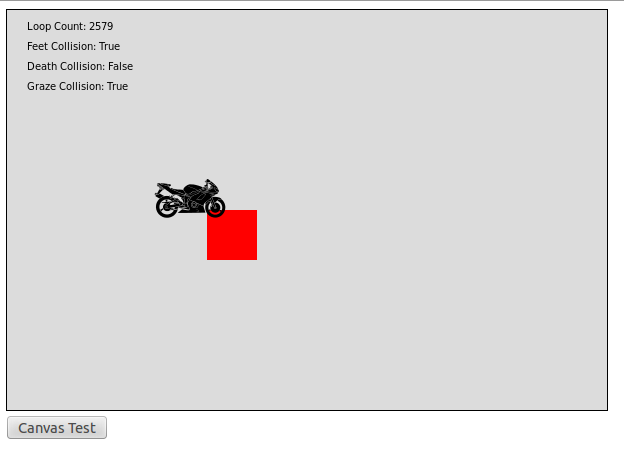
 

A sample screenshot of the collision test.

Close enough to graze and land on the square, but not close enough to hit the “death hitbox”.


I Hope You Remember High School Physics


With collisions working the next big piece of our simulation is a simple gravity system to pull the motorcycle downwards and give the player a reason to jump from platform to platform. So tune in next week as we try to find a gravity algorithm that walks the fine line between realistic and fun.
Let’s Program A JavaScript Game 6: When Worlds Collide

Mom! He’s Touching Me!


Now that I think about it, none of my childhood family vacations ever involved the classic game of “How much can you invade your sibling’s personal space before they try to get you in trouble with Mom”. I feel deprived.


Anyways, this week’s topic is collision detection: the art of figuring out when two virtual objects are touching each other or overlapping. This is a very important element of game programming and really comes in handing when you need to know things like:

  1. Is the player standing on solid ground?
  2. Did the player just run into an enemy?
  3. Did the player just touch a power up?
  4. Is the player trying to walk through a wall?
  5. Did the player jump high enough to hit the ceiling?
  6. Did the player’s bullets hit an enemy?


Without collision detection a videogame would just be an interactive piece of art where you float around a world without physics watching things happen more or less at random. Which actually sounds kind of cool now that I think about it but that’s not what we’re aiming for right now.


Simple Collision Detection


We can’t detect if two objects are touching each other without two objects to touch. And no object is easier to work with than a rectangle which can be represented as a single x and y coordinate (representing the upper-left corner of the rectangle) along with a width and height.


//Sample Rectangle Code: Don't Put In Your Game
var testRect = new Object();
testRect.x = 5;
testRect.y = 20;
testRect.width = 10;
testRect.height = 30;


Now if we build two objects like this we can test if they are touching or not with this neat little math function, which is logically equal to this function from Wikipedia.


//Test if two rectangles intersect
//Arguments are two objects which much have x, y, width and height variables
function intersectRect(r1, r2) {
   return !(r2.x > r1.x+r1.width ||
            r2.x+r2.width < r1.x ||
            r2.y > r1.y+r1.height ||
            r2.y+r2.height < r1.y);
}


This function runs four quick tests that can each prove that the two rectangles ARE NOT touching each other. The first line tests if the second rectangle is too far right to touch the first rectangle. The second line tests if the second rectangle is too far left to touch the first rectangle. The third line tests if the second rectangle is too low to be touching the first rectangle and finally the fouth line tests if the first rectangle is too high up to be touching the first rectangle.


If all the tests fail then the second rectangle must be touching the first rectangle and the function overall returns true. Come up with a few samples and run the logic by hand if you like. It’s not like this articles going anywhere.


How Many Hitboxes Does One Character Need?


With that function we have everything we need to tell when rectangles collide. Now all we have to do is wrap all of our game graphics inside of invisible rectangles and it’ll be easy to tell when the player is running into enemies or crashing into platforms.


These invisible rectangles are called “hitboxes” and they are a vital game 2D* programming trick.


But there are certain problems with having your entire character represented by just one big hitbox.


For example: Imagine You detect that your one-hitbox character has run into a one-hitbox floating block. What happens next should depend on what direction the character hit the block from.


If they collided with the block from above they should land on the block and treat it like ground.


If they collided with the block from below they should stop moving upwards and instead start falling down.


If they collided with the block from the side they should stop moving and then slide downwards.


But since the character has just one big hit-box it’s really hard to figure out what kind of collision just happened. All you know is that the character and the block are touching; you don’t know where they are touching or what part of the character hit the block first.


There is also the big issue that giving a character one big hitbox usually creates a hitbox that is larger than the character’s graphics. This can lead to frustrating scenarios where the player winds up dead because an attack hit the blank space near his character’s head. It looks like it shouldn’t count as a hit but it’s inside of the invisible hitbox so it counts.

A Diagram Of A Robot With One Hitbox

One Hitbox Per Character: Simple But Flawed

So one big hitbox makes it hard to tell exactly what is going on with your character and can lead to frustrating collisions for the player. This is a problem!


The simple solution is to give each character multiple hitboxes for different logic.


Some common hitbox types include:


Death box: A small, central hitbox for checking whether attacks hit the player or not. By making it smaller than the character graphics we give the player a little wiggle room and avoid the “phantom hits” we would get if the hitbox covered whitespace.


Bonus Box: A large hitbox that is used for detecting whether the player has touched bonus items or not. Slightly larger than the player so that they can grab coins and power ups just by getting really close without having to worry about exact pixels.


Feet Box: A short but wide hitbox used for detecting whether the player is touching the ground. We put it in the bottom center of the sprite.


Head Box: A short but wide hit box used for detecting whether the player has just bumped his head against the ceiling. We put it at the top center of the sprite.


Side Boxes: Two tall but thing hit boxes used for detecting whether the player has run into a solid obstacle. We put them on the left and right sides of the player.

A Diagram Of A Robot With Multiple Hitboxes

Multiple Hitboxes: Much More Elegant

Hitboxes For Defrag Cycle


So how many of those common hitbox types doe we need for our game? Let’s see…


We need to be able to jump from platform to platform, so we’re going to need some sort of “foot hitbox” running along the bottom of the motorcycle.


We need to keep track of when the player runs into a virus and loses, so we’re going to need a small “death hitbox” in the center of the motorcycle.


We want to give players bonus points for grazing viruses, so we’re going to need a large “bonus hitbox” that’s actually a little bit bigger than the motorcyle. When a virus is inside this box but outside the “death hitbox” is when we give graze points.


We want players to be able to jump through platforms from below to land on top, so we DON’T need any sort of “head hitbox”.


The game has no walls, so we don’t need any “side hitboxes”.


So our final hitbox model for debug cycle has three hitboxes and will look something like this:


Hitbox Diagram For A Motorcycle

I think this should work


From Theory To Practice


Not a lot of code today, but that’s OK because we’ve laid down the groundwork we need to actually do some collision detection next time. Maybe throw is some gravity and get the player’s motorcycle to actually jump between platforms if I have the time.


* 3D games have a similar collision technique based around wrapping things with invisible cubes, cylinders and spheres.

Let’s Program A JavaScript Game 5: Press Start To Play

Play A Game Or Watch A Movie?


Pop Quiz: What’s the main difference between a movie and a videogame?


If you answered “Player Input”: Congratulations, you’re exactly right! The main component that makes a game a game is the fact that the player has some control over what happens next. The player isn’t just watching some hero fight a monster, he’s pressing the buttons that make the hero fight.


If you answered anything else: You’re probably still right but that wasn’t the answer I was looking for so it doesn’t count. Try to do a better job of reading my mind next time I ask a semi-rhetorical question.


Anyways, my main point here is that player’s input is important and that’s what I’m going to be programming today.


Getting Input With JavaScript A.K.A. Whoops I Lied To You


Remember how we prototyped a getInput function and put it at the start of our gameLoop? Turns out that doesn’t work so great with JavaScript. Throw away that function and all references to it, we’re going to be doing something completely different.


Don’t look at me like that. This is a Let’s Program, I’m writing these articles at the same time as the code and I don’t always catch my mistakes early enough to fix them before hitting “post”.


Anyways, here is how it should work:


Instead of checking for input during the loop we will ask the browser to run a short piece of code every time a key is pressed. Of course, we may not be ready for player input at that exact moment so we will just have the code store the input for future use. That way if a player presses a key between game loops the input will still be there the next time we update.


As for the potential issue of the player pressing a key during a game loop… it’s not really a problem. Modern browsers can run multiple pieces of JavaScript at once so we don’t have to worry about the game lagging because it is trying to update the game and process input at the same time.


There is still the slight issue of what happens if player input changes halfway through a loop. Maybe the loop starts with the “right” key being pressed and then halfway through the key is released. This could lead to a strange state where we do 50% right key logic and 50% default logic. To prevent this we’ll just have to be sure that we only access player input once per loop so that it doesn’t have time to change on us, maybe by storing a local copy of player input at the start of every loop so that the global input can change without influencing the current frame.


Time For The Code


First off we have to let the browser know that we want the input. One easy way to do this is by adding onkeyup and onkeydown traits to the body tag in your HTML. Just change your code from this:


<body>


to this:


<body onkeydown="doKeyDown(event);" onkeyup="doKeyUp(event);">


Now everytime the user presses a key the browser will automatically run the doKeyDown function we’re about to write. And when they release a key it will automatically run the doKeyUp event that we are also about to code.


One warning: This will capture ALL keyboard input for that page, which is OK for a full page game but can be a bad idea if your game is just one part of a much larger page where people might want to use their keys for scrolling.


Capturing input doesn’t do us any good if we don’t have a place to store it, so let’s start by adding a new object declaration to the top of our script:


var playerInput = new Object()


Now we can write the doKeyDown and doKeyUp functions. They’re both pretty simple functions, with the only trick being that we have to double check whether the user is using Internet Explorer or not because certain code only works on certain browsers. Other than that we just check the numeric code of whatever button the user just pressed, see if the code matches any of the arrow keys and then record it in our playerInput variable.


function doKeyDown(event){
   var keynum;

   if(window.event){ //Browser is IE
      keynum = event.keyCode;
   }
   else{
      keynum = event.which;
   }

   if(keynum == 37){
      playerInput.left = 1;
   }
   else if(keynum == 38){
      playerInput.up = 1;
   }
   else if(keynum == 39){
      playerInput.right = 1;
   }
   else if(keynum == 40){
      playerInput.down = 1;
   }
}

function doKeyUp(event){
   var keynum;

   if(window.event){ //Browser is IE
      keynum = event.keyCode;
   }
   else{
      keynum = event.which;
   }

   if(keynum == 37){
      playerInput.left = 0;
   }
   else if(keynum == 38){
      playerInput.up = 0;
   }
   else if(keynum == 39){
      playerInput.right = 0;
   }
   else if(keynum == 40){
      playerInput.down = 0;
   }
}


Of course, if you are building a game that uses buttons other than the arrow keys you will need more else if statements for whatever buttons you are interested in. For example, maybe you want your running game to let the user use the spacebar to jump. To do so you’d just have to lookup the keycode for “space” and then keep track of a playerInput.space variable.


Introducing The Protagonist Square


We now have code for getting player input, but that’s no good without some way to test it. And while I suppose we could just print some logging text to the console that says “Player has pushed right arrow key” it would be much more fun to have some actual graphics moving around the screen.


So to start go up to the start of your script to where you declared the playerInput variable and add two new variables for xPos (x position) and yPos (y position). Let’s have them default to 100.


var xPos = 100;
var yPos = 100;


And now let’s use those variables to draw a red square on our screen by updating our screen drawing function like this:


//Draw the screen
function drawScreen(){
   var canvas = document.getElementById('gameCanvas');
   var context = canvas.getContext('2d');

   //Draw background
   context.fillStyle = '#dcdcdc';
   context.fillRect(0,0,600,400);

   //Draw black text
   context.fillStyle = '#000000';
   context.fillText("Loop Count: "+loopCount, 20, 20);

   //Draw a red square the player can control
   context.fillStyle = '#FF0000';
   context.fillRect(xPos, yPos, 50, 50);
}


And now we have a little red square that we can move around just by changing xPos and yPos. The logical next step is to use player input to change xPos and yPos, which we can do by rewriting updateGame like this:


function updateGame(){
   loopCount++;
   
   if(playerInput.right){
      xPos+=5;
   }

   if(playerInput.left){
      xPos-=5;
   }

   if(playerInput.up){
      yPos-=5;
   }

   if(playerInput.down){
      yPos+=5;
   }
}


Give It A Try


Save your changes, reload your game page and hit the “Canvas Test” button. You should see a red square appear on the screen, and the red square should move around when you press the arrow keys. If not you have some debugging to do. Make sure you copied the most recent functions correctly and that the playerInput, xPos and yPos variables are all properly declared inside the script tags but before you declare any functions.


And with that we’re done for this week. Next week I’ll probably talk about collision detection. Or maybe gravity. But since gravity isn’t really that useful without a ground to collide with I’m thinking it will probably be collision detection.

Let’s Program A JavaScript Game 4: V8 600HP Game Engine

Reinventing The Wheel


Let’s be honest: Building our own game engine from scratch is probably not a great idea. There are already open-source JavaScript game engines that do everything we need but better. If you need to quickly and efficiently build a bug free JavaScript game looking at one of these existing solutions would definitely be your first step.


But this is a Let’s Program! Doing things from scratch and learning the hard way is our goal.


Your Game Comes With The Following Pieces…


When you get right down to it, all games are made up of the following two things:


  1. Game Rules: How the game works.
  2. Game State: What is going on in the game right now.


This is true for board games, card games and videogames.


In a board game the rules are usually written on the back of the box and the game’s state is where the pieces are on the board. In a card game the rules usually come in a little pamphlet and the state is the cards in each person’s hand. In a videogame the rules are built into the code and the state is kept track of by computer variables.


Conceptionally there is no real difference between Bob and Sally playing checkers by reading the back of a box and moving pieces around a board and Bob and his computer playing Grand Theft Auto by reading millions of lines of code and moving bits of data around inside memory.


Sure, a video game like Grand Theft Auto has dozens of “turns” per second to simulate real time action, but behind the scenes it’s still just the same old board-game mechanic of “follow the rules”, “make your move”, “update where the pieces are”.


How To Play The Game


Now that we’re all on board with the ideas of game rules and game state we can simplify running a game to a process of three repeating steps:


  1. Check for player input
  2. Update the game state based on the game rules and the player input
  3. Redraw the screen based on the current game state


As an example, let’s imagine that the user presses the up key.


In step one the game checks for input and notices that the user has pressed the up key.


In step two it starts updating the game state. The game rules say that if the player presses the up key while standing on the ground he should “jump” by setting his up velocity to 20. The rules also say that the player and every enemy should move velocity pixels per update, so the game moves the player up 20 pixels and also moves two enemies on screen 10 pixels to the left. The rules also say the game should check for player/enemy collisions but the game doesn’t find any so it stops.


In step three the game now redraws the screen. It draws the player 20 pixels up in the air and draws the two enemies 10 pixels to the left of where they used to be.


50 milliseconds later the loop repeats.


In step one the game checks for input and notices that the user is still pressing the up key.


In step two the game checks the rules. The rules say that the up key only makes the player jump if he is standing on the ground, which he no longer is, so the input gets ignored. But the rules also say that characters in the air should have their velocity decreased by 5, so the player’s upward speed drops from 20 to 15. The game then updates all the characters, moving the player up by 15 pixels and the enemies left by 10. It checks for collisions and still doesn’t find any.


The game now redraws the screen. The player is now 35 pixels up in the air and the enemies are 20 pixels to the left of where they started.


50 milliseconds later the loop repeats a third time. And then a fourth time and a fifth time and so on.


Since the loop happens several dozen times a second the player gets the illusion that everything is happening in real time, but when you get right down to it the whole game could be converted into a turn-based boardgame no problem. Not that anyone would want to play a boardgame where it takes a few hundred turns to cross a room and the rulebook is written mostly in math terms… but the idea is still sound.


Looping In Javascript


Warning: We’re going to be experimenting with loops. Odds are good that you will make a mistake, create a crazy infinite loop, freeze your browser and have to force it to shut down. So don’t panic if your test page suddenly stops responding. Just close the browser and double check whatever code you just typed in.


Now our final goal for the game loop is to have it run once every 50 milliseconds. That’s 20 times a second, which is honestly a little on the low side for a video game but still high enough to feel like smooth-ish animation and interaction. Most importantly it’s slow enough that we can basically guarantee our code will complete inside of each loop, giving us plenty of wiggle room when prototyping messy code. After that’s done we can always go back and adjust the loop to run more often if the game feels too jerky.


Now the most obvious approach to make a loop run once every 50 milliseconds would be be to use “setInterval”, which allows us to schedule a function to repeat again and again every X milliseconds. It sounds perfect and this approach can work. I’ve used it in demo games before.


But running the algorithm once every 50 milliseconds does have one big issue: What happens if your function takes longer than 50 milliseconds? You can wind up in a situation where setInterval triggers a new game loop while the old one is still running, which is a bad bad thing. Having two functions trying to control your game at the same time can corrupt variables, double move characters and generally mess everything up.


To avoid this we will use this strategy instead:

  1. Check what time it is at the start of our game loop.
  2. Check what time it is at the end of our game loop.
  3. If more than 50 milliseconds have passed, immediately call the game loop function again.
  4. If less than 50 milliseconds have passed, use setTimeout, which lets us schedule a function to be called only once after a timer runs out.


Because we don’t schedule the next game loop until after we know the current game loop has finished we can now guarantee that we will never end up with multiple game loops interfering with each other. If a loop takes longer than 50 milliseconds we just wait for it finish before moving on. This will cause slight lag, but that’s better than having the engine actually break.


Now on to the nitty gritty technical details. When using setTimeout the first argument has to be a STRING copy of the code you want to run and the second argument is how many milliseconds the browser should wait before running it.


Making sure the first argument is a string is important. If the first argument is actual code it will be called immediately* instead of after the timer goes off. You can see this for yourself by experimenting with code like this:


//Wrong! The alert is called immediately
setTimeout(alert('Time Is Up!'), 2000);
//Right! The code inside the string gets called after two seconds
setTimeout("alert('Time Is Up!')", 2000);


The big risk here is creating infinite loops. For instance, our upcoming gameLoop function ends by scheduling another gameLoop. If you accidentally call gameLoop immediately instead of properly quoting it and scheduling it for later you will end up with an infinite loop of hyper-fast gameLoops instead of the steady one-loop-per-50-milliseconds you were hoping for. This will also probably freeze your browser. Happened to me. Don’t let it happen to you.


Prototyping The Loop


Open up the test code from two posts ago and replace whatever script you had with this:


var loopCount=0;

function canvasTest(){
   gameLoop();
}

//The main game loop
function gameLoop(){
   var startTime = Date.now();
   getInput();
   updateGame();
   drawScreen();

   var elapsedTime = Date.now()-startTime;
   if(elapsedTime>=50){ //Code took too long, run again immediately
      gameLoop();
   }
   else{ //Code didn't take long enough. Wait before running it again
      setTimeout("gameLoop()",50-elapsedTime);
   }
}

//Get the player's input
function getInput(){
   //Empty prototype
}

//Update the game by one step
function updateGame(){
   loopCount++;
}

//Draw the screen
function drawScreen(){
   var canvas = document.getElementById('gameCanvas');

   var context = canvas.getContext('2d');
   
   //Draw background
   context.fillStyle = '#dcdcdc';
   context.fillRect(0,0,600,400);

   //Draw black text
   context.fillStyle = '#000000';
   context.fillText("Loop Count: "+loopCount, 20, 20);
}


Now click the “Canvas Test” button and watch that counter climb at a speed of approximately 20 loops per second.


Let’s walk through the code really fast.


Clicking the button triggers canvasTest like usual, and canvasTest calls gameLoop.


gameLoop takes a note of what time it is (in milliseconds) by calling Date.now. The game loop then runs the three steps of our game (get player input, update game, and draw screen) and then checks how much time has passed by comparing the stored “startTime” to a second call to Date.now. If 50 or more milliseconds have passed we are running slow and need to call gameLoop again immediately. Otherwise we set a timer and have gameLoop run again later.


The three steps of the game are pretty empty at this point. We don’t care about player input so we leave that function blank. Our only game update is to increase the global “counterLoop” and painting the screen involves nothing but redrawing the background and printing a message about how many loops we have seen.


Next Time: Let’s Get Interactive


We’ve just built a simple but serviceable game engine skeleton. Now it’s time to start filling in the prototype functions, starting with getInput. Join me next week to see how that goes.


* There is one scenario where putting a function call in setTimeout would be a good idea: When the function’s main purpose is to return a string containing the code you actually want to schedule. Maybe you have a “builScheduledCode” function that returns different string wrapped functions depending on the state of the program. Like, if the debug flag is set it returns “logState();runLogic();” but if the debug flag is clear is only returns “runLogic()”;

Let’s Program A JavaScript Game 3: Designing “Defrag Cycle”

Some Obvious Game Design Theory


Videogames are a combination of gameplay and theme.


In Dragon Quest, an RPG, gameplay consists of exploring grids, navigating menus and trying to make your team’s numbers go up while the enemy team’s numbers go down. But the theme is “Fantasy Adventure” which turns the grids into dungeons and the number manipulations into tense combat with all sorts of magic and monsters.


In Counter Strike, an FPS, gameplay is all about moving around a big piece of geometry and trying to tag other players with various vectors. But the theme turns the geometry into a modern day battlefield and the vector tagging into guns and bullets.


When designing a game sometimes you start with a gameplay idea and then come up with a theme that fits it. Other times you start with a theme in mind and then come up with gameplay that lets you tell the story you want. And quite often the theme and gameplay evolve together in the designer’s mind, each one influencing the other.


Designing Our Gameplay


For this Let’s Program we’re going to take a “Gameplay First” approach to design. Mostly because we’re here as programmers and as programmers our main focus is on writing interesting code, not writing interesting stories. We can talk about the fine art of game theme design some other time.


One easy way to design a game is to play a lot of other games and then adopt (a.k.a. shamelessly copy) whatever gameplay elements you enjoy the most. This Let’s Program is going to focus on the “Running” genre of casual browser games. These are games where the player controls an avatar that constantly runs to the right and the player’s goal is to jump over various obstacles in order to see how far they can go.


Here are a few examples (built using Flash, not JavaScript, but you get the idea):


These games were both built by people with significantly more time and artistic talent than me, so my final product isn’t going to look anywhere near as nice or have as many special features. But I will still be following the same basic gameplay pattern.


A Picture Is Worth A Thousand Words


OK, so the basic idea is that the player has to move along a path while avoiding obstacles. In my game the two main obstacles are going to be:

  1. Gaps in the path
  2. Moving projectiles


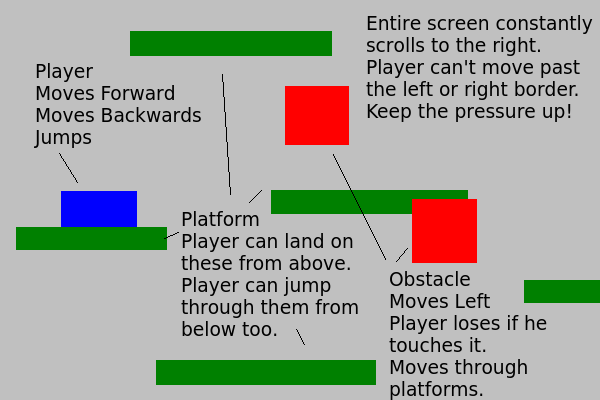
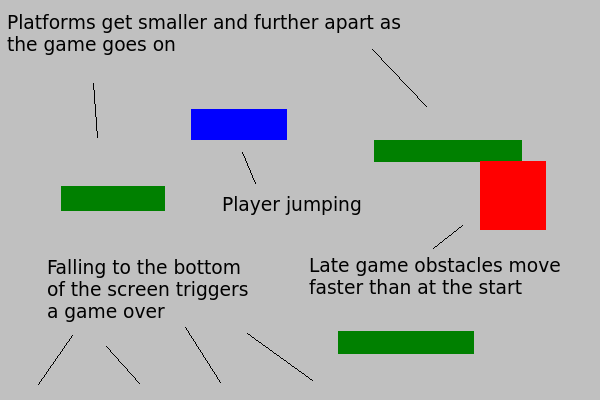
In order to avoid these obstacles the player can move left, right and perform simple jumps. To help keep the pressure on the player the entire screen will scroll constantly, forcing them to keep moving. We will also make the game get harder as it goes on by making the projectiles faster and the platforms smaller as time goes on.


Here are a couple rough pictures that help explain the gameplay I’m aiming for.

roughdesign1

Try to imagine all the pieces moving around

roughdesign2

Try making some sound effect noises while looking at this picture. It helps.

Introducing: Defrag Cycle!


Now that we have the basic gameplay under control we can start working on adding a theme to the game.


Our gameplay is pretty basic and with the right art you could turn the game into just about anything. A hero jumping along cliffs while avoiding fireballs. A ninja jumping from tree to tree while avoiding shurikens. Or even something completely crazy like a plumber jumping around on pipes while avoiding flying turtles.


But I can’t draw, so my choice of game themes is somewhat limited. I’m going to have to rely on free clipart for all my graphics, like the motorcycle and virus from the canvas tutorial.


In fact, let’s use those two exact graphics. What kind of game theme can we come up with that involves a motorcycle and a bunch of viruses?


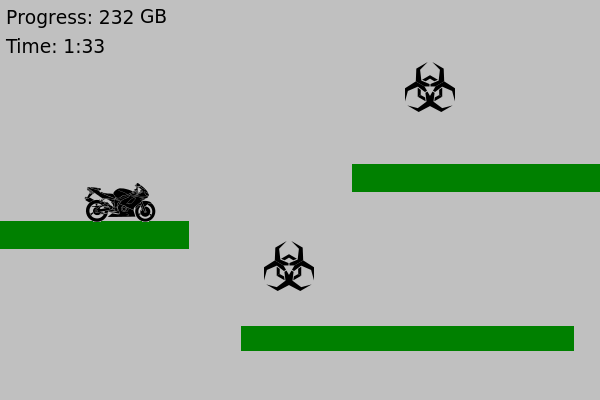
How about… the motorcycle represents a “defragmentation” computer program that helps clean up hard drives. The obstacle course that the player has to navigate represents a fragmented hard drive and the viruses represent (obviously) computer viruses. The player’s goal is to completely defrag the harddrive by avoiding the viruses and not failing off the path.


Yeah, I realize it sounds kind of like Tron. But is that really a bad thing?


Anyways, the game will have two score counters: a “progress” and a “time”. Both will automatically go up as long as the player isn’t dead. When the “progress” count reaches 1,000 GB the hard drive is completely defragged, the player wins and their total time is shown.


To help reward good players we will introduce a “graze” mechanic where people who get really close to a virus without actually colliding with it will be awarded bonus “progress” points. This will let good players defrag the hard drive faster than usual and give them a much lower total time.


Here are a couple screen shots of what I had in mind:

roughdesign3

Not bad for a game built entirely around two pieces of free clipart

roughdesign4

I don’t actually like games with graze mechanics. Why am I doing this? What I have become!?


Next Time: Start Your (Game) Engines


Now that we have a basic game design document we can start to actually program our game. So join me next week as we take the first step towards building the custom JavaScript we need to actually run our game.

Let’s Program A JavaScript Game 2: The Canvas Of Dreams

Let’s Program A JavaScript Game 2: The Canvas Of Dreams


No Time For HTML


This is “Let’s Program A JavaScript Game” not “Let’s Program A Website” so instead of discussing the fine points of HTML structuring I’m just going to drop the code for a very basic skeleton page that we can use for testing out the canvas. Just type or copy the following text into a file named something like “javascriptgame.html” and then open it up with your favorite modern browser (most up to date browsers support the canvas):


<!DOCTYPE html>
<html>
<head>
   <script>
      function canvasTest(){
         alert("Canvas Test");
      }
   </script>
</head>
<body>
   <canvas id="gameCanvas" width=600 height=400></canvas>
   <br/>
   <button onclick="canvasTest()">Canvas Test</button>
</body>
</html>


Not much to this. The HTML document has a HEAD, that holds our script, and a BODY that holds our canvas and one button. Clicking the button calls our script and if everything works properly you should get a screen sort of like this:

Just a quick test to make sure your button is connected to the script

Just a quick test to make sure your button is connected to the script

Paint It Black


The first step to actually doing something interesting with our canvas is to put a reference to the canvas inside of a JavaScript variable. Then we use that reference variable to create a “context” object that can be used to do the actual work.


With our context all set up painting the entire canvas is as simple as setting the fillStyle of our context to whatever color we want and then calling the fillRect function. This function needs four arguments: the x and y coordinates of the top-left corner of the rectangle you want to draw along with the width and height of the rectangle.


Here’s our updated canvastTest function and a picture of what it should do. Remember to refresh the page in order to get the new code into the browser. If clicking on the button just shows the alert again odds are the old page is still in your browser memory and refreshing is the easiest way to force it to get rid of the old and grab the new.


function canvasTest(){
   var canvas = document.getElementById('gameCanvas');
   var context = canvas.getContext('2d');
   context.fillStyle = '#000000';
   context.fillRect(0,0,600,400);
}


A boring but important first step: Painting the entire canvas all one color

A boring but important first step: Painting the entire canvas all one color


Paint It Black, But With Polka Dots


Painting the entire screen black is kind of boring. Let’s add some color now by choosing a new fillStyle and then drawing some more rectangles on top of the black background rectangle.


Here’s an updated canvasTest that draws two red squares and a blue square when we hit the button:


function canvasTest(){
   var canvas = document.getElementById('gameCanvas');
   var context = canvas.getContext('2d');

   //Draw background
   context.fillStyle = '#000000';
   context.fillRect(0,0,600,400);
 
   //Draw red object
   context.fillStyle = '#ff0000';
   context.fillRect(100,100,50,50);
   context.fillRect(300,300,50,50);

   //Draw blue object
   context.fillStyle = '#0000ff';
   context.fillRect(200,200,50,50);
}

Notice that when drawing the two red squares we only had to set the fillStyle once.


Colorful Geometry Is Colorful

Colorful Geometry Is Colorful


Graphics And Sprites And Images, Oh My!


Drawing colored boxes is nice, but not quite enough for a full game. People expect their games to actually look like things; the box has to be a robot or a soldier or an alien or an alien-robot-soldier.


So let’s add some graphics to this demo using these two bits of clipart I found on a free clipart website*. You’ll need to save them to the same folder as your code if you want to keep following along.

cyclevirus

Before we can draw these images to the canvas we need to load them into our code, which we do easily enough by adding a few lines to the top of our script that will be automatically run when the page loads. But watch out! Loading images over the Internet can take a long time and trying to draw an image before loading it will crash your game. This won’t be a problem for your test, since the graphics are small and already on your computer, but for an actual online game with lots of graphics it can be a real problem. We’ll talk about how to fix that later.


Once the images are loaded drawing them to the screen is as easy as a call to drawImage. Note that I also changed the color of the background so that the black clipart shows up better. Otherwise you’ll have two black images on a black screen and you’ll have no way to tell if it’s working or not.


var cycleImage = new Image();
cycleImage.src = "cycle.png";

var virusImage = new Image();
virusImage.src = "virus.png";

function canvasTest(){
   var canvas = document.getElementById('gameCanvas');
   var context = canvas.getContext('2d');

   //Draw background
   context.fillStyle = '#dcdcdc';
   context.fillRect(0,0,600,400);

   //Draw red object
   context.fillStyle = '#ff0000';
   context.fillRect(100,100,50,50);
   context.fillRect(300,300,50,50);

   //Draw blue object
   context.fillStyle = '#0000ff';
   context.fillRect(200,200,50,50);

   //Draw Images
   context.drawImage(cycleImage, 300, 100);
   context.drawImage(virusImage, 300, 200);
}


Motorcycles are cool! Hazard symbols are cool!

Motorcycles are cool! Hazard symbols are cool!


Animation! Sort of!


We’ve actually more or less covered everything we need to know to start prototyping our game. But just for fun let’s update our function to be “animated”: Every time you click the button the squares and clipart will move. We do this by creating a global “offset” variable right before our function. By adding an offset to the x or y coordinates of our drawings we can move them around the screen, and by constantly increasing the offset we can create the illusion that they are steadily moving in one direction.


So change your script to this and then click the “Canvas Test” button a few dozen times and see what happens.


var offset=0;

var cycleImage = new Image();
cycleImage.src = "cycle.png";

var virusImage = new Image();
virusImage.src = "virus.png";

function canvasTest(){
   var canvas = document.getElementById('gameCanvas');
   var context = canvas.getContext('2d');

   //Draw background
   context.fillStyle = '#dcdcdc';
   context.fillRect(0,0,600,400);

   //Draw red object
   context.fillStyle = '#ff0000';
   context.fillRect(100+offset,100,50,50);
   context.fillRect(300+offset,300-offset,50,50);

   //Draw blue object
   context.fillStyle = '#0000ff';
   context.fillRect(200,200-offset,50,50);

   //Draw Images
   context.drawImage(cycleImage, 300 - offset, 100);
   context.drawImage(virusImage, 300 + offset, 200);

   offset+=10;
}


A few things worth noticing here:


  • When two objects overlap whichever one comes last in the code gets drawn last and shows up on top. Example: The blue and red square
  • When an object is partially outside the canvas the part inside the canvas still gets drawn
  • You can “draw” an object completely outside of the canvas without breaking anything. It just doesn’t show up.


Time To Decide What To Do With All This Cool Code


So we can draw screens now and have even covered the basics of animation. We’re basically all set to start building our game!


Or we would be if we had any idea what we were going to build. So next week I’m going to take some time and lay out a simple game design document.


* Original images can be found here:

https://openclipart.org/detail/191534/motorcycle-silhouette-vector-by-raimondi1337-191534

https://openclipart.org/detail/28408/malware-hazard-symbol-by-pbcrichton


Let’s Program A JavaScript Game 1: Browser Games With JavaScript

Would You Like To Play A Game?


Our last Let’s Program was focused on some pretty serious AI techniques for solving pretty serious math problems. So this time around let’s take it easy and program a nice relaxing game.


Eh, who am I kidding. A well designed game is just as mathematically intense as your average AI. But the end product sure is a lot more fun!


Why A Browser Game?


If you’re anything like me, when you hear the word “videogame” you immediately think of a console or powerful computer running a big game like Skyrim or Final Fantasy. Tiny little browser games may not have even crossed your mind.


But don’t be too fast to look down on web browser games! Modern computer browsers have more power than most of the gaming systems I grew up with and some of the more elaborate browser games rival traditional games in terms of graphics, gameplay and content.


Browser games also benefit from a massive audience. Millions and millions of people may own gaming consoles and gaming PCs but the number of people who own web browsers is in the billions! So if you want to create a game that anyone, anywhere, can play browser games are the way to go. This is a big part of the reason that they are the king of casual games.


Not to say that they don’t have their downsides. Browsers games lack the power and size for many types of games. Skyrim could never have been built as a browser game, and even if it was no-one would want to wait the eight hours it took for that particular page.


But even if your end goal is to build the next Skyrim instead of the next Cookie Clicker you still might want to spend at least a little time playing with browser game programming. It’s a good learning experience and you might be surprised at just how much game you can fit into a small browser download.


The Rise of JavaScript And The War Against Flash


So we’ve decided to program a small game that can be inserted directly into a web page. Now how do we do that?


For years Flash was the most reliable way to include a game in a website. Flash is basically a program designed to run other programs and it let people enhance their websites with streaming video, animated menus and even entire games. It was hardly perfect and had definite issues with memory hogging and slowdown but it was very successful at letting people play online games without the normal mess of downloading and installing a separate program. They just visited a web page and Flash automatically loaded the game and started it up in the browser.


Today Flash is still one of, if not the most, popular way to build browser based games. Just visit a free gaming site like kongregate to see what I mean. Flash as far as the eye can see.


But in the last few years a new option for building browser games has arisen in the form of JavaScript.


JavaScript isn’t a new technology. It has been an important part of web browsers for a long long time. It offers a flexible scripting language that can interact directly with web pages, allowing programmers to build powerful interactive menus, perform efficient error checking and streamline page loading. Without JavaScript the Internet would be a much clunkier and user-unfriendly place.


But for all its power JavaScript was never really a good choice for game programming.


At least, not until a few years ago when a new HTML element called the “Canvas” was announced. The canvas is basically a big blank space that can be inserted into a web page and then controlled through JavaScript. A few lines of code is all it takes to fill a canvas with color or copy part of an image onto part of the canvas. And of course, if you repeatedly repaint the canvas you can create simple animations.


This was the last puzzle piece needed to build full JavaScript browser games. We can now use JavaScript to check for keyboard input, use JavaScript to simulate a game world and finally use JavaScript to draw that world to a canvas. And we can do all this using nothing but the browsers that people already own.


As a programmer, all you need in order to create one of these games is a simple text editor for writing your code and a browser for testing it in. No fancy tools required! In fact, that’s the main reason I chose JavaScript for this Let’s Program. Flash is a powerful tool but to really get the most out of it you need to buy some moderately expensive Adobe products.


So next week we’ll get this Let’s Program started by covering the basics of drawing on the HTML canvas.